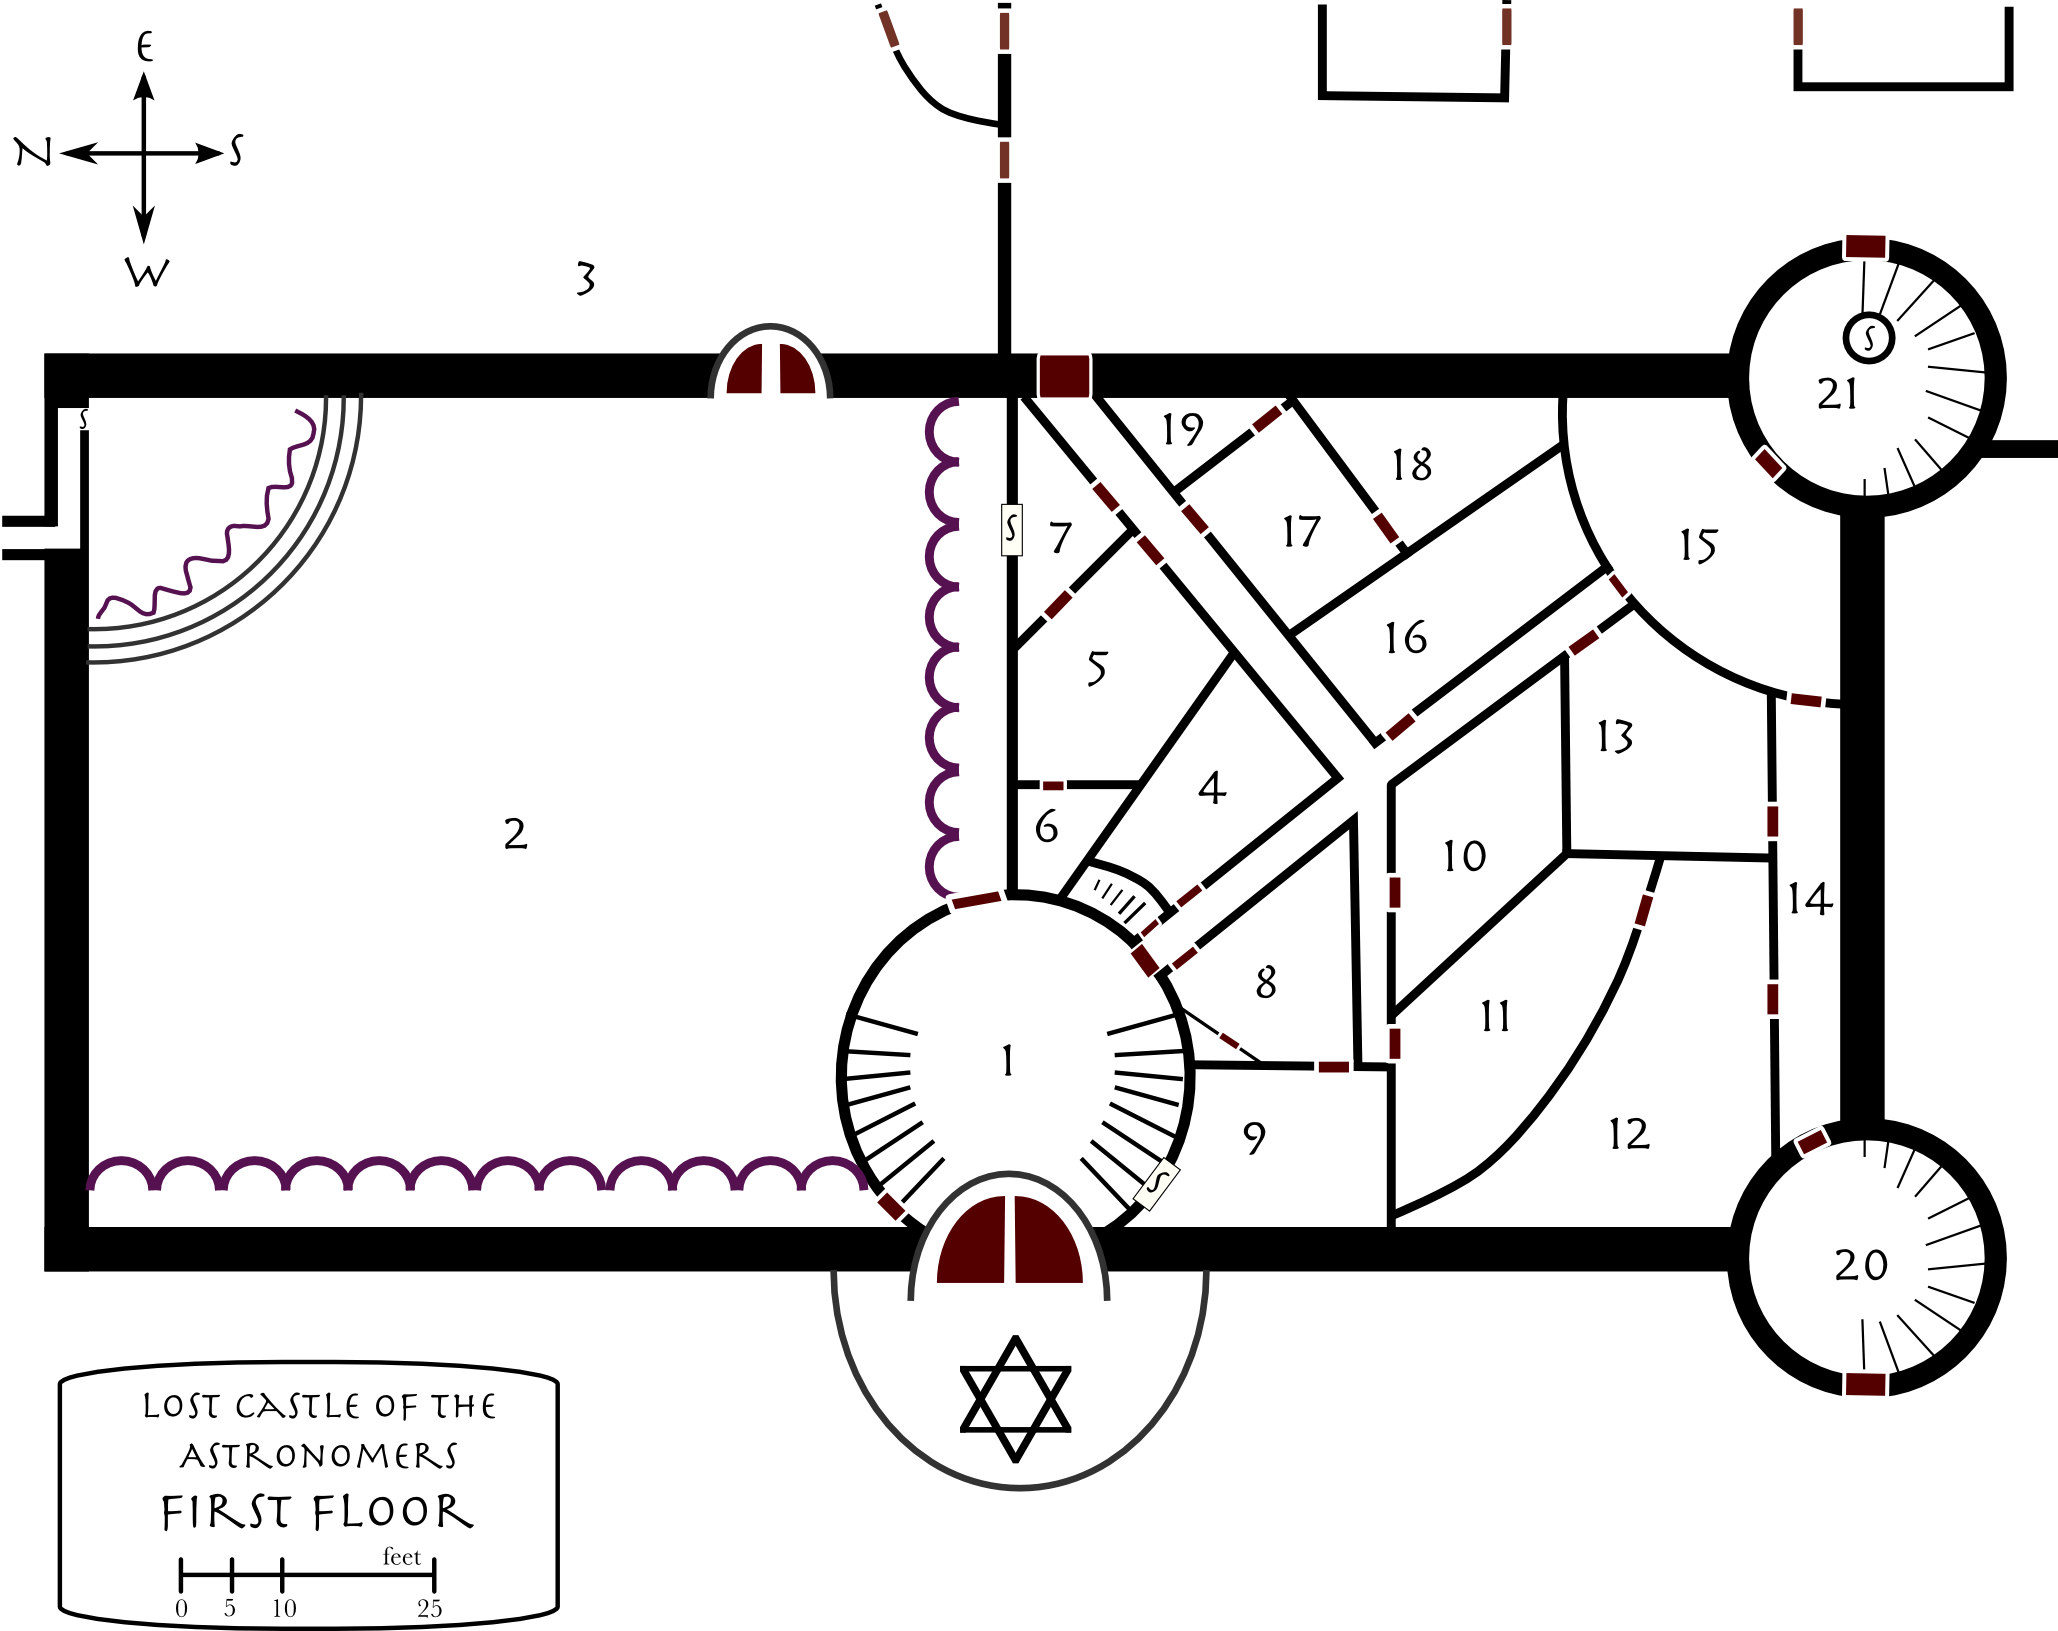
Downstairs (The First Floor): Encounters
The chance for an encounter within the downstairs area of the castle is 10% every six hours, although if the skeletons have been activated it is unlikely that other creatures will come out of hiding. There are cobwebs and dust everywhere. Most of the doors are easy to open; some are marked as hard to open, due to shifting (the door to the dungeon stairs, for example).
| 01-38 | Large Spiders (1d3) | 38% |
| 39-65 | Huge Spider (1) | 27% |
| 66-78 | Giant Rats (1d20) | 13% |
| 79-88 | Mice (1d20) | 10% |
| 89-95 | Strange Noises | 7% |
| 96-98 | Borogoves (4) | 3% |
| 99 | Pink Horror (room 8) | 1% |
| 00 | Deep Forest encounter | 1% |
See room three of the second floor for information about the borogoves.
Unless otherwise mentioned in the room description, doors down the hallway are open. The goblins did not close the place up neatly behind them when they left.
Grand Entrance (1)
The doors creak open and you find yourself gazing into a wide, long, circular hall. Great stairs lead up on both sides. Cobwebs and dust fill the space beneath them. Above you, the domed ceiling is covered in gold and silver constellations. The walls are covered in repeating knotwork.
There are no skeletons within the entrance. At night, if there is a bright moon (half full or greater), the domed ceiling will shine with stars: the 333 brightest stars are set as holes in the ceiling, so tiny that they are only visible when they shine. They match the stars on May 15, the anniversary of the christening of the castle.
The doors on the east (to room 2) are slightly stuck. A strength roll at a bonus of 2 is required to open them. Those doors, and the similar doors on the north, are small double doors intricately carved with interlocking circles, bands, and curves, with some bands ending in serpent’s heads, and some circles enclosing many-pointed stars. Tarnished green silver inlay decorates the engravings.
There is a secret door in the shadow of the stairs to the south, leading to the conference room (9). The edges of the door are at the knotwork, and both the wall and the door are wood and paneled.
The Royal Ballroom (2)
A richly embroidered cloth, once dark blue and covered in golden stars, lies crumpled beneath the marble archways leading down a long hallway. The huge ballroom beyond the arches is filled with marble columns and dead bodies. The sun shines through tinted glass in the ceiling filling the room with shafts of dusty, varicolored light. Cobwebs arch between the columns and the floor.
There is a 5% chance of encountering the borogoves from level 2, room 3, here.
On the south and west sides of the ballroom are long corridors, with a stone wall on one side and a wall of marble arches on the other, leading into the ballroom’s main area. The white marble is covered with dust and cobwebs. Silverfish will scatter from the cloth if anyone pokes at it; the cloth was once curtains.
There were also bead curtains in every other arch, and tiny beads lie scattered about the floor. The string has long since rotted away. The tiny beads are worth about a shilling for twenty, they have a bulk of 1 per 100 beads, and there are about 1,200 of them. Gathering them up takes about five minutes per twenty, or half an hour for a hundred.
The stone walls are covered in painted engravings of biblical scenes, from both the Old Testament and the New. The wedding at Cana is there, as is the crucifixion and Jesus’ ascension into the heavens. A good part of the wall is given over to the Israelites’ flight out of Egypt.
The columns are made of white marble with dark veins. Around the columns are twenty-seven human skeletons, and three goblin skeletons (although they’ll have to look hard to find them).
At the far corner of the room is a dais of black stone, and on the stone are three elaborate white marble chairs. One skeleton lies half draped over the largest, middle throne, dead where it fell. Parts of it are on the floor along with its rusted sword.
The two great arched oaken doors on the east wall are partially opened, and dirt, grass, and weeds grow in from the outside.
The secret door in the northeast corner is made to look like a historical panel. Three panels behind the thrones describe, in pictures, the founding of the order, the trip across the mountains, and the building of the castle. The rightmost panel, the building of the castle, is the secret door. It leads through a thin corridor, through the stone wall that connects with the outer wall, to a secret door on the outside. The secret door on the outside can only be opened from in the hallway. This is an exit only; it would be very difficult to enter the castle through this secret door.
The three panels are designed with hidden images of astrological signs. For example, a wine goblet is clearly (once seen) the sign for Pisces. The panels, if removed without damaging them, will be worth 50 to 200 shillings in Crosspoint, depending on the buyer.
The secret door in the south wall leads to the Lieutenant’s quarters (7). The sides of the door are designed to coincide with the engravings. However, the door is wood and the wall is stone, so attempts to find it are at a bonus of 2.
The Wild Garden (3)
In this wildly overgrown garden, bright purple flowers flow from vines hanging from trees. The trees, weighed down by the vines, droop purple and yellow trumpets toward the ground. Wrought-iron posts, ten feet tall, themselves covered in vines and weeds and shaped like tall writhing serpents, hold sparkling crystal birds shaped as if they were swooping into the garden.
The posts will not hold a person easily, because they weren’t designed for holding much weight. Leaning on them is okay; climbing will require steadying. There are twelve posts with five crystal birds. The birds are hollow, and cover the candle holder at the top of the posts. The candles are mostly burned down. The birds are worth an easy 60 pounds in Crosspoint, but will break easily. Their bulk is 10 each. There are two robins, a hummingbird, a falcon, and an owl.
See the outside area for a description of the tool shed in the back, and the outside gate.
There are two poisonous coppersnakes here. They’ll be sleeping during the day during late spring, summer, and early fall or during the night in late fall, winter, and early spring. Otherwise, they’ll be here 20% of the time. They are 50% likely to attack any creatures within the garden, and 75% if disturbed while sleeping. The snakes are three and a half to four feet long, thick, with lightly pink-tinged scales, and bold chestnut crossbands allowing them to blend easily into fallen leaves.
2 copperheads (Animal: ¼; Survival: 1,2; Move: 12; Attacks: 1; Defense: +2; Damage: 1; Poison: one round action time, d2 injuries)
The Dungeon Stairs
Musty air greets you as you force the wooden doors open. The stairs lead downward and curve slightly to the left. Large, grey stones inset into a white mortar provide a dappled look to the stairs. The stair design is pleasing to the eyes as well as functional.
The oaken door at the top of the stairs is stuck, though not heavily so. A strength roll at +2 will open it. The door at the bottom of the stairs is barred, from both sides. The bar on this side is easy enough to remove, but the bar on the other side is more difficult. It will require a thief’s locks & traps roll at a bonus of 3, or a strength roll at a penalty of 3.
The air here is musty, slightly cooler as they descend. The workmanship here is different from the rest of the castle.
Offices (4)
Small maple desks line the walls, each with a single drawer and an inkpot in the far left corner. A few of the desks have little gewgaws of wooden rods and balls. Many ledgers are open on the tables, and some lie scattered about the floor.
The wooden gewgaws are abaci. An engineer or mathematician will recognize them. Three of them are still serviceable and if they can be returned intact will be worth three shillings in Crosspoint. The ledgers are filled with astrological symbols and numbers. These are for calculating when various stars rise and set, and their locations. Some of that information might also be worth something to the right person, if the numbers can be deciphered from the tattered paper.
The Main Office (5)
A single desk with inkpot and quill faces you as you walk into this room. A chair lies on its back behind the desk. A small, round table in the rear of the room has two benches on either side of it. A ledger lies on the desk. A door hangs open around the corner.
One of the ledgers is a list of stars and orders for their calculations. Another lists texts which need to be copied. This office was the “command center” for the other offices and copy rooms, and is connected to the Lieutenant’s Quarters (7).
The Record Room (6)
Wooden boxes, filled with paper, line the floors. Bookshelves line the walls, strewn with folios and string-bound stacks of paper. The room is cramped and musty. The movement of the door sends dust flying into the air.
You can use these records as clues to other adventures you’d like the characters to discover. While important contracts and spells will be stored in the dungeon level, records of things bought, sold, and bartered will be here.
Because this is above ground, these records are in much worse shape than the ones in the dungeon. This will allow you to maximize the mystery and flexibility of your adventure clues.
Lieutenant Aaron Courlander’s Quarters (7)
An unmade bed, torn as if it were a nest of animals, sits wedged in the east corner. A small bureau is wedged in the opposite corner, next to an open door to another room. A candle holder stands on the bureau, and a torch sconce is on the north wall.
The bed was once a nest for mice, but even they’ve left now. The candle has burnt down and is covered in dust. It was burning when the lieutenant left to fight the goblins. There is a hidden door on the north wall leading to the Royal Ballroom (2). The door is not difficult to see on this side, and Perception rolls searching are at a bonus of 4. The torch sconce turns down to open a small hole that allows viewing into the ballroom area. Pulling out on it opens the door. The hinges of the door, on this side, are hidden as part of a set of hooks for hanging weapons.
The bureau contains ratty old uniforms (some of which bear a Pisces symbol), clothing (dating from about a hundred and fifty years ago), notebooks, and two small sacks of money; the sacks were once designed for hanging from a belt. One sack contains ten silver zodiac coins and one gold zodiac coin. The other sack contains 19 Crosspoint shillings from a hundred years ago.
The notebooks contain notes about his campaigns, as well as maps, and can provide clues to the goblins in the area, as well as any nearby adventure. Lieutenant Courlander also accompanied a delegation to the Dwarves once, and notes about that are in the books. The last entry mentions an argument with “Captain Cambel” about what to do if the “rumors of orcs is true”. Cambel wants to “take the field and wipe them up as we always do. Parthane agrees.” Courlander thinks “we ought to hole up. This time different. Should send courier north. Still technically at peace with Illustrators.”
Captain William Joel Cambel’s Quarters (8)
An unmade bed looks like it was a nest at one time. The room smells of old socks mixed with the tang of a departed thunderstorm. A portrait of an elderly officer hangs on the west wall. A small door on the right wall is closed, as is an ornate wooden door on the far wall. Small animal skeletons lie in the corners of the room.
The pink horror has learned to use its sucker pods to close the door, and generally does so. The door is closed 50% of the time.
Pink Horror (Fantastic: 1+1, Survival 4, Move: 15/8, Defense: 4, Attack: claw/claw, Damage: d8/d8, Special Defense: Immune to acid and fire; Special Attack: Bite called shot three times a day for d4 and paralysis with an action time of 2 rounds; Lair: 50%)
The pink horror has been weakened by its absence from the mist. It moves slower, is easier to hit, and its poison is penalized by 2. (And if the pink horror has been encountered wandering through the castle, and killed, it won’t be here.) If the pink horror is not here, there is a 1 in 10 chance of it arriving every thirty minutes.
The Captain’s walk-in closet holds his uniforms (some of which bear the Capricorn symbol), clothing, and some weapons, including his ceremonial saber. While rusted, it’s basically never been used and is still in decent shape. It should fetch thirty shillings. The key for dungeon room Pisces is in the pocket of one of the shirts that has fallen to the floor. The key is brass and shaped like the Pisces symbol.
Conference Room (9)
A long, square wooden table fills the room. A brightly colored map is painted on the north wall. Five large ceramic drinking cups stand on the table, and in the corner of the room a barrel stands on a small brick outcropping.
This was once the main conference room for planning military escapades, until the Dwarves built the dungeon area and the Taurus room. The barrel was regularly filled with beer, and the cups were used to drink the beer. The map is covered with dust, but maps out a wide area of Highland, from Crosspoint Bay in the east to Black Stag in the west, and deep down in the forest to the south, up to hundreds of miles north of the Leather Road. Orders, including the Illustrators and the Astronomers, are marked along the mountains with crosses. The orders are not titled, however. Anyone who knows where Illustrious Castle is should recognize its location, otherwise they’ll probably think it marks Biblyon.
Behind the map is a secret door to the Grand Entrance (1). It opens beneath the stairs that lead up to the second level. The door pops slightly open by pressing in on the cross marking Kristagna’s location.
The Copy Rooms (10)
Inkpots, quills, and papers lie strewn about the shelves that line the walls. Stools sit before the shelves.
Among the books and papers being copied are an apocryphal bible (no known bibles have survived the cataclysm, all bibles are apocryphal, and usually based on a founder’s teachings) and some papers on astronomy, astrology, and mathematics.
Weapons Room (11)
Warped spears, pikes, and masses of arrows line the walls in barrels.
Few of the weapons are salvageable. The wood is too far gone. Also, because the castle guard had need of the weapons, many have been taken away and are with the skeleton of their last user. Some were also taken as souvenirs by the goblins. If the characters spend time searching for useable weapons, they can find up to five spears, three pikes, and thirty-five arrows.
Guard Quarters (12)
Bedrolls, blankets, and cushions sit on a low shelf against the walls. Boxes, bags, books, and other items lie on the floor, mostly stuffed beneath the shelf. Three small tables, with a few books and candle holders, are spaced about the center of the room.
There are three zodiac coins on one table, and a board that looks like a chessboard with some coins on it. The members of the Order played a variation of checkers that used the twelve zodiac coins. When a coin was “taken”, it was kept by the taker. A game was in progress when the goblins attacked. There are seven pieces on the board now, three at heads and four at tails.
The books are prayer-books, astronomical study guides, and collections of military aphorisms. None are in readable shape.
Novitiates Quarters (13)
Wooden shelves line the walls, with blankets or rugs piled on most of them. One is lined with books and papers. A table is on its side in the center of the room. You see a skeletal hand reaching out from around the table, holding a piece of metal.
Goblins ransacked this room. There are four human skeletons; they wore simple leather armor and used short swords. One used a crossbow, but the goblins scavenged it. The metal that the skeleton is holding is the key to his crossbow crank.
The books and papers are heavily degraded. They are mostly ‘homework’ and special projects that the students were working on. One appears to be calculations on a ‘periodic’ comet—as if the comet could repeat itself over hundreds of years on a regular basis. Another is calculating the stress on the arched ceiling over the ballroom. There appear to be some problems with his math; he’s trying to get it to allow the ceiling to stand up.
The Guard’s Hallway (14)
This long thin corridor leads from one tower to the other. One skeleton’s bones are in a pile against the wall down the hall a ways. Light shines through the narrow slits along the south wall.
The bones were piled up as part of a nest by a long-gone rat.
The door to the Last Stand (room 15) is spiked shut from room 15.
Last Stand (15)
The door is open, and was clearly forced long ago. Skeletons lie in piles to the left and right, intermingled with their swords and armor. A door opens into the southeast tower.
There are three goblin skeletons here.
The door to the corridor (14) is spiked shut on this side. The door to the main hallway is open, clearly forced open and broken, although it might be possible to temporarily jam it shut with spikes if necessary.
The Magical Library (16)
The moment you open the door you are assailed by the musty smell of old and damp paper. Within this wide room books and papers line the walls and old, rotten, red-and-gold-upholstered chairs sit haphazardly throughout the room.
Despite their poor condition, the combined books of all three of these rooms are a level 5 mojo resource for mental spells, and level 4 for general spells. A character could also spend two hours culling through them to build a bulk sixty library that would be a level 2 resource for any one school of magic. One book, carefully chosen, could be a level 5 resource for any single spell.
Titles include copies of Charles Dodgson’s “Wise Words About Magical Research,” “Involuntary Reactions to Imaginary Stimuli,” and “Phantasmal Realities,” Measure’s “Magical Auras and Their Identification,” Lawrence Bisson’s “The Residual Auras of Human Writing,”, Isaiah’s “The Interpretation and Control of Somnambulist States of Being,” and the multiply-authored “Survey of Classical Sorcery in Western Highland” and “The Ring Magic of the Traveling Romans of Great Bend”.
Library of the Sciences (17)
The mossy and musty smell of old paper assaults your senses. Within this square room books and papers line the walls.
Books here include geographies of West Highland, East Highland, and Great Bend; an anonymous “Survey of Possible Geographies of the Holy Roman Empire”; “Spices of the Phoenix, a catalog”; “Gems and Mineral Lodes in the High Divide”; “The Known Heavenly World”; “Planets and Stars, a Comparative Study”; and other works of geography, geology, botany, and astronomy.
The Back Library (18)
More books line the walls of this triangle-shaped back room. Two goblin skeletons, one missing its head, lie on the floor against the small table in the center of the room. The missing head stares back at you with empty sockets from atop the small table.
The goblin’s missing head is on one of the books, where it came to rest after leaving the goblin. Blood is spattered on the books on the table, and they’ve been eaten away pretty well. Close examination of the two books on the table will make it easy to determine that they are studies of another language. A successful Perception roll will indicate that the language was Elvish. The books are far too gone to be of any use, however.
Library Workroom (19)
Wide-mouthed jars stand on shelves above a worktable. Books lie open, bound and unbound. Standing off to the side, a metal wheel stands on a stone pylon. An iron bar sticks out of the side of the pylon.
 This tiny room contains library paste, extra bindings in the process of being made, and blank paper and writing materials for the Order. Books need to be rebound every few hundred years.
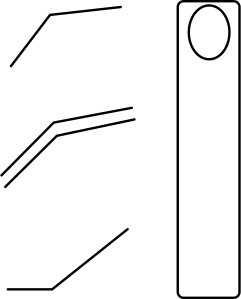
The room also contains the reset mechanism for the trap in the Gemini room, room 5 of the dungeon level. The wheel resets the trap, and the level controls its functions. The lever has three settings. Pulling it all the way up (the position it is currently in) arms the trap in the Gemini room as normal: the trap will not go off if the key is used to open the door (or if the person picking the lock is lucky enough to disable the trap as well). Pulling it straight out to the middle position arms the trap so that the trap will go off regardless of whether the key is in the lock or was used to open the door. Pulling it all the way down disarms the trap. At each position is a symbol, Dwarven for “on”, “danger”, and “off”. (See handout.)
Southwest Tower (20)
Stone stairs lead in a circle up the side of the tower toward a trap door in the ceiling. The air is very slightly damp. A pale fungi grows along the ceiling and walls. The door leading outside is partway open.
 The trap door to the upper room is charred slightly around the edges, and blocked with pieces of furniture and spikes. There is a symbol drawn on the door in rouge. To someone who knows spellcraft, the symbol is probably a magical fire symbol of some kind. The symbol is drawn large at five feet out—a bit far for a goblin. It was part of the spell that burned the defenders on the second level of this tower (level 2, Southwest Tower, 11).
Southeast Tower (21)
The skeletons lie so thick in this tower you need to step carefully if you wish to avoid stepping on them. A trickle of light shines through a cracked and busted trap door above the circular stairs, and more light shines in from the partially open door to the outside.
As in the other towers, the doors between levels are horizontal trap doors, though the trap door to the next higher level is busted open. There are no goblin skeletons here. The warriors were a volunteer guard, guarding the escape route that their friends used to escape the battle. The goblins never found the trap door in the floor; perhaps they never cared. The trap door route leads under the castle walls and up the hills.
One skeleton is lying as if reaching toward something on the floor. Its shattered forehead still holds the arrow that killed it, like a wilting flower in a deranged flower pot.
The secret trap door opens by pressing down on one of the stones. Finding the stone is at a bonus of 2. The door will shift down slightly and may then be pushed further. It will spring back and lock if let go quickly.
It is a thin tunnel, barely four and a half feet wide. Twenty feet into the tunnel is a trap, set off by a plate in the ground. The plate is marked by lines on the wall so that those who know it is there can jump across. Anyone weighing more than 30 pounds stepping on the plate will set it off. The roof will collapse upon them, causing 3d6 points damage; an Evasion roll will reduce this to half damage. The plate for the trap is five feet wide; the tunnel collapses for a thirteen foot length, four feet on either side. Anyone at the edges of the collapse can make an Evasion roll to avoid the collapse completely.
Someone looking for previous tracks might recognize that five people last used this escape route decades ago.
Related Pages
- Outside
- Downstairs (The First Floor)
- Encounters
- Grand Entrance (1)
- The Royal Ballroom (2)
- The Wild Garden (3)
- The Dungeon Stairs
- Offices (4)
- The Main Office (5)
- The Record Room (6)
- Lieutenant Aaron Courlander’s Quarters (7)
- Captain William Joel Cambel’s Quarters (8)
- Conference Room (9)
- The Copy Rooms (10)
- Weapons Room (11)
- Guard Quarters (12)
- Novitiates Quarters (13)
- The Guard’s Hallway (14)
- Last Stand (15)
- The Magical Library (16)
- Library of the Sciences (17)
- The Back Library (18)
- Library Workroom (19)
- Southwest Tower (20)
- Southeast Tower (21)
- Upstairs (The Second Floor)
- Zodiac Dungeon
- Stelopolis