A sickly, murky, moss-covered moat surrounds the castle. The moat is filled with the detritus of battle. Skeletons of man and goblin share a watery open grave. The trees across the moat stand stark and empty in the sunlight, their orange, red, and yellow leaves scattered across the yellowish grass on the lightly rolling hill that leads up to the castle.
The moat is generally about forty feet wide, and is as much as sixty feet wide in some places. The drawbridge is down, but it is also broken. Only a few feet extend over the water from the castle. The grass on the castle side of the moat is yellow, the trees smaller and slightly more gnarled and twisted than their taller cousins in the forest. None of them hold their leaves, which are scattered loosely about the ground in red, orange, and yellow, leaving the trees stark and sharp.
On the north side of the moat, a war engine lies on its side mostly crossing the moat. The goblin mage’s army attempted to get it across and up to the castle, but failed. Here, also, skeletons of man and goblin lie about the brackish water. Any character trying to cross the moat by clambering across the war engine will need to make an Evasion roll or slip and fall.
Outside: Encounters
The chance for an encounter here is 10% per day and per night, although if the skeletons have been activated none of the normal animals will stick around.
| 01-30 | Large Spiders (1d3) | 30% |
| 31-57 | Giant Rats (1d20) | 27% |
| 58-72 | Huge Spider (1) | 15% |
| 73-84 | Copperheads (1d6) | 12% |
| 85-94 | Timber Snakes (1d4) | 10% |
| 95-97 | Borogoves (4, level 2 room 3) | 3% |
| 98-99 | Pink Horror (level 1 room 8) | 2% |
| 00 | Deep Forest encounter | 1% |
Copperheads and timber snakes are standard poisonous snakes. The borogoves travel together, and if killed will not appear again—there are only four in the entire area. See level 2, room 3 (the East Overlook) for more information about them.
On the Outer Walls
The battlement is dotted with skeletons, mostly human and a few goblin. The human skeletons are in rusted chain and crackled leather, some bony hands still clutching their decayed swords and spears.
Looking out through the embrasures you feel some of the pride that the defenders must have felt, overlooking the moat filled mostly with goblin skeletons and looking out over the vast forest outside of the walls. This was a heroic battle, and you held your own against wave after wave of evil creatures from the forest.
Inside the walls, you see the path leading up to the huge arched doors of the stone castle, the great dome over the north half of the castle, and the great three-handed clock above the arched doors. The largest of the hands has moved since you last looked.
The outer walls are four yards tall and four feet wide, with crenellated sides and a walkway on the top. Doors, still open, lead into the second story of each of the towers from the battlements. Skeletons of both man and goblin lie in jumbles outside the walls where they fell in battle. There are also skeletons in the battlements, although fewer, and mostly human (any goblins killed were thrown over the side, until the very end).
Searching the dead humans of the outer walls will yield another d20 zodiac coins, up to a maximum of 23.
The Outer Towers
Searching the dead humans and bedrolls of the outer towers will yield d6 zodiac coins per tower floor, up to a maximum of 7 (NW), 9 (SW), 7 (SE), and 10 (NE). Only the third floor has windows, although the second has arrow slits. Each floor has only a few skeletons (the third floor none). Most of the soldiers left the towers to engage the goblins in battle.
Open doors facing the inner courtyard enter onto the first floor; each floor has only one circular room. The stairs circle upward at the walls. There are no doors between floors, just the stairs.
The windowless room is dark except for a small amount of light that trickles in from above the stairs. A few skeletons, human and goblin, lie scattered about the floor, their swords and spears strewn about them.
The stairs circle up to the second floor, where:
Light spills down from the stairs above, casting deep shadows around the room. There are four arrows on the floor as you walk in, and a skeleton, a cracked bow by its side, on the far end near an arrow slit, which also lets in a little dusty light. A few swords and spears are hanging on the walls, and some shields lie scattered beneath them.
The shields were once hanging along with the swords and spears, but their straps cracked over time and they fell. There are spears that have fallen among them. At most one to two of the weapons are in any serviceable condition, and they’ll require restoration before they can be used.
Each second floor has at least one dead archer where he was killed at his post by a goblin. Not all of them fired at their attackers; some dropped their bow and went for their sword.
The stairs circle up to the third floor:
Sunlight streams down dusty shafts to illuminate tattered bedrolls, dirty chamber pots, and old plates and other tools. Some of the bedrolls are torn, as if they’ve been used as a nest. A small stringed instrument lies on the floor, faded and covered in dust.
The third floor of each of the outer towers contain bedrolls and chamber pots, none of them special. The musical instrument’s strings have snapped, the instrument itself is cracked. Only use the instrument description once, for the first tower they enter. Feel free to replace it or add to it in other towers with other ways soldiers might pass their time: dice, whistles, playing cards.
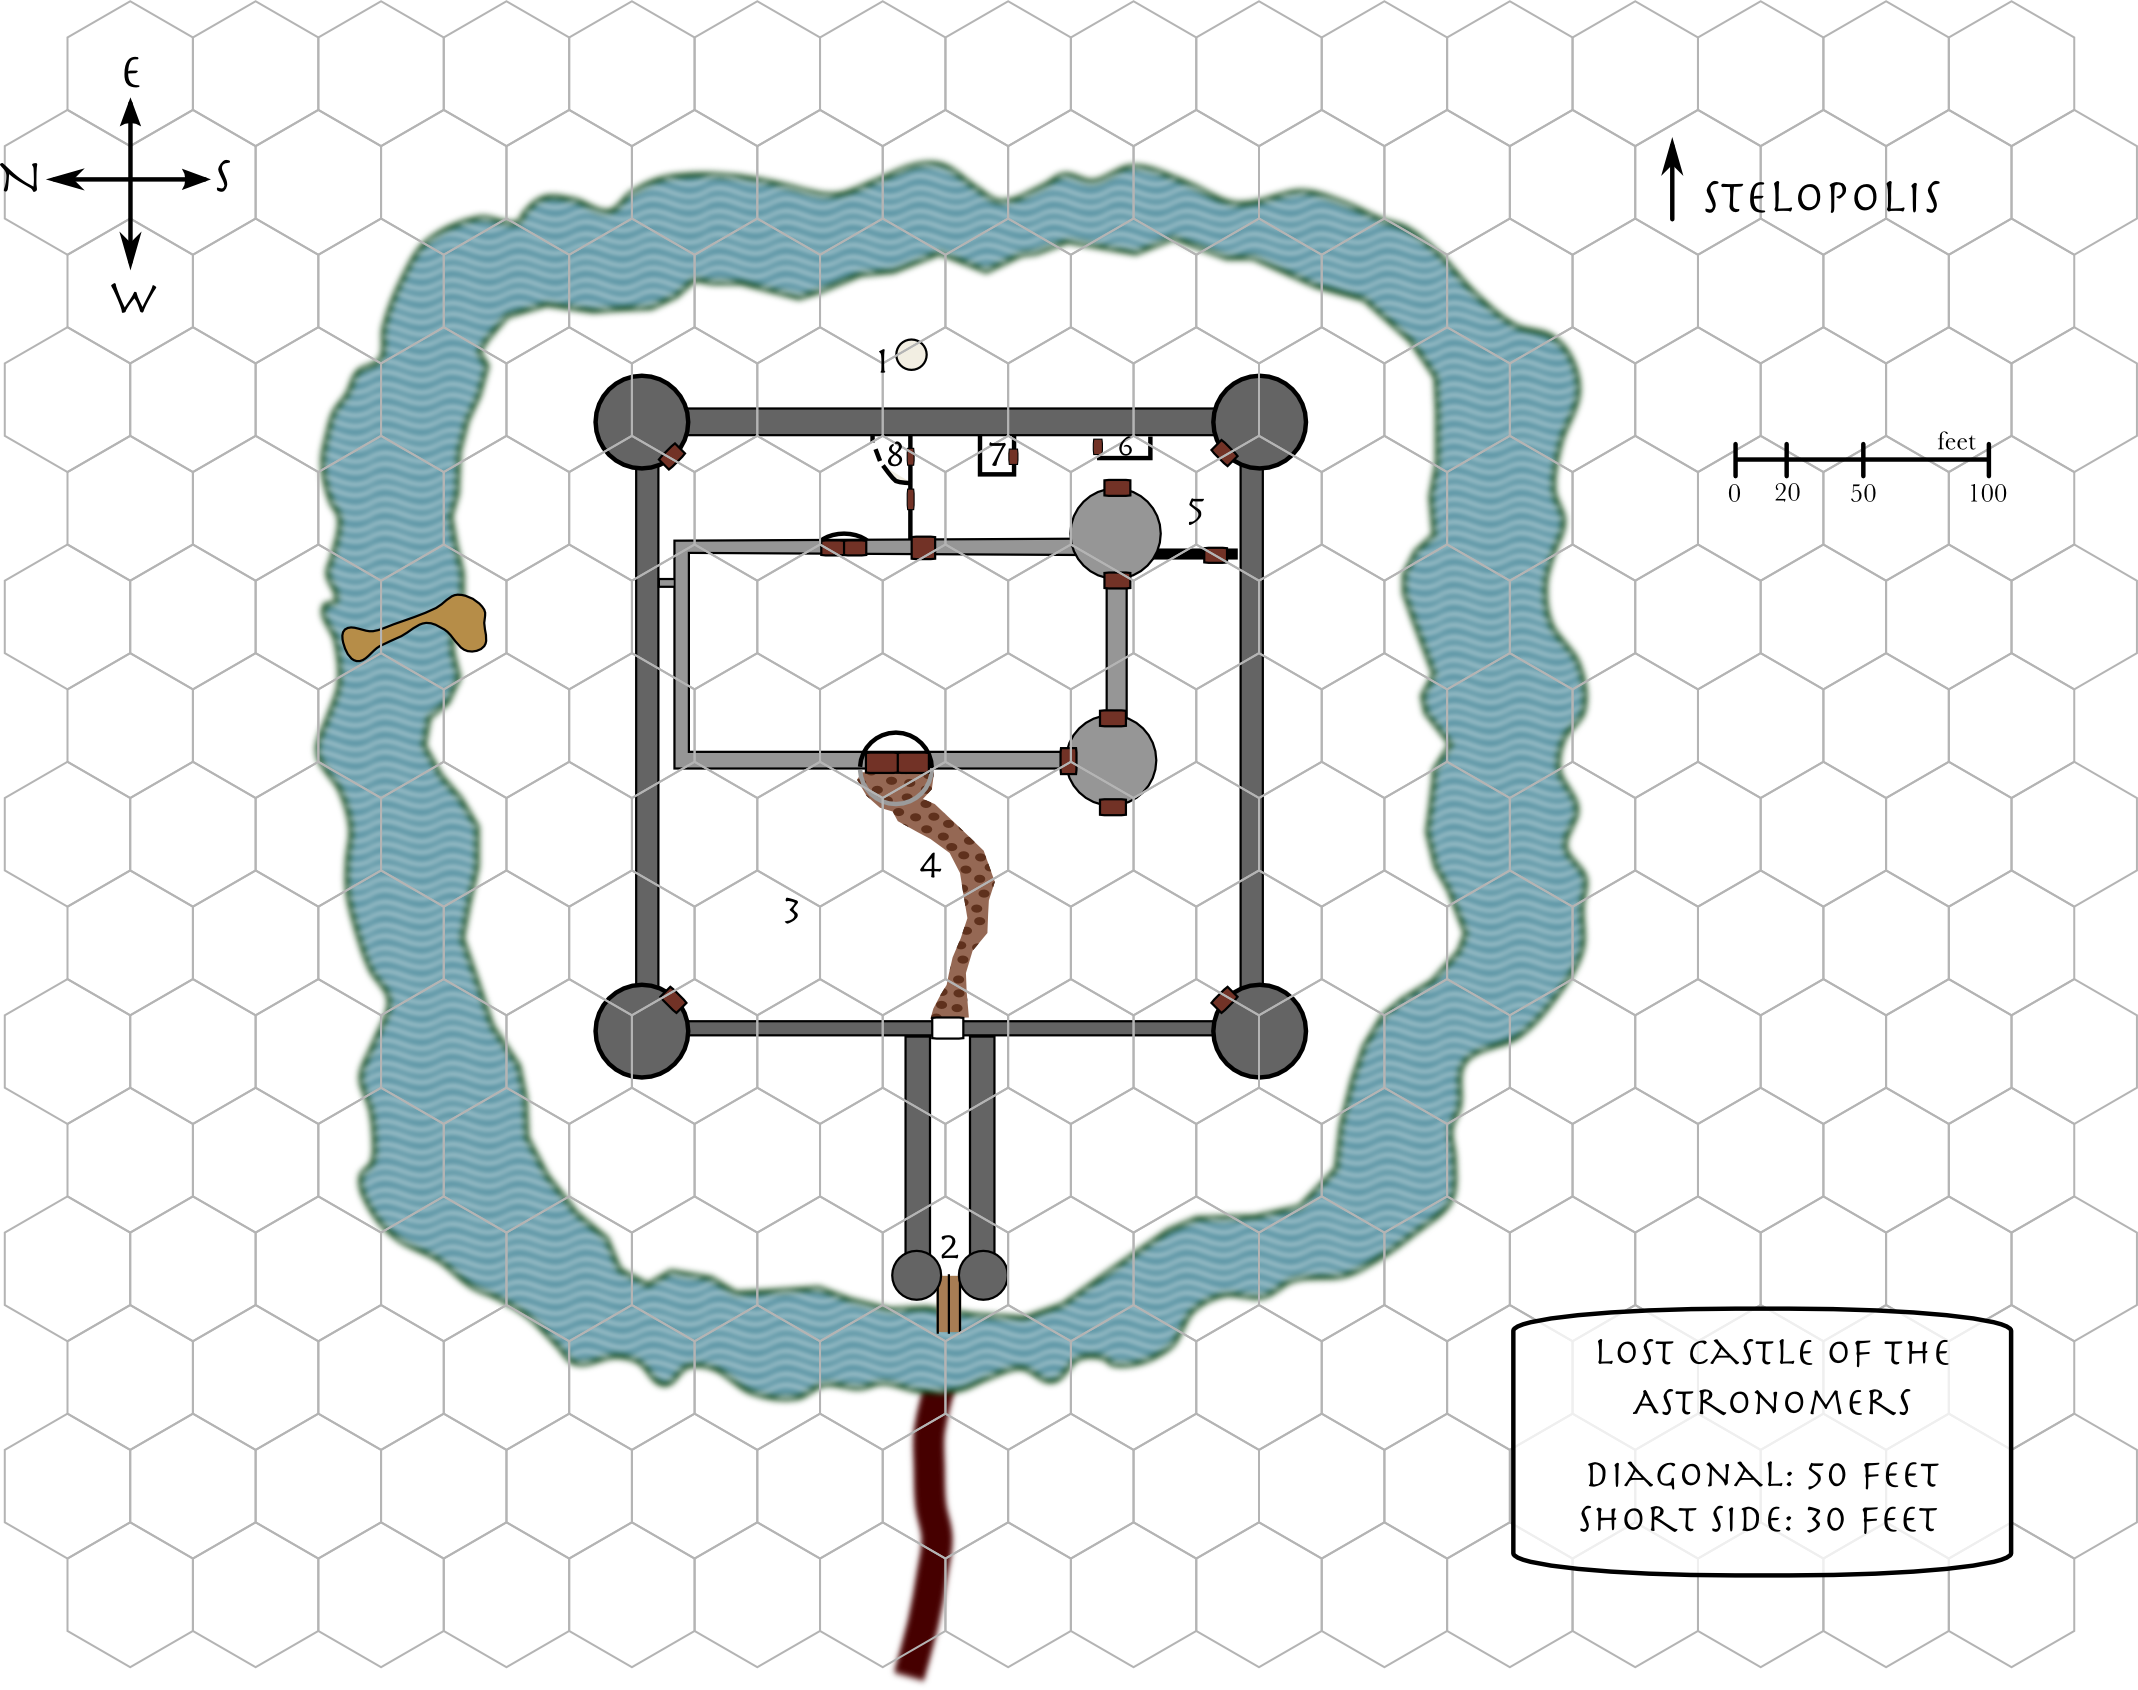
The Statue of Moses (1)
A great bearded man in a flowing robe holds his staff out horizontally over the sloping hill at the rear of the castle’s outer walls. The statue’s detail is intricate; you can almost see the shadows of wrinkles on the old man’s face move as the sun drifts across the sky. His gnarled staff looks like the wood it is modeled after. The statue has a presence of power and wisdom.
This statue is also the exit from the dungeon’s Capricorn (crypt) room. It is generally un-openable from this end. The secret exit was kept secret from the rank and file, so they did not use it to escape the dungeon. See the Capricorn room for more information about this exit. The statue is dwarf-make, and very high quality. It has a bulk of five hundred.
The Entrance Gate (2)
The long, thickly walled hall from the drawbridge to the inner courtyard is filled with broken beams from the ceiling. The ceiling has nearly completely caved in, as have the two small stone towers flanking the drawbridge. More goblin skeletons and human skeletons carpet the floor of the entranceway. The two wooden doors at the far end of the hall are busted through, showing a glimpse of the paved walkway of the inner courtyard.
There are also signs of fire on the upper parts of the ceiling remnants.
The Inner Courtyard (3)
Dead warriors and goblins lie scattered about the grounds and atop the beautiful, white marble pathway which curves to the terrace and huge arched doorway of the castle proper. In the still silence you hear a faint ticking coming from the clock above the archway. A stylized image of the sun is on the right door, and of a waning moon on the left. The images are faded and faint.
From here, the only obvious entrance (besides the various windows) are the main arched doors and the smaller door in the southwest tower.
Marble Terrace and Path (4)
The path and terrace are made of marble tiles, white with red veins. Grass pokes up between the marble tiles of the path and terrace. In some places the tiles have cracked and sunk down. In others, they’ve been forced up as small trees try to grow through. In the center of the terrace, inlaid with white marble, is a circle enclosing a six-pointed star. Two huge doors on the front wall beneath the dome are closed, a faded moon painted on the left door, and a faded sun painted in gold on the right.
The marble terrace is up three steps from the marble path, about two feet. The vertical tiles that were on the sides of the raised terrace have mostly fallen over. Intact tiles have a bulk of two each and would be worth about five shillings each in Crosspoint. There are one hundred and thirteen intact tiles.
The Back Yard (5)
A decorative rock wall once ran from the southeast tower to the south wall, near the rear of the castle. Now the collapsed wall stands only as a reminder that nothing of man survives forever. Double doors, six feet wide and bound in iron, still stand in their doorways, open, allowing entrance to the rear yard.
The back yard contains two smaller buildings, and a rear entrance to the castle. The inner and outer towers have entrances at ground level. Arrow slits open to the courtyard (and to the outside of the outer walls, of course). The buildings back here all have sloping roofs that slope to the south. The door to the garden shed is closed. The others are all open. The rear door of the castle is also open. The door to the garbage shed is seven feet wide, like a small barn door.
At the north end of the rear yard a decorative rock wall, still standing, runs from the castle’s rear entrance to the rear wall. A door of cast iron and brass meshwork stands partially open. A less ornate wooden door on the east side of the wall, adjacent to the outer wall of the castle, is still closed.
The metal is woven into a scene of a man walking among the stars, with the black of the cast iron and the brass forming the contrasting colors. It creaks, loudly, if they open it further, which they’ll have to do to go into the garden from here. The wall is eight feet tall. The garden is described in room three of the first floor.
The Garbage Shed (6)
A dry grainy smell permeates this six yard wide, two yard deep, building. Carts are filled with mounds of grey and brown things. Light streams in from small holes in the ceiling, silhouetting a dark child-like form emerging from one of the mounds.
Garbage was stored here before being hauled away. It contains horse carts filled with now-dried garbage. The holes are from goblins who jumped down onto the roof from the battlements. At least one goblin remains stuck in the garbage where it died. It is now a skeleton, the “dark, child-like form” that they see illuminated. It is just an inanimate skeleton.
The Kitchen (7)
A huge chimney looms over the sloping roof of this square building. Through the open doors, you see a mess of metal and bone.
Inside, a huge oven dominates the north wall. Kitchen utensils, knives, pots, and pans, are strewn about the floor, rusted, amid three human skeletons.
The pots and pans were thrown down by the goblins. While a few of the utensils were taken by goblins as souvenirs, most lie rusted in the dirt floor. The three Astronomer skeletons are unarmored, but armed with large kitchen knives. Two are male, one is female.
The Garden Shed (8)
The door is stuck against the door jam, and opens only with effort. Inside the six or seven yard arched room are old wheelbarrows, cans, axes, and other gardening tools. Everything is covered in dust and cobwebs. Even the cobwebs are long abandoned.
See the first level, room 3, for a description of the garden. The shed contains implements for gardening: old axes, cans, wheelbarrows, and other tools for maintaining a castle courtyard and the castle itself, scissors, rakes, pots, watering cans, decorative rocks, and extra lamps, statues, and oil. The oil is now gone, but the statues, could they be hauled away, would be worth as much as the statues in the garden itself. The items are arranged neatly. In one corner are two highly decorated chamber pots. One is decorated with the signs for Leo and Sagittarius and is gold-inlaid, the other with the signs for Aquarius and Pisces and is silver-inlaid. The former is worth 15 pounds, the latter 10 pounds.
 This shed has a door on both ends: the wild garden (first level, room 3) and the back yard (outside, area 5).