Wandering Encounters
Within the dungeons, creatures come in from the caverns. There is a 10% chance every hour of an encounter. As in the dungeon level, if the characters are extremely quiet and listen to the walls or floor, they can on a perception roll hear a faint humming or whooshing sound from the water below them.
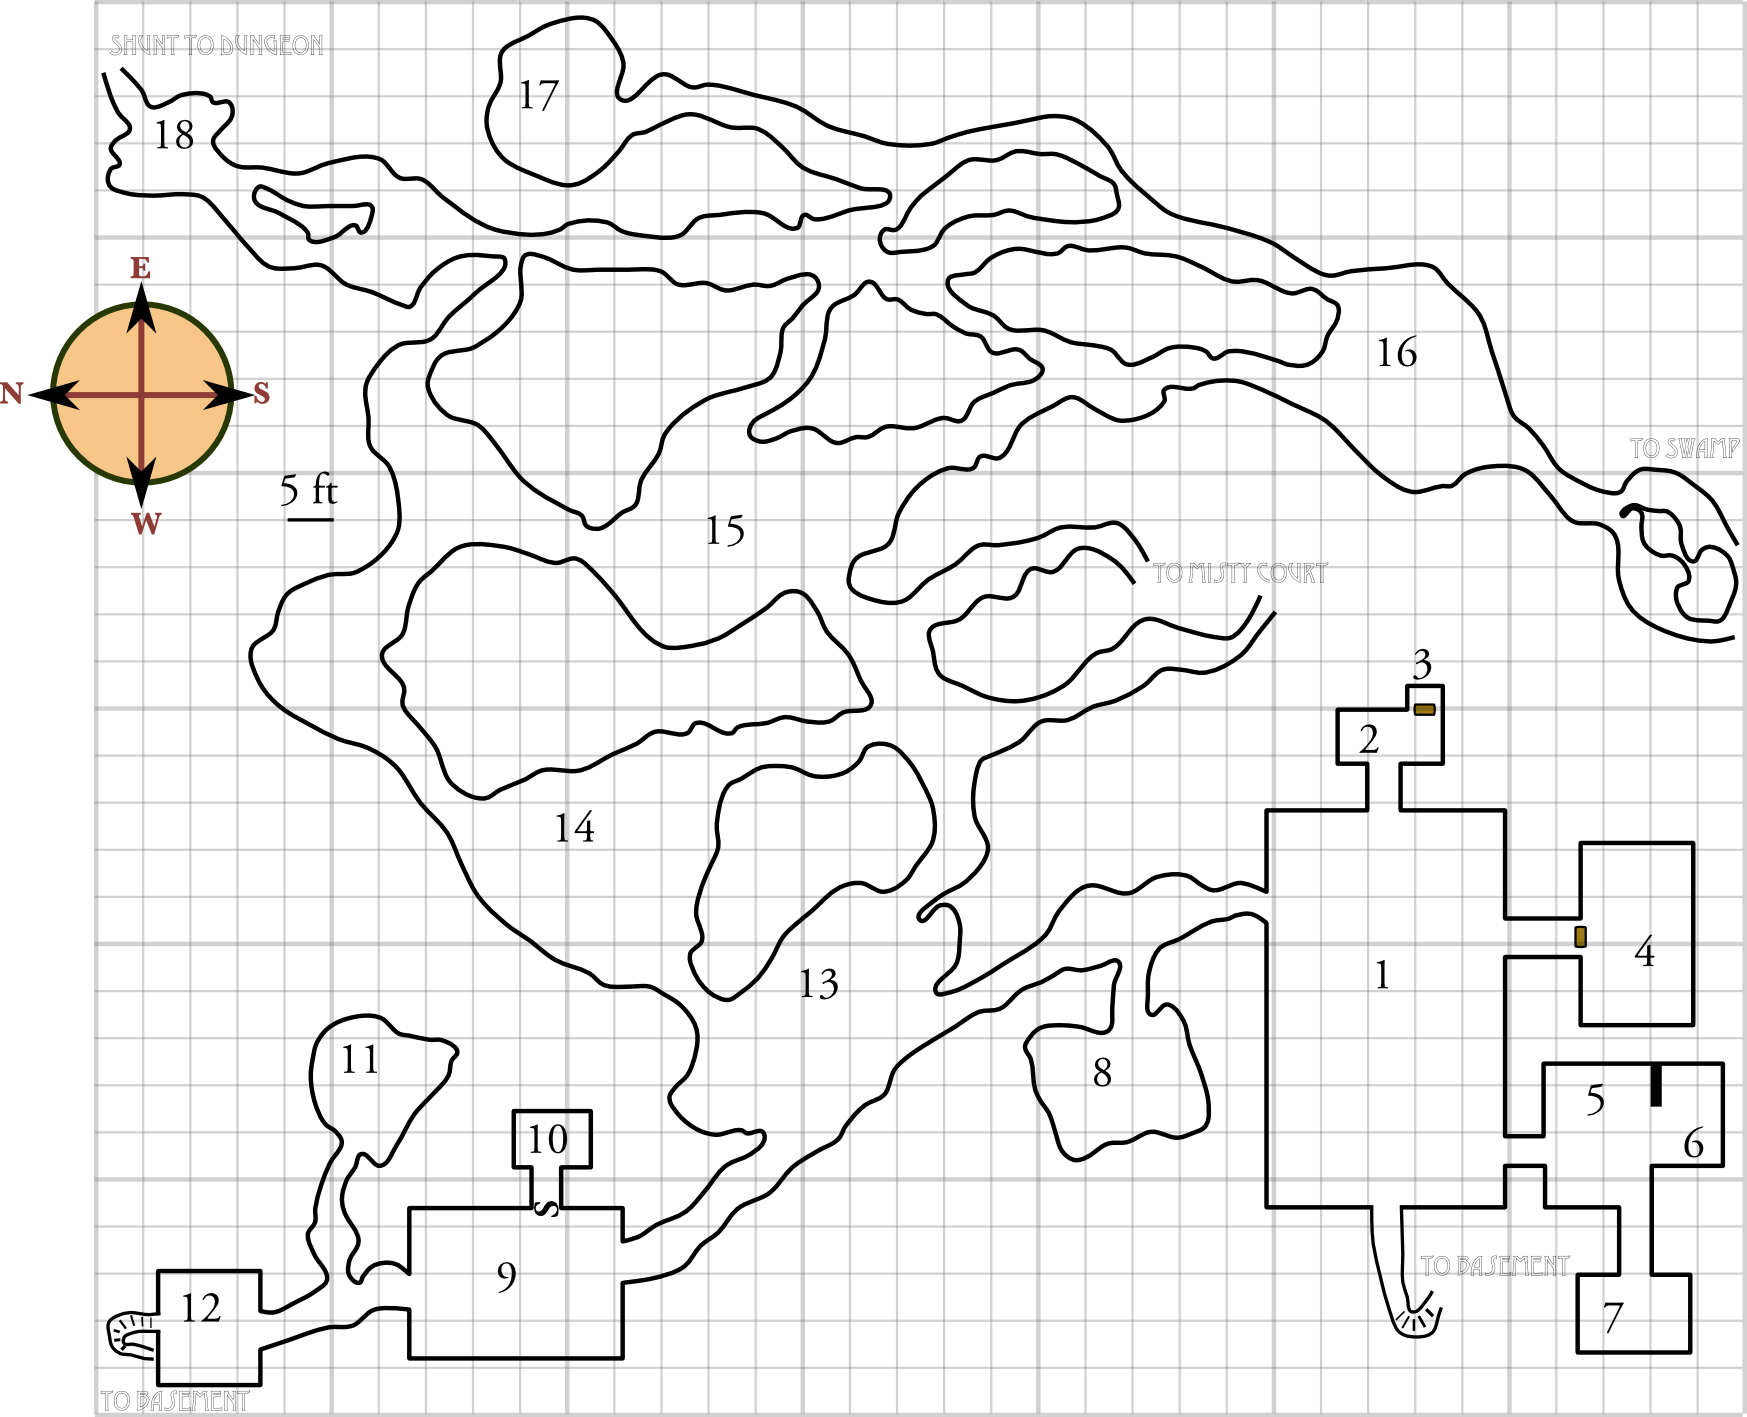
The two circular stairways from the basement—The King’s bedroom (17b) and Secret Meeting Room (12)—go down 60 feet, and are 200 feet long. The shunt from the dungeon’s Common Prisoner Area Two (5) is 150 feet long.
| 01-68 | Giant Crickets (d6) | 68% |
| 69-98 | Rats (d12) | 30% |
| 99-00 | Carrion Worm | 2% |
Giant crickets: animal 2; move 6/12; legs d4; defense 5; chirping drowns out normal noise.
Rats: animal 1 pt; move 8; bite or claw 1pt; defense 0.
Carrion worms: fantastic 4; move 10; 8 tentacles (paralysis) or claws d8 or bite d6; defense 3; armored head +4 defense.
Dining Room of the Dead (1)
Twelve skeletons sit at a long table, (facing you on the left or to your right) as you walk into this long, deep room. Bony fingers loosely grip crystal goblets. Silver gleams amidst grey strands that flutter, then settle. The walls are dark blue: beams of moonlight and starlight shining on great lakes, where fishermen haul in strange creatures.
There are also three tables, empty but for white-frayed silver candelabras that glitter in your light.
There are four other exits from this room, two of them on (your right or the wall ahead of you).
Each of the three east/west tables is empty. The head table, at the west, has twelve skeletons and is set with thirteen silver plates (30 shillings each), thirteen glass goblets (60 shillings each), and a large silver candelabra (90 shillings). The other tables each have a candelabra (45 shillings). The head table has an empty setting at the front.
It is easier for Eliazu to animate dead by tying them to earthly treasure and limiting them to specific actions. Eliazu can see using these skeletons just like the ones in the basement. A skeleton will follow and attack the characters immediately if anyone leaves the room with either the candelabra, their goblet or plate, or the empty space’s goblet or plate. Skeletons will will not stop their chase until the stolen item(s) are returned to the table.
Soft, wet wood creeks against stone. An unfelt wind billows through threadbare evening attire. Bone scrapes bone. The dinner party stands and turns to face you, tattered thread against white rib cages, and walks toward you, beckoning you forward.
The walls of this room are covered in drawings of the night sky and huge lakes. Vaguely non-human beings seem to be walking about the lakes, fishing and fighting with each other.
On closer examination, the fishermen are odd men indeed, wearing bird-like masks with long beaks and huge, crab-like claws for hands. Within the paintings they spear for fish while a huge eye watches them from the great lake.
12 skeletons: undead 1; survival 3, 3, 4, 4, 4, 5, 5, 6, 6, 6, 7; move 10; short sword d6; defense 3; slashing weapons do half damage, thrusting weapons do one point damage.
Waiting Room (2)
A stuffed sofa sits comfortably against the opposite wall, and a soft chair to your right. There is a wooden door on the right of the opposite wall. A small, round, single-legged wooden table on your left is in reaching distance of the sofa.
The table is the only thing of worth here, a maple table with two surfaces (one at about two feet and one at three feet), worth 15 shillings. The sofa and chair are damp-damaged, though comfortable enough if you’re in armor.
Bathroom (3)
A small clay basin, earthy-red, and a matching jug sit on the floor near a wide, glazed chamber pot. The glaze glistens with alternating bands of red, orange, and brown.
The chamber pot is part of the room, and has a hole in the bottom that empties to the river below the castle.
Apprentices’s Rooms (4)
The door creaks open on rusty hinges. Two rows of cots, one above the other, stand ragged against the left wall. Small tables and chairs lie haphazardly about the right side of the room, and against the far wall are three chests.
In their zeal to learn dark secrets, the Illustrators were training summoners. This was where the apprentice summoners lived and studied. There were four cots: two per row, though only three were occupied at the time of the final summoning. The three locked chests each have a magic book and spell components among old clothes.
The locked chests are trapped with a weak poison. Anyone attempting to pick the lock must make an evasion roll or be affected. The poison is strength 0, with an action time of one minute. It causes one injury.
Chest 1: (3rd level summoner): inscription, farseeing, ghost lights, ghost walkers, guardian, indestructible object, delay passage, magic table, bar passage
Chest 2: (2nd level summoner): inscription, ghost lights, guardian, indestructible object, secret message, delay passage
Chest 3: (1st level summoner): inscription, ghost lights, guardian
Underground Kitchen (5)
A light whistle rises softly as you enter this room. There is a small black pot standing on a tripod in an alcove to your left, and several knives on the wall above a shelf to your right.
There is an elaborate chimney here, that kept smoke (and heat) rising to the surface. A slight wind blows through the room, through the almost-closed fireplace doors, and up the chimney. Otherwise, this is a well-furnished kitchen; large pot in a fireplace, pans, utensils, plates, pots, etc. There is a notebook that contains recipes in abbreviated form. To the right cook or gourmand, the book could be worth up to ten shillings.
The Secret Places: Pantry (6)
Moldy old sacks lie scattered about this small room. Even the mold is dried and crusted with age.
The sacks contain flour, grains, dried root vegetables, and dried meats.
Servants’ Quarters (7)
You step down a short musty hallway. Inside the wide room two large boxes, one in each corner, flank a row of natty old bedrolls.
The Order had some servants who were trusted only with this downstairs area, and they were rarely trusted to go aboveground. There are two large boxes here, shared by the maidservants. Each contains old and rotted clothing.
Storage Cave (8)
A square-shaped cavern opens from the cave-like hallway. It is filled with sacks, dried meats hanging from hooks in the ceiling, and barrels and boxes.
The entrance to this cave was widened, and it is used for the storage of empty wooden boxes, a small box of writing quills, extra wood, a table, some wooden chairs. There are also sacks of grain, dried meats hanging from hooks in the ceiling, and barrels of pickled vegetables.
Ceremonial Area (9)
This entire room is charred black from floor to ceiling. Strange symbols cover the walls. Four large white circles peek through the ashes on the floor, with strange runes written at the edges of the circles. Some of the circles contain straight lines.
A hideous, horned face sticks its tongue out at you from the right (left) wall.
This is the room where the special ceremonies took place, including the one that destroyed the Order. There is a magic circle of protection engraved into the floor: a triangle inscribed inside a circle, and arcane symbols inscribed around the circumference of the circle. (This is a thaumaturgic circle.) There is a smaller circle in the center for the ritual leader to stand in, and three other circles equidistant around the center for three attendants to stand in.
The secret door to Secret Equipment Room (10) operates by poking a finger into the mouth of a particularly hideous demon’s head. The door then slides down. It is secret mostly because of the thick ash on the walls. Water pressure forces the door up, slowly, within ten minutes after opening. A similar mechanism opens it from the inside, although a lever is used there.
The strange symbols are symbols related to Christian demonology and astrology. Eliazu’s symbol is one of them.
There is one key here amidst the ashes: the apprentice summoners (Acastus and Cleophus) were carrying them, and Acastus was burned to ashes here. Each key is the same, and will open any of the summoners’ three chests. (Wendell Redstar was also one of the attendants, but he did not have a key.)
Secret Equipment Room (10)
This room is covered in thick ash. Framed against the soot, a blackened, charred body, its ashen skin crumpled against its bones, lies flat against the ground.
This room is covered in wood ash two inches thick. The skeleton holds in its charred, bony fingers a jet black wand. See The Undeath Wand for more information. There are also two keys here, one for the summoners’ three chests and one for the spellbook chest in the Order’s secret treasure room.
The wielder of the wand, Cleophus, tried to escape the firestorm by crawling here, but that allowed the firestorm entrance.
Maiden’s Room (11)
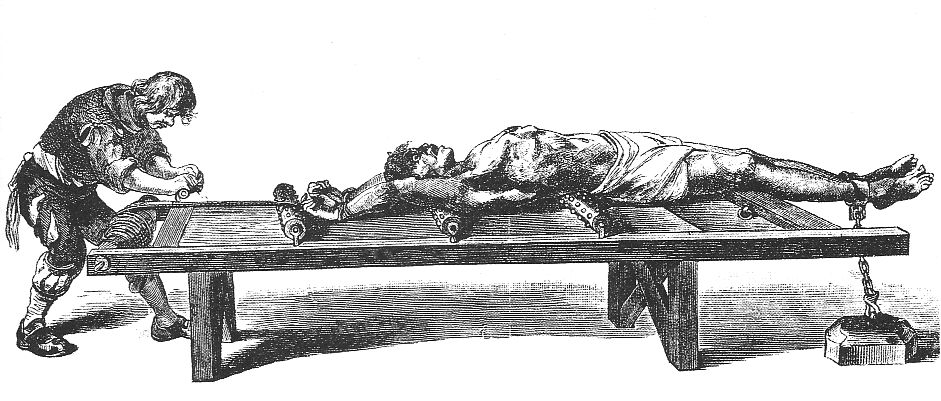
An irregular room, iron rings are embedded into the walls and leather straps or belts hang from them. On the right, bones hang by straps from two of the rings, and a pile of bones lie beneath on the floor.
This is where the young men and women were kept for sacrifice. One skeleton remains, its forearm bones still tied to the wall with leather straps, but the rest of it in a pile below the arm bones.
Lost Library (12)
Charred shelves, covered in ash and ashen fragments, line the walls. The floor is grey, the ceiling black.
The floor and shelves of this room are covered in the ash of burnt books. One charred fragment remains, visible in the corner. It says “metu”, part of the Ancient word for fear. The shelves are burnt to ragged black edges.
Cave Breakthrough (13)
The hall breaks through to caves here. This cave is haunted by a poltergeist, a confused and hateful ghost of the sacrifice. It throws rocks for d3 points damage. It awakens on a perception roll of 4, with bonuses for noise, magic, or spiritual activity.)
Poltergeist: undead 1; survival 4; move 20; rocks d3; defense 2; spaceshifting, immune to non-magical weapons.
The Secret Places: Empty (14)
This highly irregular cavernous room has two other caverns leading off from it.
The Secret Places: Empty (15)
This highly irregular cavernous room has three other caverns leading off from it.
Tunnel to the Swamp (16)
There is a 40% chance that d3 killer toads from the stagnant pool at the top will be here. If noise is made, there is a one in ten chance per round that d3 more will show up in 2d6 rounds. A marshy, weed-choked tunnel drains a small trickle of warm, stagnant water from the warm water source above through the pool in this room and down holes in the far wall.
There is a skeleton in the pool, with chains on its arms.
These caves were originally created by the river that is now far below. There are no true stalactites or stalagmites, although there will occasionally be similar structures. The caves are mostly dry, and vaguely warm (naturally so).
Dead Fighter (17)
The skeleton of a fighter who tried to investigate the Order is here. The man was Arthur Wells. His brother’s daughter was one of the sacrifices. He wore leather armor and a shield (on his right arm). The shield bears the crest of his family: a well on a hill, and the morning sun. This is a +1 shield, and has been handed down in the family since it was made for them by Robert Annis over four centuries ago. Clutched in his left hand is his sword, rusted and rotted.
In the remains of his purse are 85 Crosspoint shillings, 152 Crosspoint pennies, 69 Crosspoint half-pennies, 53 Black Stag pennies, 25 Black Stag half-pennies, and 32 Black Stag farthings. There is a ruby worth 240 shillings.
No Escape (18)
Depending on their light source, they may need to make a perception roll to avoid falling over the ten foot drop.
Lime Walls (19)
The caverns slope steeply downward, and the limestone grows damper and slimier.
The walls are easily smashed (four survival points total, each attack is reduced by two points, and damage by edged weapons is then halved). The cavern wall to the south is covered in condensation, due to the mist in the Skeleton Room.
These thin limed walls were built up by Eliazu, to hide himself from anyone who takes up residence in the castle. If the party makes it this far and Eliazu decides that they will be easily fooled into helping free him, and if they have all the things they need to free him, he’ll try to find some way to break the wall down. He could cause a crack to form in it over a period of several hours, or he could bring one of his skeletons down, have it “attack”, and have it accidentally hit the wall and crack it. He can even suggest the idea to the player characters mentally.
Eliazu will not do this if the characters have any chance of sending him back to hell: if, for example, he knows that they have the scroll of exorcism. (He won’t recognize the marrow cross.)
The thin cavern opens onto a wider cavern, and a ten foot drop leads to the floor of that cavern. There is another opening off of the cavern on the far side. A bone dangles from a chain to your left. The chain is trapped by a large rock.
A huge rock fell on an escaping prisoner’s chain, trapping him there to die. His arm bone is hanging, and the rest of him is in a heap on the floor.
Related Pages
- Rumors
- Eliazu
- What If the Characters Go for Assistance?
- The Castle Grounds
- The First Floor of the Castle
- The Upstairs of the Castle
- The Basement
- The Dungeons
- The Secret Places
- Wandering Encounters
- Dining Room of the Dead (1)
- Waiting Room (2)
- Bathroom (3)
- Apprentices’s Rooms (4)
- Underground Kitchen (5)
- Pantry (6)
- Servants’ Quarters (7)
- Storage Cave (8)
- Ceremonial Area (9)
- Secret Equipment Room (10)
- Maiden’s Room (11)
- Lost Library (12)
- Cave Breakthrough (13)
- Empty (14)
- Empty (15)
- Tunnel to the Swamp (16)
- Dead Fighter (17)
- No Escape (18)
- Lime Walls (19)
- The Misty Court
- The Lake Cavern