
A Gods & Monsters Adventure
A Gods & Monsters dungeon crawl suitable for three to six 1st to 2nd level characters
by Jerry Stratton
Copyright © 2011
http://www.godsmonsters.com/Guide/Lost/
Things that fly and things that creep
with leather wings and slimy hoof,
feared, and fled, in the forest deep
before the Mist’s well-armored horde.
See godsmonsters.com/Guide/conversions/ if you’d like to use Lost Castle of the Astronomers in other old-school games.
Permission is granted to copy, distribute and/or modify this document under the terms of the GNU Free Documentation License Version 1.3, published by the Free Software Foundation. A copy of the license is included in the section entitled “GNU Free Documentation License”
September 7, 2013
Go to http://www.godsmonsters.com/Guide/ for more great adventures!
1. Illustrious Castle, for 2nd to 3rd level
2. Vale of the Azure Sun, for 3rd to 5th level
3. The House of Lisport, for 4th to 6th level
4. Helter Skelter, for 5th to 6th level
The mountains of West Highland are dotted with scholarly orders, most of them now lost. The Order of the Astronomers and the Order of Illustration were rivals over a hundred years past. Scholarly disputes in the high days of the Orders often led to battle, and the Astronomers and Illustrators were known to fight over the finer points of their philosophies.
The Knights of Illustration nearly lost Illustrious Castle to the goblins during the Goblin War, when the Night Trolls under the mysterious Goblin Mage nearly overran the civilized world of West Highland; they fell into ruin and disappeared eighty years ago. The Astronomers are presumed to have lost Kristagna Castle and all of their lives during the War: none have been heard from since then, and the location of their castle is lost. The library at Biblyon lost much of its works during the War and only vague references remain to taunt treasure-hunters and spell-seekers.
Kristagna is south of the Leather Road, hidden in the Deep Forest. The Deep Forest is a dangerous place, home to many strange creatures, dragons, and evil faerie, and of course is overrun with Night Trolls. The forest is not to be traveled lightly, and only adventurers of stout heart and cunning mind can hope to penetrate the forest and return with their treasures alive.
If you have a player character, it will be more fun if you do not read this book. It contains information for the Adventure Guide. The Guide will use it to present a series of encounters to you as your characters experience the adventure.
This is the same adventure that the sample characters went through in The Order of the Astronomers. New players should read that story first. The goal is not necessarily surprise (although the characters will almost certainly run into things that the fictional players’ characters did not), but an exercise in “what if?” What would the players like their characters to do differently? How will the players use their own characters’ abilities?
This is also an exercise in role-playing. The players will know, ahead of time, things that their characters do not know. This is always the case: players always know things that their characters do not, and their characters know things the players do not. Role-playing is a balance between acting as players and ignoring character knowledge, and acting as characters, ignoring player knowledge. How will your players and your group handle this? Different individuals and groups will come to different balances. This otherwise simple adventure will require your group to face this issue head-on.
If the characters have some experience (for example, having gone through the introductory adventure in the Adventure Guide’s Handbook), they will probably reach the second level of experience by the time they finish the adventure. The adventure will last at least one night, and probably two. If this is the characters’ first adventure, you may wish to play up a “mini-adventure” on the trip to the ruins, or perhaps even within Hightown.
The characters must be willing to travel into unknown areas to search for knowledge or treasure. At least one of the characters should be a mage who is aware of the legend that the Astronomers knew powerful magics. If you feel your players need an added bonus, let one of them have found the key to the Gemini room safe; it was taken from Abbot Parthane’s corpse by a goblin, who lost it to a guardsman on a caravan raid. The guardsman, unaware of the significance of the astrological symbol (Gemini) on the key, sold it cheaply at a Crosspoint street fair, where the character in question found it. They’ve held it since hoping for more clues to the lost castle. If you do this, remove the key from its expected location in Stelopolis.
The italicized text for encounters is meant to be read to the players as their characters enter the location in question. Sometimes you’ll need to modify the flavor text. For example, if the flavor text states that “a waxing moon rises, barely visible in the morning air”, and the players have started out in the evening, you’ll need to change that.
In this adventure, nearly every location has flavor text. Some have multiple texts for different times of day and for different perspectives. When you create your own adventures, you’ll usually provide flavor text for key encounters, and notes for the rest. Put in just enough preparation time to make the game more fun for you and your players, and no more.
Note that on the maps of Stelopolis and the castle, the top of the map points east rather than north.
The adventure goal in Hightown is to acquire enough information to foray into the Deep Forest in search of Kristagna, the lost castle of the Astronomers.
Hightown stands in the foothills of the High Divide. The mountains loom mightily to the east. At the west end of town you can stand atop a hill and look out across the vast western forest, now tinged with the earthy reds, yellows, and golds of autumn. The stocky wooden buildings of Hightown are centered around the always-active, if uncolorful, marketplace. A waxing moon hangs, barely visible in the morning air, over the western forest.
The players should ensure that their characters are in Hightown. Because Hightown is a major stop on the Leather Road, players can easily arrange for their characters to be there. They might travel with a caravan, be traveling to friends in the west, or be leaving Crosspoint for reasons of personal safety. (There are only two directions to go if Crosspoint is no longer hospitable: west or south.) Scholarly characters might be taking advantage of the library at Biblyon, north of Hightown. Such characters would easily come down to Hightown for supplies, or perhaps to help a Biblyon merchant acquire supplies.
Hightown Pass is the only way across the mountains between West Highland and East Highland without traveling far north and back down again. The pass still rises an easy 3,500 feet above sea level, and Hightown, on the lower western side of the pass, is still 2,000 feet above sea level. Dawn comes late to Hightown: the sun does not rise above the mountains for an hour after it would if the mountains weren’t there.
Characters from smaller towns to the west are likely to view Hightown—with its relatively varied culture and relatively larger population—as a large town. Hightown sees merchants from both east and west, and occasionally even from the south. It has a political culture which, if not thriving, at least exists for the sake of the market, unlike the political cultures of smaller towns which are usually far more authoritarian.
While Hightown is smaller than Black Stag on the west end of the Leather Road, Black Stag is an insular and homogenous town. Hightown, especially its market, will contain things that Black Stag residents might never see. Many of those things will, however, be crated up.
Characters from Crosspoint will, on the other hand, see Hightown as the quintessential boring West Highland town, at least until they find a more boring one. Crosspoint already gets everything from West Highland that Hightown has: almost by definition, anything that passes through Hightown arrives at Crosspoint or shipped from there.
As you walk about the market, smells hit you more than colors or sounds. The Hightown Market is not filled with the brightly colored fabrics of Crosspoint, nor the bright vegetables of most markets, but with crates, barrels, and pallets. You smell the sharp smell of newly-made leather; the sickly-sweet smell of autumn’s first cider pressing; the smell of horse is everywhere.
While your first impression is one of barrels and crates, you soon see that there are stalls for individual buyers. Most sell leather goods, hot foods, and ciders and beers to drink. There are apple pies in the stall to your left; cured meats hang to your right.
Everyone around you is haggling over something. The numbers you catch range from pennies for pies to shillings and pounds for wagonloads of beer, salt, leather, beef, and hams.
A crowd gathers beyond the pie stalls, and you hear music. The singer sings a story about two Knightly Orders going to war.
The center of life in Hightown is the market. Here, merchants exchange goods; many West Highland merchants never leave West Highland, and many East Highland merchants never go further west than Hightown. Within the market, deals are made and wholesale goods change hands.
Here, also, caravans will stock up on the supplies they’ll need to cross the High Divide or to travel the Leather Road, depending on which way they’re going. Hightown is the only choice for such supplies, and they know it. Prices are usually about 20% higher for arms, armor, dry rations, and other traveling supplies.
Villagers from the surrounding villages will come to sell their crops or wares, and perhaps to pick up a few things themselves that their local markets don’t carry. Occasionally, Knights of one of the northern Orders will send a delegation to purchase or commission supplies.
In almost all cases not involving merchants (and in many cases involving them also), trade occurs without the use of money: barter is the order of the day, and an important part of interpersonal relations in Hightown is determining what the other person would want enough to trade for a good deal for what they have.
As befits the main town of the Leather Road, leather is everywhere.
For the rest of this adventure, it is assumed to be autumn; if it is not you will have to modify some descriptions.
The song is necessary as part of the backstory. Work with the other players—at least one character needs a strong reason to seek out the lost castle. They might catch snippets of the song first, words like “lost gold”, “Illustrators” and “Astronomers”.
A pair of dark-haired twins sing a bawdy tale of two armies back in the days of scholarly combat. Their accent is the unmistakable lisp of Great Bend. CHARACTER recognizes one of the orders: it must be about the legendary lost castle of the Astronomers.
The singers are two rogues from Great Bend. They are twins, and their song is the adventure hook. The player with the sorceror, or whichever player is the scholar who knows about the Order of the Astronomers, will recognize that, if true, the song includes instructions on how to find the lost castle of the Astronomers! Unlike the oft-visited “Haunted Illustrious Castle” to the north, Kristagna is likely to never have been visited by any human since its presumed demise.
When the singers finish, they receive a few farthings in their caps, but most of the people at Hightown Market are not here for entertainment, nor to give their money away.
If the characters are friendly with the singers, the singers will be friendly also. They don’t know anything more about the song, although they will claim to have heard it from a survivor of the battle, a nigh-impossibility unless they’re a lot older than they look or the survivor was Elvish.
“Or perhaps it was a survivor’s daughter.”
The singers speak in a vaguely French accent, the strong nasal accent of Great Bend. They will (if asked) claim to be here because of a run-in with a Southern Duke over the Duke’s daughter, and can go on about their escapades with her for as long as interest (or beer, should their suggestion to retire to the nearby tavern be successful) holds out. Their stories may or may not be true; but they will certainly be sensational.
If you wish, the twins can be avatars (or a single avatar halved) of Artemis and Apollo, Janus, Gemini, or the Yoruba gods, or any twin god of your campaign. If so, the twin singers will become permanent fixtures in the adventurers’ lives, managing to get them into major trouble with whatever heavenly power struggle is currently going on.
…so passed the Mist through Biblyon.
“South!” he cried, and south he led
his hundred men down past the road,
into the deepest forest led
a hundred men to quarrel bold
at Kristagna’s starry hold.
They marched beneath a waning moon.
Three days they marched and many a troll
fell to his army and his sword.
And many creatures long unnamed
were stirred, and fled, Mistole’s horde.
Things that fly and things that creep
with leather wings and slimy hoof,
feared, and fled, in the forest deep
before the Mist’s well-armored horde.
The third night out the moon was gone
Beneath the stars they made their camp.
One by one the stars went dull,
A mist rose up, so cold and damp.
“Mist for Mistoles? An omen good,”
So cried Mistoles’ aide-de-camp.
They built a fire, tall and hot,
and heeded not the omen,
to drive the mist that chilled their hearts
to dry the damp ‘til morning.
The fire crackled to the sky,
sent fiery coals a-borning,
when from the mist they heard a cry,
a scream, and then a warning.
Groping! Groping in the dark!
The camp was in a turmoil.
Groping! Groping in the wood
But only for a moment.
The warnings died, the screaming waned,
and when they counted up their men,
A hundred men were ninety.
At morning when the sun arose
cradled in Elijah’s breasts,
It burned the mist away.
And ninety men turned east and left
the thing that gropes the wood.
They bore due east upon the breasts,
to remote Kristagna rode.
And many songs describe the war,
and many tales are told.
In some they die in forest deep,
In some they win the suit.
But no song knows the fate of those
lost to the thing that gropes the wood.
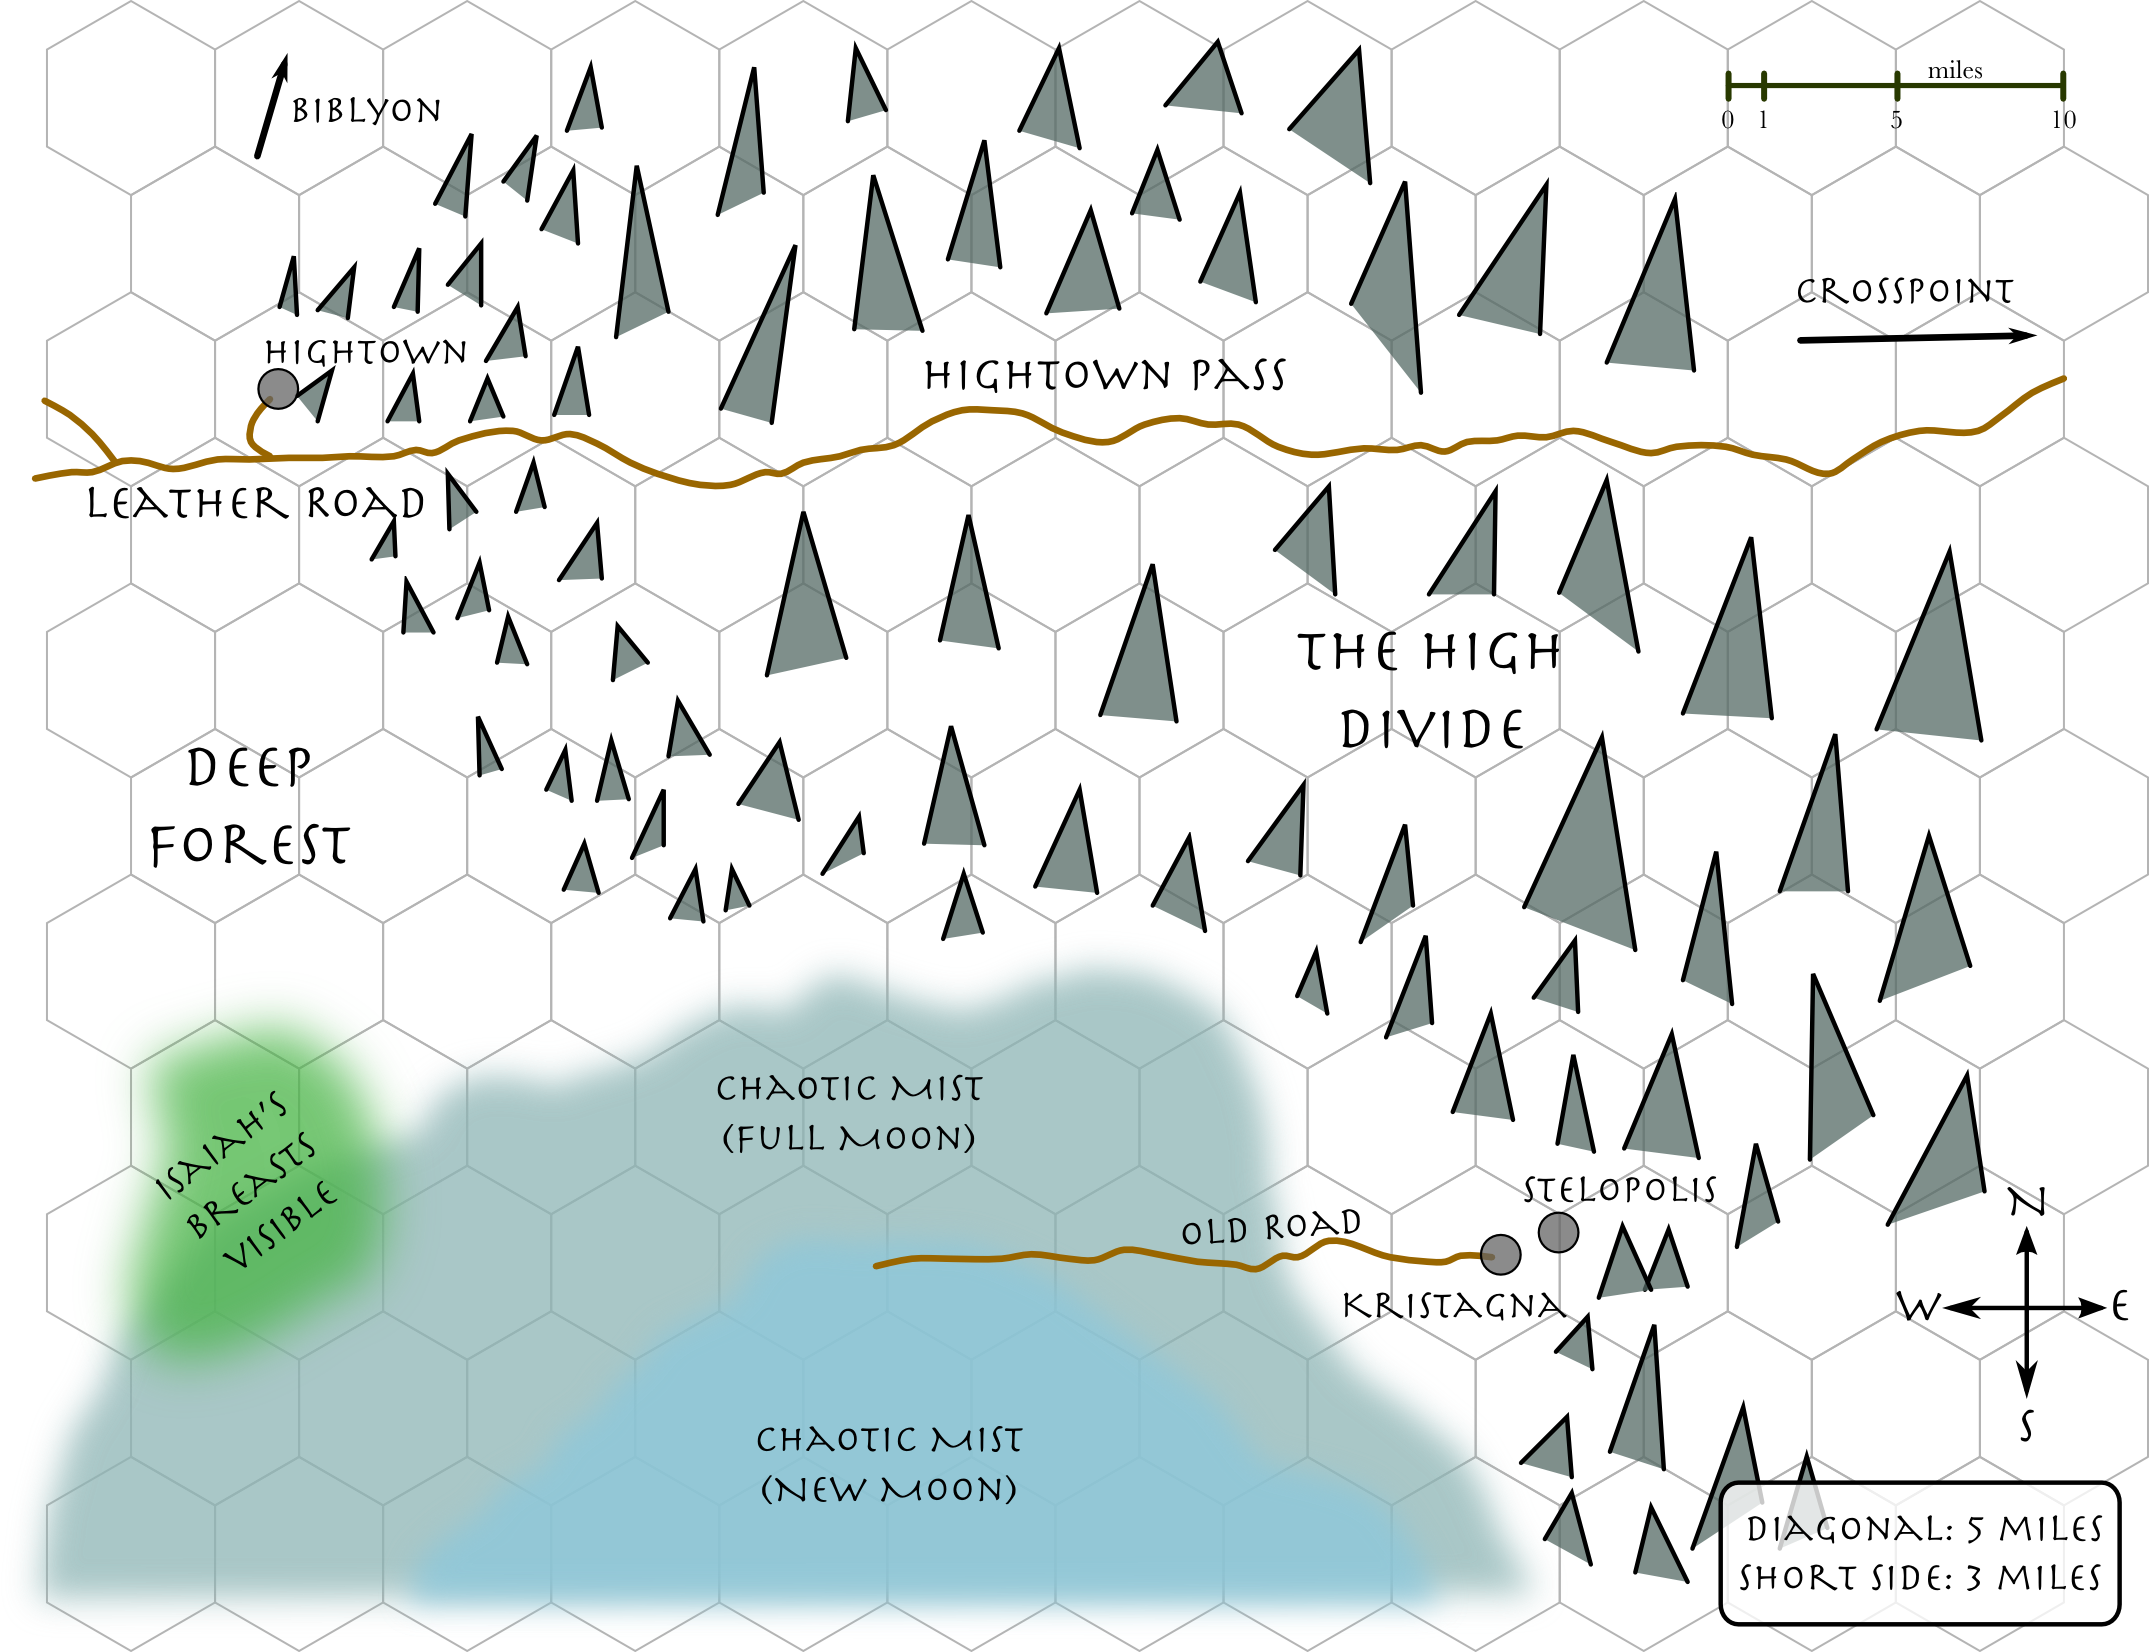
It is less than two miles between Hightown and the Leather Road, so unless the characters tarry considerably, they won’t have to worry about encounters north of the road. The goal at this part of the adventure is to reach the castle.
The walking path south to the Leather Road is shaded by massive trees of oak and maple, whose red, yellow, and brown leaves rustle lightly in the breeze. The well-worn path curves around low hills. The path is patched with grasses and ferns, and wild flowers of yellow and purple lace the edges.
Remember that you can determine these encounters by chance, or choose encounters in response to player character actions, using these charts as a guide to what lives in the area. Also, these outdoor charts include possible encounters with creatures nearly impossible for first and second level characters to defeat head-on. While poor decisions on the characters’ parts might lead to their deaths, you should not personally place the characters in untenable positions. Let them do that on their own.
What makes an encounter? It has to be memorable. Frantically hiding the horses when a gryphon flies overhead is an encounter, even if the gryphon never takes notice. Noticing a single goblin several hills away is not an encounter—unless the goblin comes back later in the night to steal from the player characters, or goes off to raise a band of brigands in hopes of waylaying the player characters.
This is especially important for animal encounters; in the wild, the characters see normal animals all the time. But when an animal is rolled as an encounter, that encounter must impact them in some way. The animal might get into their food; it might get in their way as they’re trying to do something else. Maybe the characters have intruded on the animal’s lair or nest and it defends itself. Whatever it is, if the animal was rolled as an encounter, it must affect the player characters—or require player character action to avoid being affected.
When traveling north of the Leather Road, encounters occur 20% of the time every 24 hours.
| 01-43 | Natural Encounters | 43% |
| 44-70 | Animals | 27% |
| 71-83 | Humanoid Creatures | 13% |
| 84-93 | Civilized Peoples | 10% |
| 94-00 | Fantastic Creatures | 7% |
| 01-40 | Farmers (d6) | 40% |
| 41-60 | Small Village (d50+5) | 20% |
| 61-76 | Travelers (d12) | 16% |
| 77-86 | Hermit (1) | 10% |
| 87-95 | Brigands (d4) | 9% |
| 96-00 | Masquerades | 5% |
| 01-40 | Werewolf (1) | 40% |
| 41-55 | Werebear (1) | 15% |
| 56-70 | Apparitions (1d4) | 15% |
| 71-84 | Dryads (d6) | 14% |
| 85-94 | Phantasm (1) | 10% |
| 95-00 | Deities (1d2) | 6% |
Most masquerade encounters will be with a creature acting human; deities may act as just about any creature or thing. The characters may never know they met a werewolf, dryad, phantasm, or god. Such encounters are unlikely to result in combat, but may set up a later adventure when the characters discover that their acquaintance (perhaps by then a friend) has a secret.
| 01-60 | Goblins (1d20) | 60% |
| 61-90 | Orcs (1d2) | 30% |
| 91-00 | Yeti (1d3) | 10% |
Goblins are 15% likely to have 1 orc master.
| 01-20 | light storm (d80 hours) | 20% |
| 21-36 | swarm/flock | 16% |
| 37-51 | lake or pond | 15% |
| 52-64 | stream in path | 13% |
| 65-74 | extra hot/cold (d6 days) | 10% |
| 75-83 | heavy storm (d20 hours) | 9% |
| 84-92 | fog (2d12 yards visibility) | 9% |
| 93-94 | Celtic ruin | 2% |
| 95-96 | unmarked tomb | 2% |
| 97-98 | ruins of small settlement | 2% |
| 99 | part of animal skeleton | 1% |
| 00 | human skeleton | 1% |
| 01-11 | Deer (d20) | 11% |
| 12-20 | Squirrels (d20) | 9% |
| 21-29 | Wolves (1d8) | 9% |
| 30-36 | Stags (d3) | 7% |
| 37-42 | Owls (d4) | 6% |
| 43-47 | Badgers (d4) | 5% |
| 48-52 | Dogs (d4) | 5% |
| 53-57 | Rats (d20) | 5% |
| 58-62 | Skunks (d6) | 5% |
| 63-67 | Snakes | 5% |
| 68-71 | Black Widows (d8) | 4% |
| 72-74 | Horses (d6) | 3% |
| 75-77 | Bats (d40) | 3% |
| 78-80 | Ravens (d6) | 3% |
| 81-82 | Bull (1) | 2% |
| 83-84 | Cattle (d20) | 2% |
| 85-86 | Wolverines (1d2) | 2% |
| 87-88 | Eagles (d3) | 2% |
| 89-90 | Goats (2d10) | 2% |
| 91-92 | Rams (d3) | 2% |
| 93-94 | Weasels (d2) | 2% |
| 95-96 | Leopard (1) | 2% |
| 97-98 | Wildcats (d3) | 2% |
| 99 | Bear (1) | 1% |
| 00 | Pheasants (d20) | 1% |
| 01-51 | Garter snakes (d6) | 51% |
| 52-71 | Blue Racers (d4) | 20% |
| 72-85 | Water snakes (d20) | 14% |
| 86-94 | Copperheads (d8) | 9% |
| 95-99 | Rattlesnakes (d4) | 5% |
| 00 | Huge snake (1) | 1% |
Copperheads, waterheads, and rattlers are standard poisonous snakes.
| 01-20 | Large Spiders (d3) | 20% |
| 21-35 | Unicorns (d3) | 15% |
| 36-45 | Pegasi (d2) | 10% |
| 46-55 | Brownies (d20) | 10% |
| 56-63 | Dryad (1) | 8% |
| 64-71 | Pixies (d20) | 8% |
| 72-79 | Apparitions (d100) | 8% |
| 80-86 | Naiad (1) | 7% |
| 87-92 | Poltergeist (1) | 6% |
| 93-97 | Gryphon (1) | 5% |
| 98-00 | Ghouls (d4) | 3% |
Most animal-like fantastic creatures will hardly notice the characters; those that eat livestock might descend upon the characters’ packmounts if they have any, but unless the characters do something stupid to attract the attention of, say, a gryphon, these fantastic encounters will be marvels to tell about having seen when they return home. Undead encounters will occur in an appropriate location: phantasms or poltergeists in abandoned homes, ghouls in a cemetery.
The characters are likely to spend no more than a few minutes on the Leather Road, but you may find this information useful if they decide to travel somewhere other than Hightown when the adventure ends.
The small and winding Hightown Road finally ends, opening onto the wider Leather Road. Tree trunks, of trees long-since chopped down, dot the edges of the road. A seven-foot wooden post with four wooden arrows gives you directions: east to “Crosspoint, 180 miles”, west to “Black Stag, 250 miles”, and north to “Hightown, 2 miles or so”. The fourth points south and reads simply “Dragons”. The Leather Road goes east to the mountains and west to the forests, but south is only a solid line of oak, ferns, and bushes.
The Deep Forest is dangerous, and some of that danger seeps over to the Road. Most people who travel on the road band together into caravans for protection.
The Leather Road is the boundary between the normal and the fantastic in Highland; some of that reputation may be uncalled for (caravans do, in fact, use the Leather Road regularly), but when you’re traveling it with only two or three companions for company, those noises in the night will recall all the stories your parents told you to keep you on the farm.
When traveling on the Leather Road, encounters occur 20% of the time every 24 hours.
| 01-40 | Civilized Peoples | 40% |
| 41-71 | Natural Encounters | 31% |
| 72-91 | Animals | 20% |
| 92-96 | Humanoid Creatures | 5% |
| 97-00 | Fantastic Creatures | 4% |
| 01-40 | Caravan (d20+10) | 40% |
| 41-60 | Merchant (d6) | 20% |
| 61-79 | Traveler (d6) | 19% |
| 80-93 | Brigands (d4) | 14% |
| 94-98 | Inn and village (d60+4) | 5% |
| 99-00 | Masquerades | 2% |
| 01-40 | Werewolf (1) | 40% |
| 56-80 | Apparitions (d6) | 25% |
| 41-55 | Vampire (1) | 15% |
| 81-94 | Phantasms (d2) | 14% |
| 95-00 | Deities (1d2) | 6% |
Most masquerade encounters will be with a creature acting human; deities may act as just about any creature or thing. The characters may never know they met a werewolf, dryad, phantasm, or god. Such encounters are unlikely to result in combat, but may set up a later adventure when the characters discover that their acquaintance (perhaps by then a friend) has a secret.
| 01-60 | Goblins (1d20) | 60% |
| 61-90 | Orcs (1d2) | 30% |
| 91-00 | Yeti (1d3) | 10% |
Goblins are 25% likely to have Orc leaders.
| 01-26 | light storm (d80 hours) | 26% |
| 27-41 | unbridged stream | 15% |
| 42-54 | swarm/flock | 13% |
| 55-66 | extra hot/cold (d6 days) | 12% |
| 67-76 | heavy storm (d20 hours) | 10% |
| 82-89 | fog (2d12 yards visibility) | 8% |
| 77-81 | bridge over stream | 5% |
| 94-96 | remains of travelers | 3% |
| 90-91 | ghost village | 2% |
| 92-93 | unmarked tomb | 2% |
| 97-98 | part of animal skeleton | 2% |
| 99-00 | human skeleton | 2% |
| 01-11 | Deer (d20) | 11% |
| 12-20 | Wolves (1d8) | 9% |
| 21-29 | Squirrels (d20) | 9% |
| 30-36 | Stags (d3) | 7% |
| 37-42 | Owls (d4) | 6% |
| 43-47 | Badgers (d4) | 5% |
| 48-52 | Dogs (d4) | 5% |
| 53-57 | Rats (d20) | 5% |
| 58-62 | Skunks (d6) | 5% |
| 63-67 | Snakes | 5% |
| 68-71 | Black Widows (d8) | 4% |
| 72-74 | Horses (d6) | 3% |
| 75-77 | Bats (d40) | 3% |
| 78-80 | Ravens (d6) | 3% |
| 81-82 | Bull (1) | 2% |
| 83-84 | Cattle (d20) | 2% |
| 85-86 | Wolverines (1d2) | 2% |
| 87-88 | Eagles (d3) | 2% |
| 89-90 | Goats (2d10) | 2% |
| 91-92 | Rams (d3) | 2% |
| 93-94 | Weasels (d2) | 2% |
| 95-96 | Leopard (1) | 2% |
| 97-98 | Wildcats (d3) | 2% |
| 99 | Bear (1) | 1% |
| 00 | Pheasants (d20) | 1% |
| 01-51 | Garter snakes (d6) | 51% |
| 52-71 | Blue Racers (d4) | 20% |
| 72-85 | Water snakes (d20) | 14% |
| 86-94 | Copperheads (d8) | 9% |
| 95-99 | Rattlesnakes (d4) | 5% |
| 00 | Huge snake (1) | 1% |
Copperheads, water snakes, and rattlers are standard poisonous snakes.
| 01-20 | Large Spiders (d3) | 20% |
| 21-36 | Apparitions (d100) | 16% |
| 37-47 | Pegasi (d2) | 11% |
| 48-57 | Gryphon (1) | 10% |
| 58-67 | Brownies (d20) | 10% |
| 68-76 | Unicorns (d3) | 9% |
| 77-83 | Pixies (d20) | 7% |
| 84-89 | Deep Forest Fantastic Creature | 6% |
| 90-95 | Poltergeist (1) | 6% |
| 96-97 | Dryad (1) | 2% |
| 98-00 | Ghouls (d4) | 3% |
Most animal-like fantastic creatures will hardly notice the characters; those that eat livestock might descend upon the characters’ packmounts if they have any, but unless the characters do something stupid to attract the attention of, say, a gryphon, these fantastic encounters will be marvels to tell about having seen when they return home. Undead encounters will occur in an appropriate location: phantasms or poltergeists in abandoned homes, ghouls in a cemetery.
The forest south of the Leather Road is thick, and smells of autumn. Oak and maple trees form a canopy above the dry ground. Brown leaves crackle as you walk along the rolling hills. Sunlight shines through the trees in beams that shine like spotlights to the ground. You step through ferns and bushes, some flowering in bright blue, others mustard-yellow.
The players might decide to try and triangulate where the castle should be in order to shorten their trip. This is fraught with danger: from nearer, the breasts will not be as obvious as they are from further, especially given that the time frame will be different. The High Divide is a wide set of mountains, and it will be very easy to miss the castle. The southern forest is thick, dark, and completely uncivilized. An Intelligence roll at a penalty of 4 is required to successfully navigate the forest using the instructions from the song if they have good maps. Surveying, map-making, or woodland skills will assist.
The best way to become unlost when lost in the Deep Forest is to go north to the Leather Road. A Perception roll at +8 is required when traveling across the Leather Road to notice it.
There are very few encounters in the Deep Forest with “civilized peoples”. While they do stand a good chance of meeting evil and fantastic creatures, most of their encounters will be with nature and history. There are strange ruins all over the Deep Forest, remnants of lost villages from before the Goblin Wars (when the people of Highland thought they could conquer the forest) and the lost cultures of the ancients from before the Cataclysm.
Night priests are evil or ordered evil prophets of the invisible world. See the Highland lorebook for more about them. When a night priest party is encountered, one will be a level d4 prophet, potentially leading a level d3 warrior and/or thief.
Wandering Druids will be level d4, with one or two Fienna (learned warriors) and/or bards (warriors, thieves, or sorcerors) of level d3. See the Highland lorebook for more about Druids and the Celts.
When traveling south of the Leather Road, encounters occur 20% of the time each day and each night.
| 01-35 | Natural Encounters | 35% |
| 36-69 | Animals | 34% |
| 70-86 | Humanoid Creatures | 17% |
| 87-97 | Fantastic Creatures | 11% |
| 98-00 | Civilized Peoples | 3% |
| 01-37 | Masquerades | 37% |
| 38-71 | Gnomes (d40) | 34% |
| 72-89 | Dwarves (d20) | 18% |
| 90-99 | Humans | 10% |
| 00 | Elves (d4) | 1% |
| 01-25 | Adventurers (2d6-1) | 25% |
| 26-50 | Hermit (1) | 25% |
| 51-70 | Ancient Ruins | 20% |
| 71-85 | Celtic Ruins | 15% |
| 86-93 | Wandering Druid (d3) | 8% |
| 94-00 | Night Priest (d3) | 7% |
| 01-30 | Werewolf (1) | 30% |
| 31-42 | Weresnakes (1d3) | 12% |
| 43-54 | Apparitions (d12) | 12% |
| 55-63 | Phantasms (d3) | 9% |
| 64-72 | Dryads (d6) | 9% |
| 73-80 | Wererats (d10) | 8% |
| 81-87 | Werebear (1) | 7% |
| 88-94 | Petraiads (d4) | 7% |
| 95-00 | Deities (1d2) | 6% |
See earlier for notes on masquerades.
| 01-53 | Goblins (1d20) | 53% |
| 54-75 | Orcs (1d4) | 22% |
| 76-90 | Ogres (d3) | 15% |
| 91-00 | Yeti (d3) | 10% |
Goblins are 25% likely to have Orc leaders.
| 01-26 | light storm (d120 hours) | 26% |
| 27-34 | heavy storm (d40 hours) | 8% |
| 35-42 | swarm/flock | 8% |
| 43-50 | Celtic ruin | 8% |
| 51-57 | stream in path | 7% |
| 58-64 | deep valley | 7% |
| 65-71 | fog (d20 yards visibility) | 7% |
| 72-77 | extra hot/cold (d8 days) | 6% |
| 78-83 | lake or pond | 6% |
| 84-88 | swamp | 5% |
| 89-92 | river in path | 4% |
| 93-94 | dead forest | 2% |
| 95-96 | unmarked tomb | 2% |
| 97-98 | remains of small settlement | 2% |
| 99 | part of animal skeleton | 1% |
| 00 | human skeleton | 1% |
| 01-11 | Deer (d20) | 11% |
| 12-20 | Wolves (1d8) | 9% |
| 21-28 | Squirrels (d20) | 8% |
| 29-35 | Stags (d3) | 7% |
| 36-42 | Snakes | 7% |
| 43-48 | Owls (d4) | 6% |
| 49-53 | Badgers (d4) | 5% |
| 54-58 | Dogs (d4) | 5% |
| 59-63 | Rats (d20) | 5% |
| 64-67 | Skunks (d6) | 4% |
| 68-71 | Black Widows (d8) | 4% |
| 72-74 | Bear (1) | 3% |
| 75-77 | Horses (d6) | 3% |
| 78-80 | Bats (d40) | 3% |
| 81-83 | Ravens (d6) | 3% |
| 84-85 | Wolverines (1d2) | 2% |
| 86-87 | Eagles (d3) | 2% |
| 88-89 | Goats (2d10) | 2% |
| 90-91 | Rams (d3) | 2% |
| 92-93 | Weasels (d2) | 2% |
| 94-95 | Leopard (1) | 2% |
| 96-97 | Wildcats (d3) | 2% |
| 98 | Bull (1) | 1% |
| 99 | Cattle (d20) | 1% |
| 00 | Pheasants (d20) | 1% |
| 01-47 | Garter snakes (d6) | 47% |
| 48-67 | Blue Racers (d4) | 20% |
| 68-81 | Water snakes (d20) | 14% |
| 82-90 | Copperheads (d8) | 9% |
| 91-96 | Huge snake (1) | 6% |
| 97-00 | Rattlesnakes (d4) | 4% |
Copperheads, water snakes, and rattlers are standard poisonous snakes.
| 01-12 | Treeherders (d4) | 12% |
| 13-24 | Large Spiders (d3) | 12% |
| 25-36 | Pixies (d20) | 12% |
| 37-47 | Huge Spiders (d2) | 11% |
| 48-57 | Apparitions (d100) | 10% |
| 58-63 | Mist encounter | 6% |
| 64-68 | Unicorns (d3) | 5% |
| 69-73 | Pegasi (d2) | 5% |
| 74-77 | Brownies (d20) | 4% |
| 78-81 | Dryad (1) | 4% |
| 82-85 | Petraiads (50% 1 or d4) | 4% |
| 86-88 | Gryphon (1) | 3% |
| 89-91 | Carrion Worms (d4) | 3% |
| 92-94 | Naiads (50% 1 or d20) | 3% |
| 95-97 | Satyrs (d10) | 3% |
| 98-99 | Poltergeist (1) | 2% |
| 00 | Ghouls (d4) | 1% |
See earlier for notes on fantastic encounters.
As the sun caresses the tops of the trees from the horizon, a sense of golden calm settles over the forest. Birds chirp cheerfully, go silent, and then chirp again from a different direction. A cool breeze lazily flutters a few leaves here and there as shadows lengthen upon your first night in the Deep Forest.
Approximately three days’ walk south of Hightown, if the characters are occasionally rising above the trees, the “breasts”, the twin peaks that lead to Kristagna, become visible. Any character with tracking, mapping, or surveying skills will (if paying attention at all) see the breasts automatically. Others must make a Perception roll at a bonus of five.
The characters will have to climb trees or hills, or otherwise rise above the level of the treetops, to see the mountain’s peaks.
Climbing to the top of a small hill, you suddenly realize that to your left, rising out of the High Divide, are twin peaks, each with rounded ascents and each with a tiny cap of snowy white. The resemblance is too striking to be anything other than the peaks which mark the location of the lost castle of the Astronomers.
As long as the characters sight their path on the peaks, they will not only find the castle, but will very likely find themselves walking on the old road to Kristagna Castle.
At some point the characters are likely to pass through or near the Chaotic Mist. Where the creatures of the Deep Forest are dangerous, the creatures of the Mist are dangerous and alien. The chaotic mist is largest on nights of the full moon. If the characters left Hightown during the waxing moon, the moon is most likely full now, resulting in a three or four day journey through the mist. On a new moon, the journey through the mist will take less than a day (unless, of course, they get lost).
The old road to Kristagna goes into the mist. The mist has grown since the road was built; it would have been easy to build the road around the mist’s full moon border.
If the mist rolls in on their camp:
A deep mist rolls in from the south during the evening as you unpack and build your fire. The twinkling stars slowly fade from view. The moon’s white light filtering through the mist lends an eerie feel to your camp.
If they encounter the mist while walking:
A fog slowly builds as you move east. Tendrils of mist block your view and then clear, and then finally turn deep and thick. You see barely ten paces in front of you. The sun is a mere brighter white area in the (eastern or western, as appropriate for time of day) sky. Water condenses on your faces and your clothes.
When fully within the mist, at night:
Within this thick fog, the darkness is complete. Sound has a strange hollowness within the fog, and you hear faintly the sounds of squeaks, clatterings, and thumps from a great distance. When the moon rises, you see only vague outlines of trees and hills, and occasionally of strange, moving shapes along the ground or in the air.
When traveling within the mist, encounters occur 20% of the time each day and each night. Because of the thickness of the mist, it may be possible for careful groups to avoid detection by these strange and dangerous creatures.
| 01-15 | Fire Spider (1) | 15% |
| 16-30 | Beaked Sweeper (1) | 15% |
| 31-45 | Crazy Crabs (d2) | 15% |
| 46-60 | Pink Horrors (d6) | 15% |
| 61-75 | Toves (d3) | 15% |
| 76-84 | Giant Venus Flytraps (d4, see below) | 9% |
| 85-90 | Mushroom Walker (1, see below) | 6% |
| 91-96 | Giant Leeches (d8, see below) | 6% |
| 97-00 | Mist Wraith (1) | 4% |
Flytraps, mushroom walkers, and leeches will often (75%) be encountered in a chaotic grove, a wild collection of alien plants, growing like clumps of green blades coming out of the ground, with red or purple flowers; trees with brush-like red appendages hanging down from strand-like branches resembling weeping willows; trees with flowers like yellow trumpets that smell of dung; creeping weeds with purple flowers that tear down larger trees.
If they follow the breasts and do not try to go a roundabout way, they will eventually find the old road.
As you walk along you slowly realize that the path you have been walking on is a long-abandoned stone road. Every once in a while one of the stones of the old road peeks above the grass. To your right is a low stone marker with some marking on it.
The marker reads the number of miles to the castle in roman numerals.
Within a half mile of the castle, the last battle between the goblins and the Astronomers still has its remnants.
Half-buried in the ground and grass to your right is a small skeleton, almost a child’s skeleton except for the fangs in the jaw. As you gaze around, you see, a bit further into the forest, a man-sized skeleton, still in its rusted armor, with grass and ferns growing around and through it. A bright blue flower rises through the eye sockets.
They will see several of these on the road, and, if they walk off of the road, they will see ten or twenty more.
If they search the human skeletons they will be able to find d20 silver coins marked with signs of the zodiac, each worth about a shilling in Crosspoint. There are a maximum of 28 coins on all the human skeletons out here (they had little use for coinage here in the middle of nowhere). Each player may make a Perception roll to see either Captain Cambel or Lieutenant Courlander; if a player makes their Perception roll, roll randomly to see which skeleton that player has found.
Captain Cambel’s skeleton is more richly arrayed than the others. His sword and armor are rusted away; as one of the twelve leaders of the Astronomers, his gear was once embroidered with the symbol for Capricorn. He wears an amethyst ring with a glittering Capricorn engraved beneath the gem, the band gold. The ring is worth 15 pounds in Crosspoint, 10 in Black Stag.
Another skeleton, that of Lieutenant Courlander, wears the Moonstone Ring (see back), a ring of silver strands with a soft white pearl. Courlander’s helmet, with iron wings and a Pisces symbol on the forehead, pokes above the ground. His long sword is rusted, but the hilt’s intricately woven fish designs are still visible (though fragile).
Throughout these battles, there are perhaps three to four times as many goblin skeletons as human ones.
The road rises very slightly as they move east toward the castle. It also continues on, around the castle, to the “city” of Stelopolis, up the mountains.
Now that they’re at the castle, the adventure goal will be character-specific: different characters may have different goals, such as finding treasure, finding knowledge, or going home again.
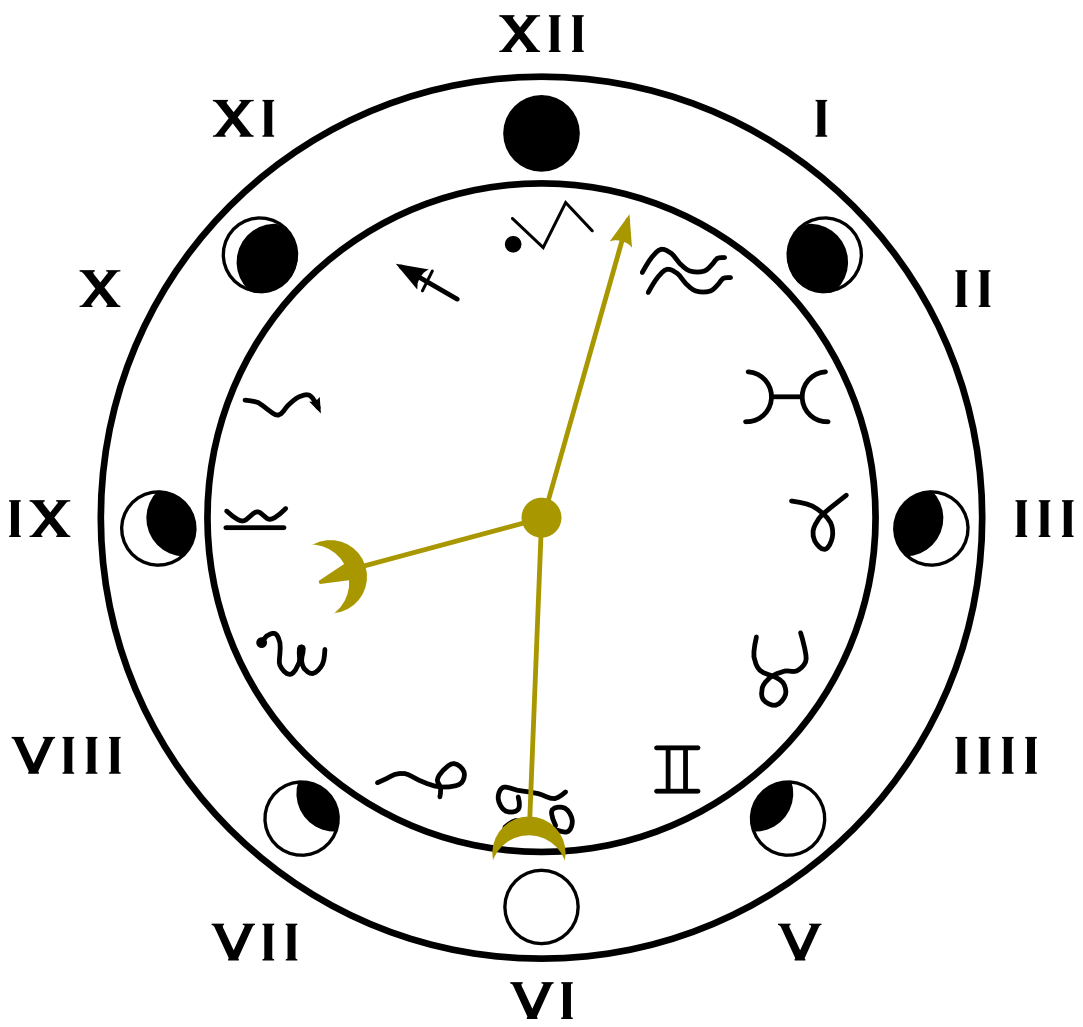
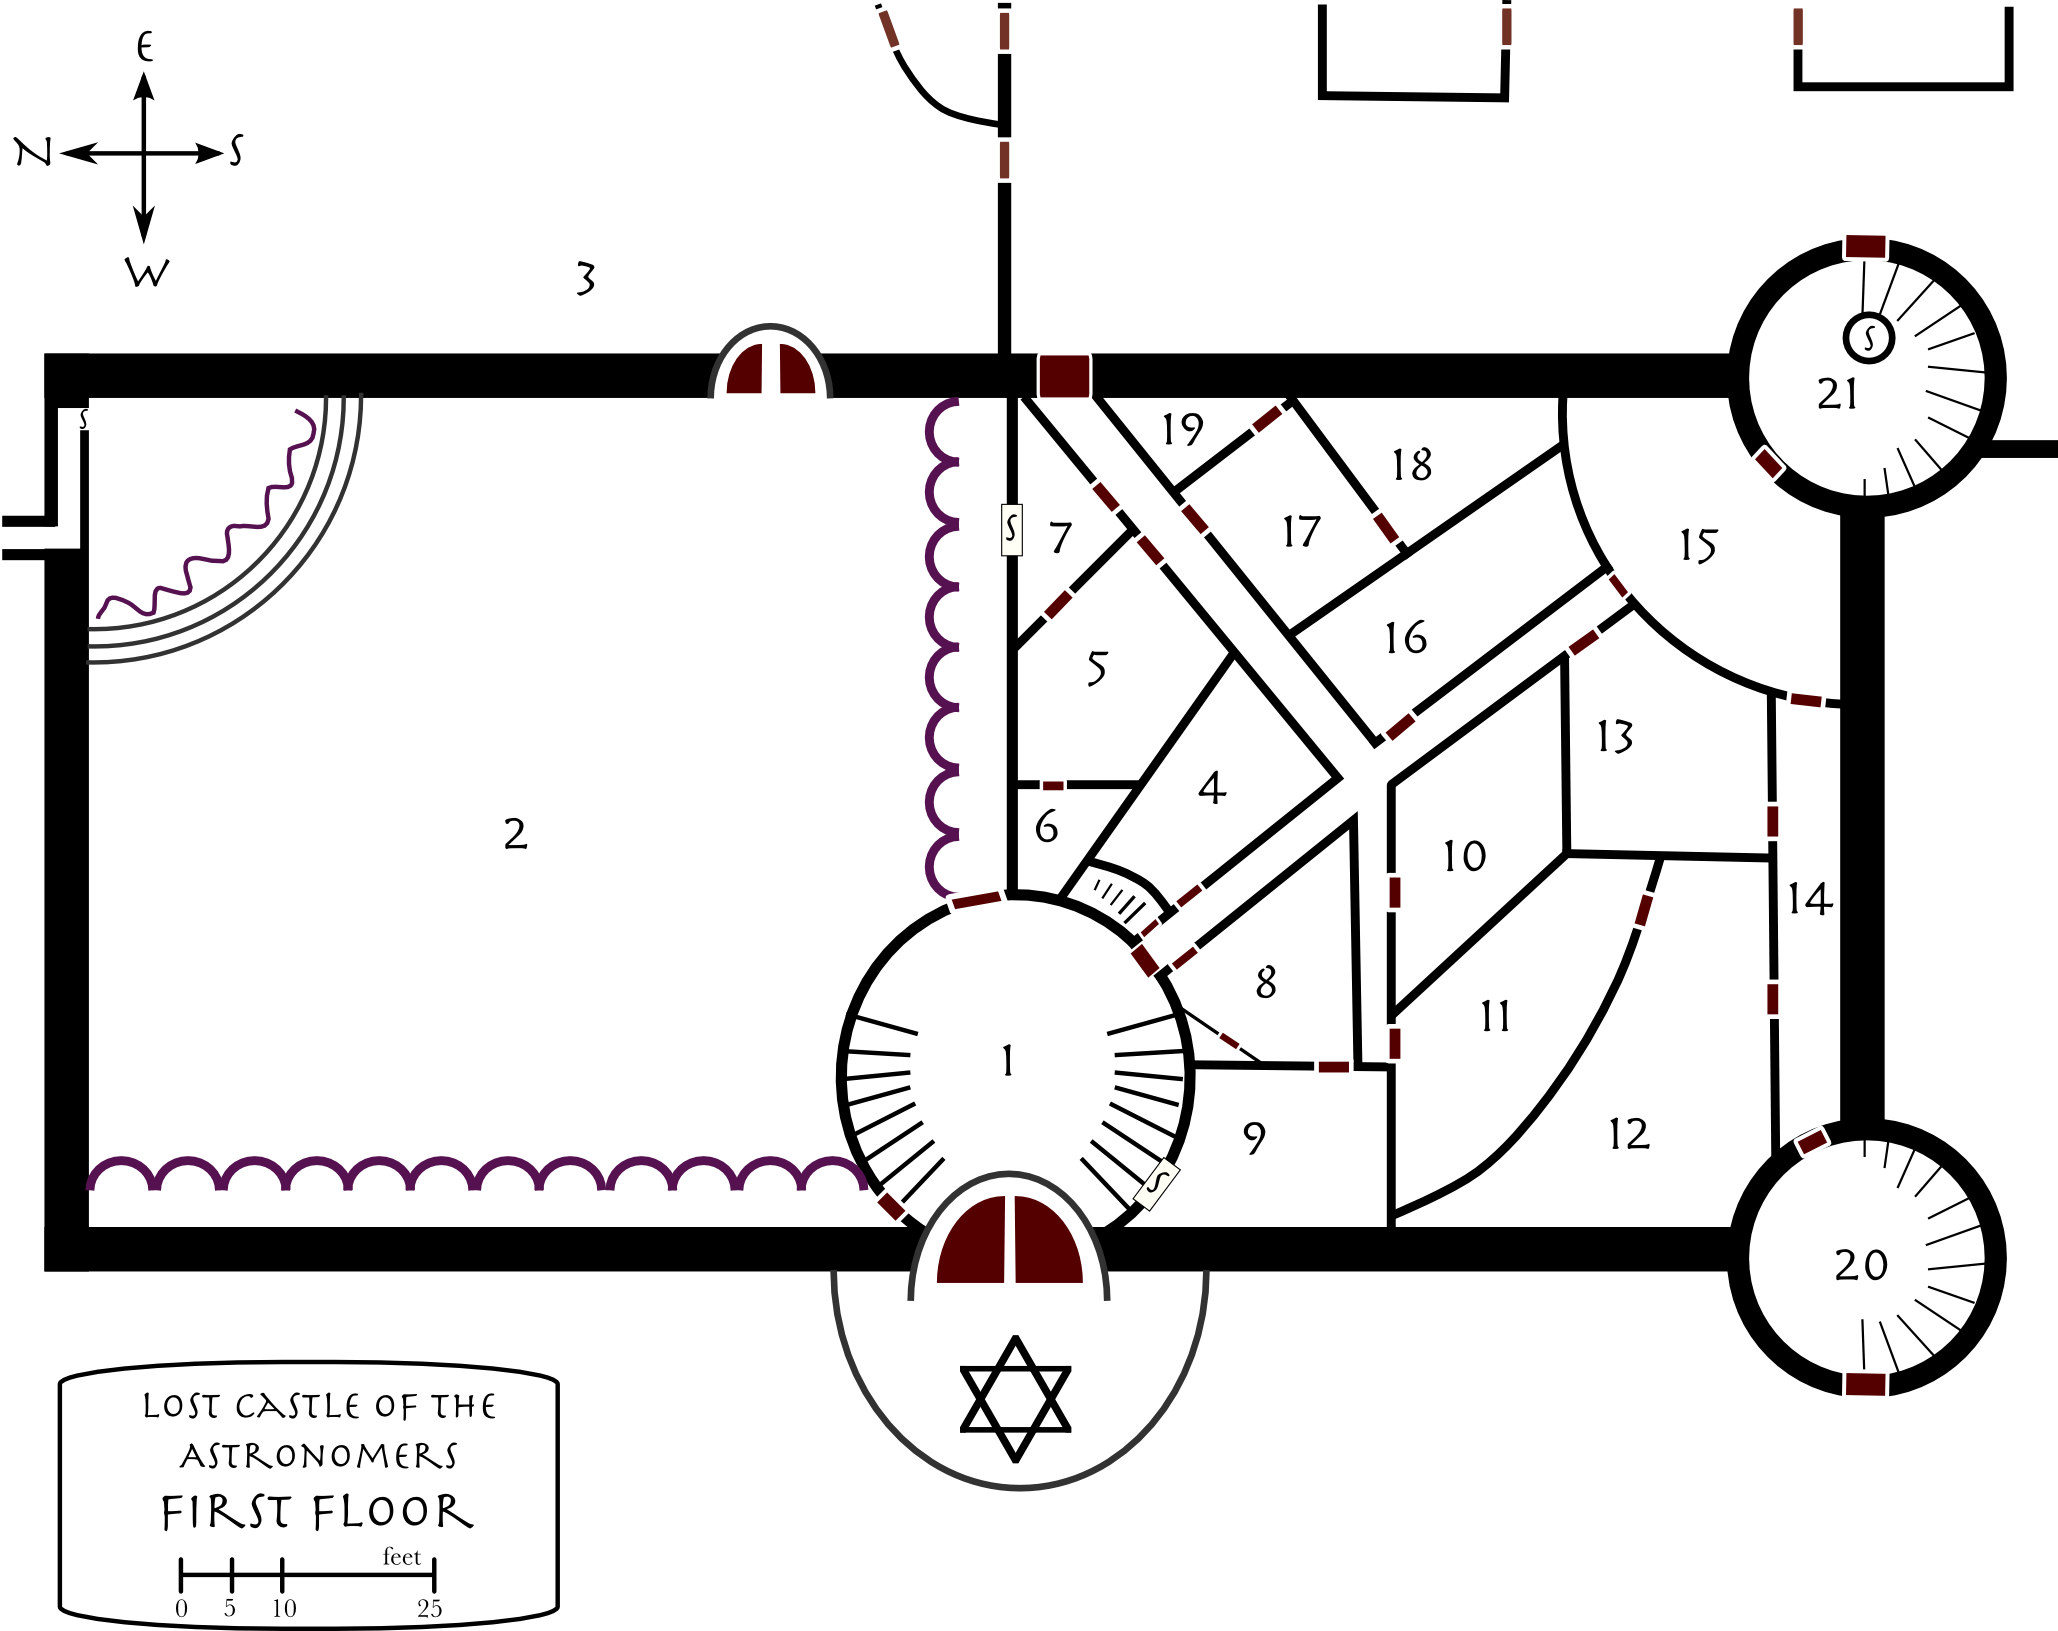
The forest ends at a clearing and within the clearing a castle sits on a slight rise, four tall towers girding it, low outer walls surrounding it. The outer walls are of granite stones, the inner walls and inner tower of smaller stones. A golden dome rises from the north side of the castle, and in the center an arch of white marble encloses a great golden timepiece covered in arcane symbols, moon phases, and Roman numerals.
The timepiece reads not only the correct time, but also the correct zodiac symbol (the “arcane symbols” on the clock) and phase of the moon. The clock has three hands, one for the hour, one for the zodiac, and one for the moon. Since, for these astronomers, the actual positions of the stars was important, the zodiac dates will appear to be wrong: they do not follow the Ancient dates, but rather follow the current dates. Each astrological month begins approximately:
1. Aquarius: February 17
2. Pisces: March 12
3. Aries: April 18
4. Taurus: May 14
5. Gemini: June 21
6. Cancer: July 20
7. Leo: August 10
8. Virgo: September 16
9. Libra: October 31
10. Scorpio: November 23
11. Sagittarius: December 18
12. Capricorn: January 20
The moon hand points to the new moon at “12” and the full moon at “6”. The hours run from 12 at the top to 1 through 12 again, with 6 at the bottom. However, the hours do not run steadily. In the morning, ‘6’ is always sunrise, and in the evening, ‘6’ is always sunset. True midnight and true noon always occur at ‘12’. It is likely that the moon hand points now to the full moon, at 6. The moon hand is mid-sized; the astrological hand smallest, and the sun’s hand longest. The astrological hand is likely in Virgo, coming close to Libra.
Characters with architecture, engineering, or other skills that might let them assess the quality of the castle will see it as a fairly standard piece of work. Some design ideas were seriously flawed (the walls of the inner bailey would not normally be so close to the walls of the outer bailey). The castle’s design was enough to fend off normal attacks by orcs and goblins, and keep out wildlife, but probably contributed to its fall when met with a more determined effort. Given the size of the attacking army, however, it isn’t clear how successful a better design would have been.
The clock and the dungeon are, to characters with the skill to see it, clearly of far better quality than the rest of the castle. To those who can recognize it, both are of Dwarven workmanship.
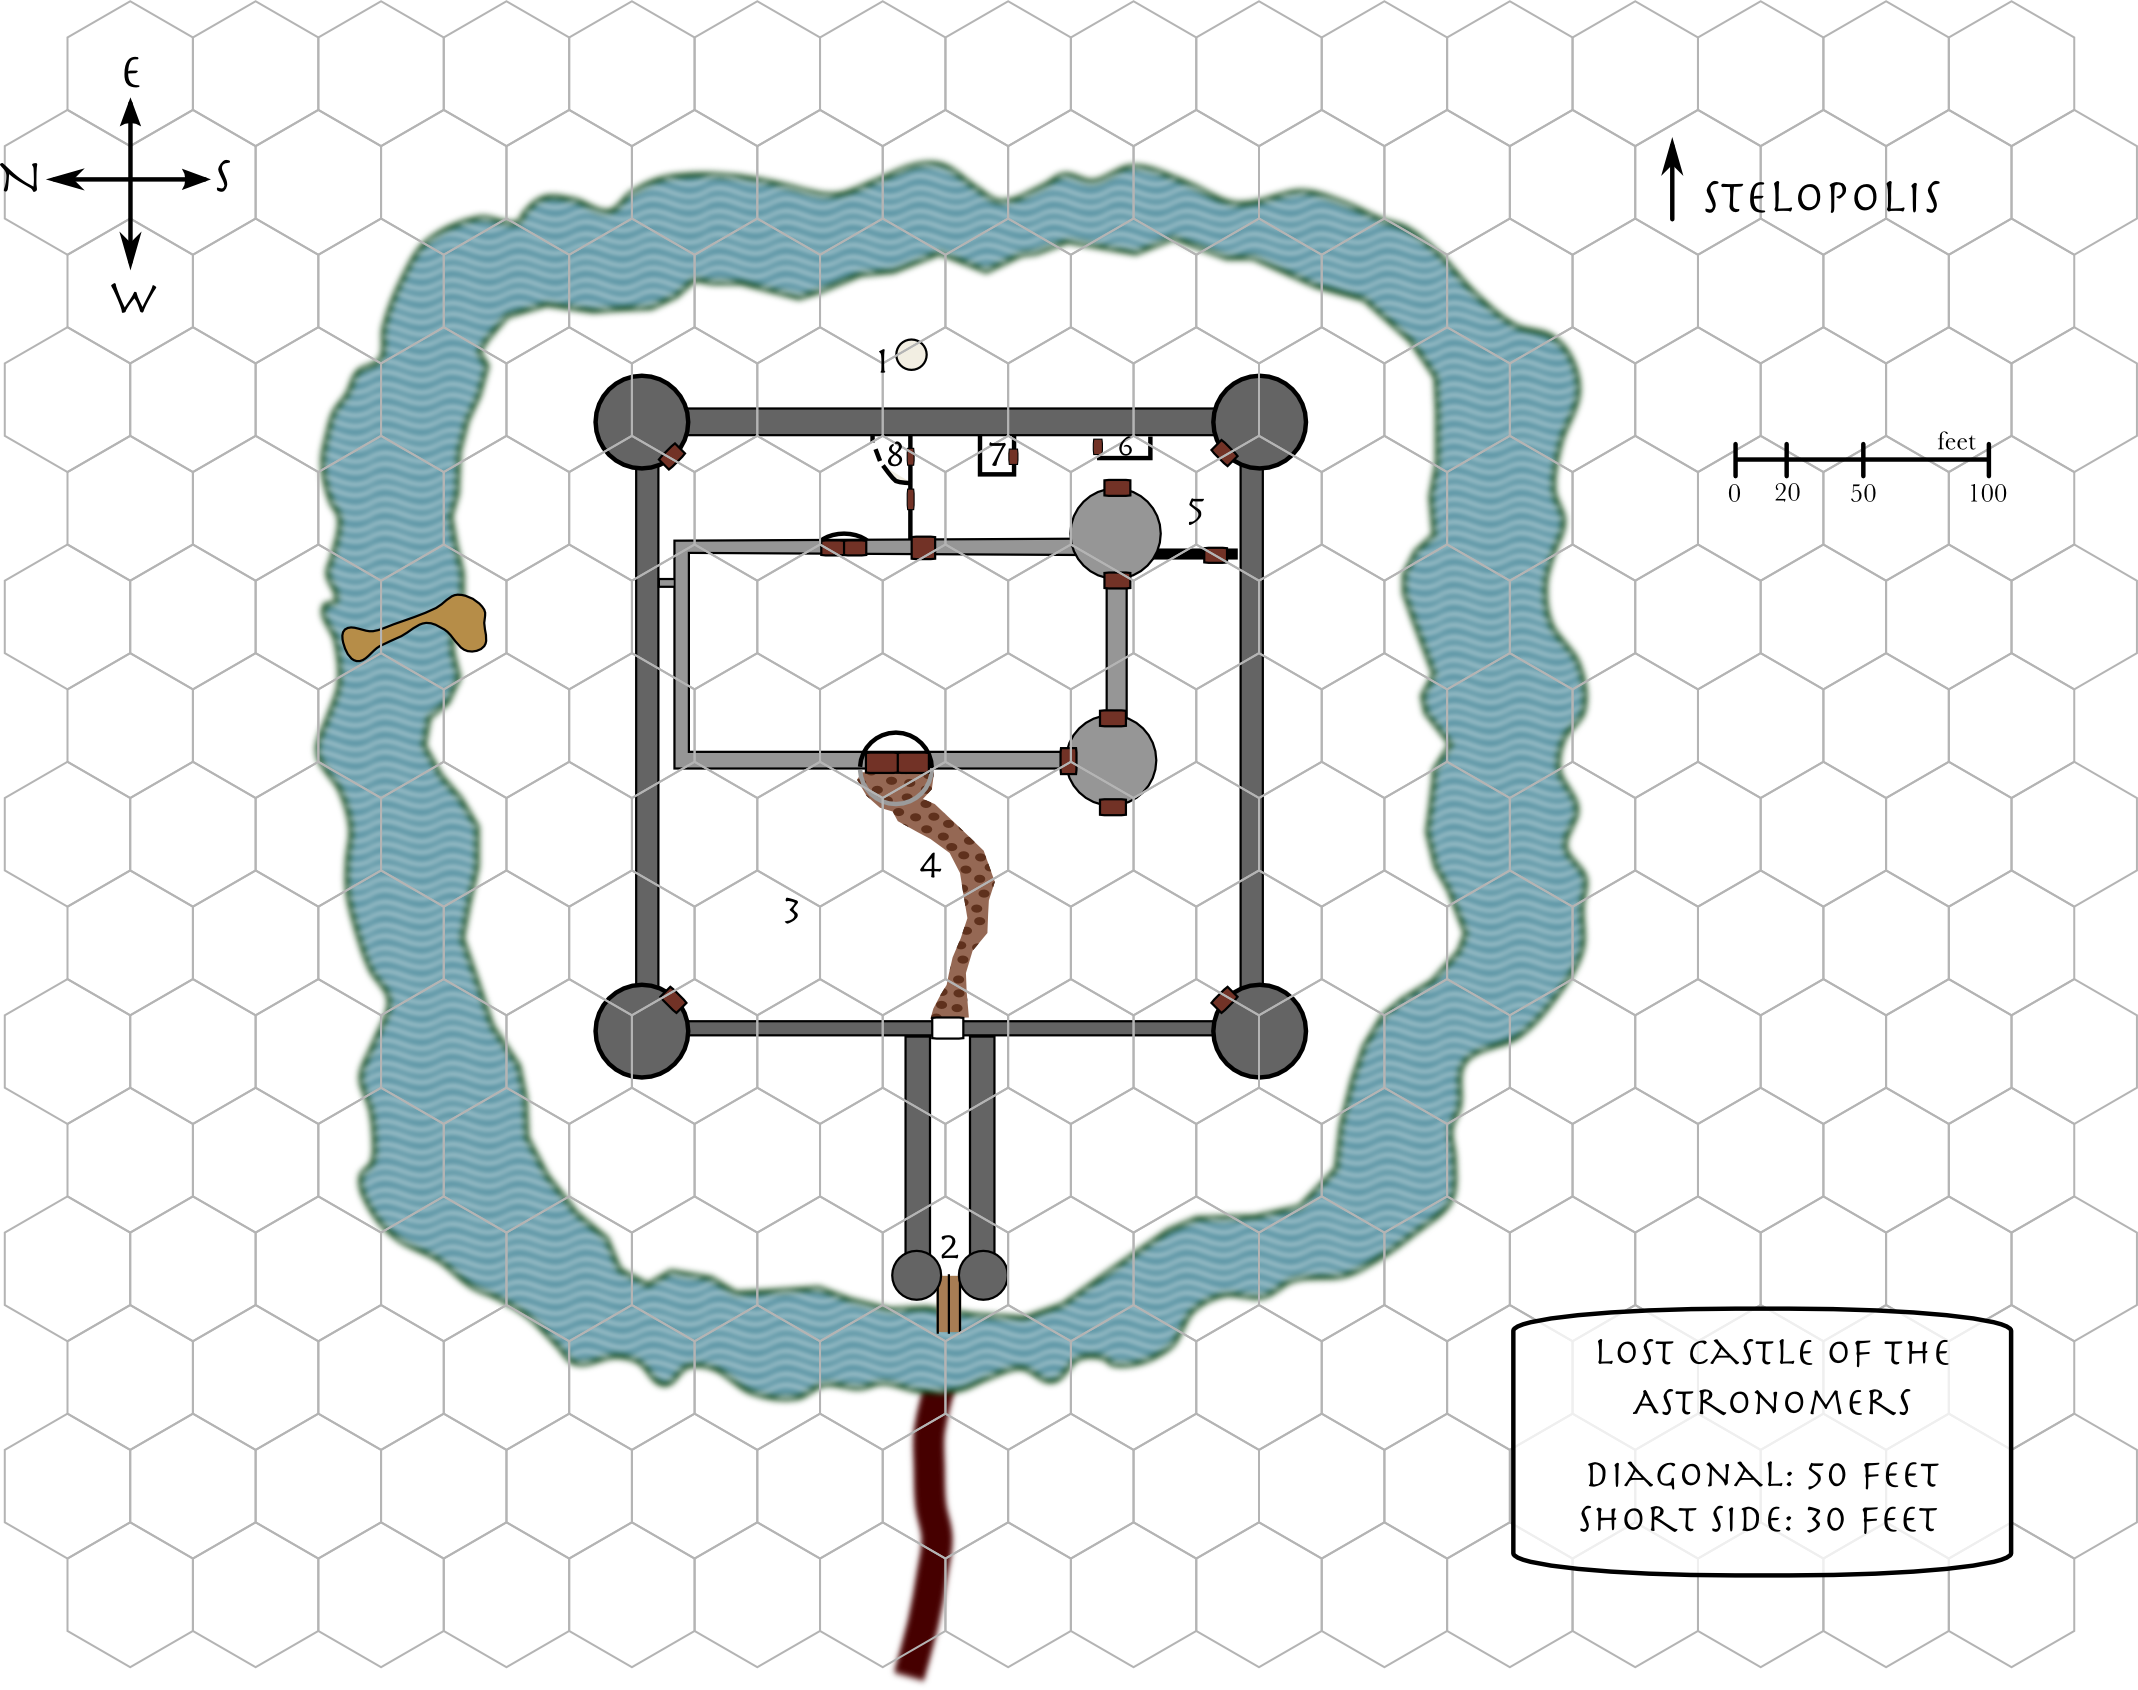
A sickly, murky, moss-covered moat surrounds the castle. The moat is filled with the detritus of battle. Skeletons of man and goblin share a watery open grave. The trees across the moat stand stark and empty in the sunlight, their orange, red, and yellow leaves scattered across the yellowish grass on the lightly rolling hill that leads up to the castle.
The moat is generally about forty feet wide, and is as much as sixty feet wide in some places. The drawbridge is down, but it is also broken. Only a few feet extend over the water from the castle. The grass on the castle side of the moat is yellow, the trees smaller and slightly more gnarled and twisted than their taller cousins in the forest. None of them hold their leaves, which are scattered loosely about the ground in red, orange, and yellow, leaving the trees stark and sharp.
On the north side of the moat, a war engine lies on its side mostly crossing the moat. The goblin mage’s army attempted to get it across and up to the castle, but failed. Here, also, skeletons of man and goblin lie about the brackish water. Any character trying to cross the moat by clambering across the war engine will need to make an Evasion roll or slip and fall.
The chance for an encounter here is 10% per day and per night, although if the skeletons have been activated none of the normal animals will stick around.
| 01-30 | Large Spiders (1d3) | 30% |
| 31-57 | Giant Rats (1d20) | 27% |
| 58-72 | Huge Spider (1) | 15% |
| 73-84 | Copperheads (1d6) | 12% |
| 85-94 | Timber Snakes (1d4) | 10% |
| 95-97 | Borogoves (4, level 2 room 3) | 3% |
| 98-99 | Pink Horror (level 1 room 8) | 2% |
| 00 | Deep Forest encounter | 1% |
Copperheads and timber snakes are standard poisonous snakes. The borogoves travel together, and if killed will not appear again—there are only four in the entire area. See level 2, room 3 (the East Overlook) for more information about them.
The battlement is dotted with skeletons, mostly human and a few goblin. The human skeletons are in rusted chain and crackled leather, some bony hands still clutching their decayed swords and spears.
Looking out through the embrasures you feel some of the pride that the defenders must have felt, overlooking the moat filled mostly with goblin skeletons and looking out over the vast forest outside of the walls. This was a heroic battle, and you held your own against wave after wave of evil creatures from the forest.
Inside the walls, you see the path leading up to the huge arched doors of the stone castle, the great dome over the north half of the castle, and the great three-handed clock above the arched doors. The largest of the hands has moved since you last looked.
The outer walls are four yards tall and four feet wide, with crenellated sides and a walkway on the top. Doors, still open, lead into the second story of each of the towers from the battlements. Skeletons of both man and goblin lie in jumbles outside the walls where they fell in battle. There are also skeletons in the battlements, although fewer, and mostly human (any goblins killed were thrown over the side, until the very end).
Searching the dead humans of the outer walls will yield another d20 zodiac coins, up to a maximum of 23.
Searching the dead humans and bedrolls of the outer towers will yield d6 zodiac coins per tower floor, up to a maximum of 7 (NW), 9 (SW), 7 (SE), and 10 (NE). Only the third floor has windows, although the second has arrow slits. Each floor has only a few skeletons (the third floor none). Most of the soldiers left the towers to engage the goblins in battle.
Open doors facing the inner courtyard enter onto the first floor; each floor has only one circular room. The stairs circle upward at the walls. There are no doors between floors, just the stairs.
The windowless room is dark except for a small amount of light that trickles in from above the stairs. A few skeletons, human and goblin, lie scattered about the floor, their swords and spears strewn about them.
The stairs circle up to the second floor, where:
Light spills down from the stairs above, casting deep shadows around the room. There are four arrows on the floor as you walk in, and a skeleton, a cracked bow by its side, on the far end near an arrow slit, which also lets in a little dusty light. A few swords and spears are hanging on the walls, and some shields lie scattered beneath them.
The shields were once hanging along with the swords and spears, but their straps cracked over time and they fell. There are spears that have fallen among them. At most one to two of the weapons are in any serviceable condition, and they’ll require restoration before they can be used.
Each second floor has at least one dead archer where he was killed at his post by a goblin. Not all of them fired at their attackers; some dropped their bow and went for their sword.
The stairs circle up to the third floor:
Sunlight streams down dusty shafts to illuminate tattered bedrolls, dirty chamber pots, and old plates and other tools. Some of the bedrolls are torn, as if they’ve been used as a nest. A small stringed instrument lies on the floor, faded and covered in dust.
The third floor of each of the outer towers contain bedrolls and chamber pots, none of them special. The musical instrument’s strings have snapped, the instrument itself is cracked. Only use the instrument description once, for the first tower they enter. Feel free to replace it or add to it in other towers with other ways soldiers might pass their time: dice, whistles, playing cards.
A great bearded man in a flowing robe holds his staff out horizontally over the sloping hill at the rear of the castle’s outer walls. The statue’s detail is intricate; you can almost see the shadows of wrinkles on the old man’s face move as the sun drifts across the sky. His gnarled staff looks like the wood it is modeled after. The statue has a presence of power and wisdom.
This statue is also the exit from the dungeon’s Capricorn (crypt) room. It is generally un-openable from this end. The secret exit was kept secret from the rank and file, so they did not use it to escape the dungeon. See the Capricorn room for more information about this exit. The statue is dwarf-make, and very high quality. It has a bulk of five hundred.
The long, thickly walled hall from the drawbridge to the inner courtyard is filled with broken beams from the ceiling. The ceiling has nearly completely caved in, as have the two small stone towers flanking the drawbridge. More goblin skeletons and human skeletons carpet the floor of the entranceway. The two wooden doors at the far end of the hall are busted through, showing a glimpse of the paved walkway of the inner courtyard.
There are also signs of fire on the upper parts of the ceiling remnants.
Dead warriors and goblins lie scattered about the grounds and atop the beautiful, white marble pathway which curves to the terrace and huge arched doorway of the castle proper. In the still silence you hear a faint ticking coming from the clock above the archway. A stylized image of the sun is on the right door, and of a waning moon on the left. The images are faded and faint.
From here, the only obvious entrance (besides the various windows) are the main arched doors and the smaller door in the southwest tower.
The path and terrace are made of marble tiles, white with red veins. Grass pokes up between the marble tiles of the path and terrace. In some places the tiles have cracked and sunk down. In others, they’ve been forced up as small trees try to grow through. In the center of the terrace, inlaid with white marble, is a circle enclosing a six-pointed star. Two huge doors on the front wall beneath the dome are closed, a faded moon painted on the left door, and a faded sun painted in gold on the right.
The marble terrace is up three steps from the marble path, about two feet. The vertical tiles that were on the sides of the raised terrace have mostly fallen over. Intact tiles have a bulk of two each and would be worth about five shillings each in Crosspoint. There are one hundred and thirteen intact tiles.
A decorative rock wall once ran from the southeast tower to the south wall, near the rear of the castle. Now the collapsed wall stands only as a reminder that nothing of man survives forever. Double doors, six feet wide and bound in iron, still stand in their doorways, open, allowing entrance to the rear yard.
The back yard contains two smaller buildings, and a rear entrance to the castle. The inner and outer towers have entrances at ground level. Arrow slits open to the courtyard (and to the outside of the outer walls, of course). The buildings back here all have sloping roofs that slope to the south. The door to the garden shed is closed. The others are all open. The rear door of the castle is also open. The door to the garbage shed is seven feet wide, like a small barn door.
At the north end of the rear yard a decorative rock wall, still standing, runs from the castle’s rear entrance to the rear wall. A door of cast iron and brass meshwork stands partially open. A less ornate wooden door on the east side of the wall, adjacent to the outer wall of the castle, is still closed.
The metal is woven into a scene of a man walking among the stars, with the black of the cast iron and the brass forming the contrasting colors. It creaks, loudly, if they open it further, which they’ll have to do to go into the garden from here. The wall is eight feet tall. The garden is described in room three of the first floor.
A dry grainy smell permeates this six yard wide, two yard deep, building. Carts are filled with mounds of grey and brown things. Light streams in from small holes in the ceiling, silhouetting a dark child-like form emerging from one of the mounds.
Garbage was stored here before being hauled away. It contains horse carts filled with now-dried garbage. The holes are from goblins who jumped down onto the roof from the battlements. At least one goblin remains stuck in the garbage where it died. It is now a skeleton, the “dark, child-like form” that they see illuminated. It is just an inanimate skeleton.
A huge chimney looms over the sloping roof of this square building. Through the open doors, you see a mess of metal and bone.
Inside, a huge oven dominates the north wall. Kitchen utensils, knives, pots, and pans, are strewn about the floor, rusted, amid three human skeletons.
The pots and pans were thrown down by the goblins. While a few of the utensils were taken by goblins as souvenirs, most lie rusted in the dirt floor. The three Astronomer skeletons are unarmored, but armed with large kitchen knives. Two are male, one is female.
The door is stuck against the door jam, and opens only with effort. Inside the six or seven yard arched room are old wheelbarrows, cans, axes, and other gardening tools. Everything is covered in dust and cobwebs. Even the cobwebs are long abandoned.
See the first level, room 3, for a description of the garden. The shed contains implements for gardening: old axes, cans, wheelbarrows, and other tools for maintaining a castle courtyard and the castle itself, scissors, rakes, pots, watering cans, decorative rocks, and extra lamps, statues, and oil. The oil is now gone, but the statues, could they be hauled away, would be worth as much as the statues in the garden itself. The items are arranged neatly. In one corner are two highly decorated chamber pots. One is decorated with the signs for Leo and Sagittarius and is gold-inlaid, the other with the signs for Aquarius and Pisces and is silver-inlaid. The former is worth 15 pounds, the latter 10 pounds.
 This shed has a door on both ends: the wild garden (first level, room 3) and the back yard (outside, area 5).
The chance for an encounter within the downstairs area of the castle is 10% every six hours, although if the skeletons have been activated it is unlikely that other creatures will come out of hiding. There are cobwebs and dust everywhere. Most of the doors are easy to open; some are marked as hard to open, due to shifting (the door to the dungeon stairs, for example).
| 01-38 | Large Spiders (1d3) | 38% |
| 39-65 | Huge Spider (1) | 27% |
| 66-78 | Giant Rats (1d20) | 13% |
| 79-88 | Mice (1d20) | 10% |
| 89-95 | Strange Noises | 7% |
| 96-98 | Borogoves (4) | 3% |
| 99 | Pink Horror (room 8) | 1% |
| 00 | Deep Forest encounter | 1% |
See room three of the second floor for information about the borogoves.
Unless otherwise mentioned in the room description, doors down the hallway are open. The goblins did not close the place up neatly behind them when they left.
The doors creak open and you find yourself gazing into a wide, long, circular hall. Great stairs lead up on both sides. Cobwebs and dust fill the space beneath them. Above you, the domed ceiling is covered in gold and silver constellations. The walls are covered in repeating knotwork.
There are no skeletons within the entrance. At night, if there is a bright moon (half full or greater), the domed ceiling will shine with stars: the 333 brightest stars are set as holes in the ceiling, so tiny that they are only visible when they shine. They match the stars on May 15, the anniversary of the christening of the castle.
The doors on the east (to room 2) are slightly stuck. A strength roll at a bonus of 2 is required to open them. Those doors, and the similar doors on the north, are small double doors intricately carved with interlocking circles, bands, and curves, with some bands ending in serpent’s heads, and some circles enclosing many-pointed stars. Tarnished green silver inlay decorates the engravings.
There is a secret door in the shadow of the stairs to the south, leading to the conference room (9). The edges of the door are at the knotwork, and both the wall and the door are wood and paneled.
A richly embroidered cloth, once dark blue and covered in golden stars, lies crumpled beneath the marble archways leading down a long hallway. The huge ballroom beyond the arches is filled with marble columns and dead bodies. The sun shines through tinted glass in the ceiling filling the room with shafts of dusty, varicolored light. Cobwebs arch between the columns and the floor.
There is a 5% chance of encountering the borogoves from level 2, room 3, here.
On the south and west sides of the ballroom are long corridors, with a stone wall on one side and a wall of marble arches on the other, leading into the ballroom’s main area. The white marble is covered with dust and cobwebs. Silverfish will scatter from the cloth if anyone pokes at it; the cloth was once curtains.
There were also bead curtains in every other arch, and tiny beads lie scattered about the floor. The string has long since rotted away. The tiny beads are worth about a shilling for twenty, they have a bulk of 1 per 100 beads, and there are about 1,200 of them. Gathering them up takes about five minutes per twenty, or half an hour for a hundred.
The stone walls are covered in painted engravings of biblical scenes, from both the Old Testament and the New. The wedding at Cana is there, as is the crucifixion and Jesus’ ascension into the heavens. A good part of the wall is given over to the Israelites’ flight out of Egypt.
The columns are made of white marble with dark veins. Around the columns are twenty-seven human skeletons, and three goblin skeletons (although they’ll have to look hard to find them).
At the far corner of the room is a dais of black stone, and on the stone are three elaborate white marble chairs. One skeleton lies half draped over the largest, middle throne, dead where it fell. Parts of it are on the floor along with its rusted sword.
The two great arched oaken doors on the east wall are partially opened, and dirt, grass, and weeds grow in from the outside.
The secret door in the northeast corner is made to look like a historical panel. Three panels behind the thrones describe, in pictures, the founding of the order, the trip across the mountains, and the building of the castle. The rightmost panel, the building of the castle, is the secret door. It leads through a thin corridor, through the stone wall that connects with the outer wall, to a secret door on the outside. The secret door on the outside can only be opened from in the hallway. This is an exit only; it would be very difficult to enter the castle through this secret door.
The three panels are designed with hidden images of astrological signs. For example, a wine goblet is clearly (once seen) the sign for Pisces. The panels, if removed without damaging them, will be worth 50 to 200 shillings in Crosspoint, depending on the buyer.
The secret door in the south wall leads to the Lieutenant’s quarters (7). The sides of the door are designed to coincide with the engravings. However, the door is wood and the wall is stone, so attempts to find it are at a bonus of 2.
In this wildly overgrown garden, bright purple flowers flow from vines hanging from trees. The trees, weighed down by the vines, droop purple and yellow trumpets toward the ground. Wrought-iron posts, ten feet tall, themselves covered in vines and weeds and shaped like tall writhing serpents, hold sparkling crystal birds shaped as if they were swooping into the garden.
The posts will not hold a person easily, because they weren’t designed for holding much weight. Leaning on them is okay; climbing will require steadying. There are twelve posts with five crystal birds. The birds are hollow, and cover the candle holder at the top of the posts. The candles are mostly burned down. The birds are worth an easy 60 pounds in Crosspoint, but will break easily. Their bulk is 10 each. There are two robins, a hummingbird, a falcon, and an owl.
See the outside area for a description of the tool shed in the back, and the outside gate.
There are two poisonous coppersnakes here. They’ll be sleeping during the day during late spring, summer, and early fall or during the night in late fall, winter, and early spring. Otherwise, they’ll be here 20% of the time. They are 50% likely to attack any creatures within the garden, and 75% if disturbed while sleeping. The snakes are three and a half to four feet long, thick, with lightly pink-tinged scales, and bold chestnut crossbands allowing them to blend easily into fallen leaves.
2 copperheads (Animal: ¼; Survival: 1,2; Move: 12; Attacks: 1; Defense: +2; Damage: 1; Poison: one round action time, d2 injuries)
Musty air greets you as you force the wooden doors open. The stairs lead downward and curve slightly to the left. Large, grey stones inset into a white mortar provide a dappled look to the stairs. The stair design is pleasing to the eyes as well as functional.
The oaken door at the top of the stairs is stuck, though not heavily so. A strength roll at +2 will open it. The door at the bottom of the stairs is barred, from both sides. The bar on this side is easy enough to remove, but the bar on the other side is more difficult. It will require a thief’s locks & traps roll at a bonus of 3, or a strength roll at a penalty of 3.
The air here is musty, slightly cooler as they descend. The workmanship here is different from the rest of the castle.
Small maple desks line the walls, each with a single drawer and an inkpot in the far left corner. A few of the desks have little gewgaws of wooden rods and balls. Many ledgers are open on the tables, and some lie scattered about the floor.
The wooden gewgaws are abaci. An engineer or mathematician will recognize them. Three of them are still serviceable and if they can be returned intact will be worth three shillings in Crosspoint. The ledgers are filled with astrological symbols and numbers. These are for calculating when various stars rise and set, and their locations. Some of that information might also be worth something to the right person, if the numbers can be deciphered from the tattered paper.
A single desk with inkpot and quill faces you as you walk into this room. A chair lies on its back behind the desk. A small, round table in the rear of the room has two benches on either side of it. A ledger lies on the desk. A door hangs open around the corner.
One of the ledgers is a list of stars and orders for their calculations. Another lists texts which need to be copied. This office was the “command center” for the other offices and copy rooms, and is connected to the Lieutenant’s Quarters (7).
Wooden boxes, filled with paper, line the floors. Bookshelves line the walls, strewn with folios and string-bound stacks of paper. The room is cramped and musty. The movement of the door sends dust flying into the air.
You can use these records as clues to other adventures you’d like the characters to discover. While important contracts and spells will be stored in the dungeon level, records of things bought, sold, and bartered will be here.
Because this is above ground, these records are in much worse shape than the ones in the dungeon. This will allow you to maximize the mystery and flexibility of your adventure clues.
An unmade bed, torn as if it were a nest of animals, sits wedged in the east corner. A small bureau is wedged in the opposite corner, next to an open door to another room. A candle holder stands on the bureau, and a torch sconce is on the north wall.
The bed was once a nest for mice, but even they’ve left now. The candle has burnt down and is covered in dust. It was burning when the lieutenant left to fight the goblins. There is a hidden door on the north wall leading to the Royal Ballroom (2). The door is not difficult to see on this side, and Perception rolls searching are at a bonus of 4. The torch sconce turns down to open a small hole that allows viewing into the ballroom area. Pulling out on it opens the door. The hinges of the door, on this side, are hidden as part of a set of hooks for hanging weapons.
The bureau contains ratty old uniforms (some of which bear a Pisces symbol), clothing (dating from about a hundred and fifty years ago), notebooks, and two small sacks of money; the sacks were once designed for hanging from a belt. One sack contains ten silver zodiac coins and one gold zodiac coin. The other sack contains 19 Crosspoint shillings from a hundred years ago.
The notebooks contain notes about his campaigns, as well as maps, and can provide clues to the goblins in the area, as well as any nearby adventure. Lieutenant Courlander also accompanied a delegation to the Dwarves once, and notes about that are in the books. The last entry mentions an argument with “Captain Cambel” about what to do if the “rumors of orcs is true”. Cambel wants to “take the field and wipe them up as we always do. Parthane agrees.” Courlander thinks “we ought to hole up. This time different. Should send courier north. Still technically at peace with Illustrators.”
An unmade bed looks like it was a nest at one time. The room smells of old socks mixed with the tang of a departed thunderstorm. A portrait of an elderly officer hangs on the west wall. A small door on the right wall is closed, as is an ornate wooden door on the far wall. Small animal skeletons lie in the corners of the room.
The pink horror has learned to use its sucker pods to close the door, and generally does so. The door is closed 50% of the time.
Pink Horror (Fantastic: 1+1, Survival 4, Move: 15/8, Defense: 4, Attack: claw/claw, Damage: d8/d8, Special Defense: Immune to acid and fire; Special Attack: Bite called shot three times a day for d4 and paralysis with an action time of 2 rounds; Lair: 50%)
The pink horror has been weakened by its absence from the mist. It moves slower, is easier to hit, and its poison is penalized by 2. (And if the pink horror has been encountered wandering through the castle, and killed, it won’t be here.) If the pink horror is not here, there is a 1 in 10 chance of it arriving every thirty minutes.
The Captain’s walk-in closet holds his uniforms (some of which bear the Capricorn symbol), clothing, and some weapons, including his ceremonial saber. While rusted, it’s basically never been used and is still in decent shape. It should fetch thirty shillings. The key for dungeon room Pisces is in the pocket of one of the shirts that has fallen to the floor. The key is brass and shaped like the Pisces symbol.
A long, square wooden table fills the room. A brightly colored map is painted on the north wall. Five large ceramic drinking cups stand on the table, and in the corner of the room a barrel stands on a small brick outcropping.
This was once the main conference room for planning military escapades, until the Dwarves built the dungeon area and the Taurus room. The barrel was regularly filled with beer, and the cups were used to drink the beer. The map is covered with dust, but maps out a wide area of Highland, from Crosspoint Bay in the east to Black Stag in the west, and deep down in the forest to the south, up to hundreds of miles north of the Leather Road. Orders, including the Illustrators and the Astronomers, are marked along the mountains with crosses. The orders are not titled, however. Anyone who knows where Illustrious Castle is should recognize its location, otherwise they’ll probably think it marks Biblyon.
Behind the map is a secret door to the Grand Entrance (1). It opens beneath the stairs that lead up to the second level. The door pops slightly open by pressing in on the cross marking Kristagna’s location.
Inkpots, quills, and papers lie strewn about the shelves that line the walls. Stools sit before the shelves.
Among the books and papers being copied are an apocryphal bible (no known bibles have survived the cataclysm, all bibles are apocryphal, and usually based on a founder’s teachings) and some papers on astronomy, astrology, and mathematics.
Warped spears, pikes, and masses of arrows line the walls in barrels.
Few of the weapons are salvageable. The wood is too far gone. Also, because the castle guard had need of the weapons, many have been taken away and are with the skeleton of their last user. Some were also taken as souvenirs by the goblins. If the characters spend time searching for useable weapons, they can find up to five spears, three pikes, and thirty-five arrows.
Bedrolls, blankets, and cushions sit on a low shelf against the walls. Boxes, bags, books, and other items lie on the floor, mostly stuffed beneath the shelf. Three small tables, with a few books and candle holders, are spaced about the center of the room.
There are three zodiac coins on one table, and a board that looks like a chessboard with some coins on it. The members of the Order played a variation of checkers that used the twelve zodiac coins. When a coin was “taken”, it was kept by the taker. A game was in progress when the goblins attacked. There are seven pieces on the board now, three at heads and four at tails.
The books are prayer-books, astronomical study guides, and collections of military aphorisms. None are in readable shape.
Wooden shelves line the walls, with blankets or rugs piled on most of them. One is lined with books and papers. A table is on its side in the center of the room. You see a skeletal hand reaching out from around the table, holding a piece of metal.
Goblins ransacked this room. There are four human skeletons; they wore simple leather armor and used short swords. One used a crossbow, but the goblins scavenged it. The metal that the skeleton is holding is the key to his crossbow crank.
The books and papers are heavily degraded. They are mostly ‘homework’ and special projects that the students were working on. One appears to be calculations on a ‘periodic’ comet—as if the comet could repeat itself over hundreds of years on a regular basis. Another is calculating the stress on the arched ceiling over the ballroom. There appear to be some problems with his math; he’s trying to get it to allow the ceiling to stand up.
This long thin corridor leads from one tower to the other. One skeleton’s bones are in a pile against the wall down the hall a ways. Light shines through the narrow slits along the south wall.
The bones were piled up as part of a nest by a long-gone rat.
The door to the Last Stand (room 15) is spiked shut from room 15.
The door is open, and was clearly forced long ago. Skeletons lie in piles to the left and right, intermingled with their swords and armor. A door opens into the southeast tower.
There are three goblin skeletons here.
The door to the corridor (14) is spiked shut on this side. The door to the main hallway is open, clearly forced open and broken, although it might be possible to temporarily jam it shut with spikes if necessary.
The moment you open the door you are assailed by the musty smell of old and damp paper. Within this wide room books and papers line the walls and old, rotten, red-and-gold-upholstered chairs sit haphazardly throughout the room.
Despite their poor condition, the combined books of all three of these rooms are a level 5 mojo resource for mental spells, and level 4 for general spells. A character could also spend two hours culling through them to build a bulk sixty library that would be a level 2 resource for any one school of magic. One book, carefully chosen, could be a level 5 resource for any single spell.
Titles include copies of Charles Dodgson’s “Wise Words About Magical Research,” “Involuntary Reactions to Imaginary Stimuli,” and “Phantasmal Realities,” Measure’s “Magical Auras and Their Identification,” Lawrence Bisson’s “The Residual Auras of Human Writing,”, Isaiah’s “The Interpretation and Control of Somnambulist States of Being,” and the multiply-authored “Survey of Classical Sorcery in Western Highland” and “The Ring Magic of the Traveling Romans of Great Bend”.
The mossy and musty smell of old paper assaults your senses. Within this square room books and papers line the walls.
Books here include geographies of West Highland, East Highland, and Great Bend; an anonymous “Survey of Possible Geographies of the Holy Roman Empire”; “Spices of the Phoenix, a catalog”; “Gems and Mineral Lodes in the High Divide”; “The Known Heavenly World”; “Planets and Stars, a Comparative Study”; and other works of geography, geology, botany, and astronomy.
More books line the walls of this triangle-shaped back room. Two goblin skeletons, one missing its head, lie on the floor against the small table in the center of the room. The missing head stares back at you with empty sockets from atop the small table.
The goblin’s missing head is on one of the books, where it came to rest after leaving the goblin. Blood is spattered on the books on the table, and they’ve been eaten away pretty well. Close examination of the two books on the table will make it easy to determine that they are studies of another language. A successful Perception roll will indicate that the language was Elvish. The books are far too gone to be of any use, however.
Wide-mouthed jars stand on shelves above a worktable. Books lie open, bound and unbound. Standing off to the side, a metal wheel stands on a stone pylon. An iron bar sticks out of the side of the pylon.
 This tiny room contains library paste, extra bindings in the process of being made, and blank paper and writing materials for the Order. Books need to be rebound every few hundred years.
The room also contains the reset mechanism for the trap in the Gemini room, room 5 of the dungeon level. The wheel resets the trap, and the level controls its functions. The lever has three settings. Pulling it all the way up (the position it is currently in) arms the trap in the Gemini room as normal: the trap will not go off if the key is used to open the door (or if the person picking the lock is lucky enough to disable the trap as well). Pulling it straight out to the middle position arms the trap so that the trap will go off regardless of whether the key is in the lock or was used to open the door. Pulling it all the way down disarms the trap. At each position is a symbol, Dwarven for “on”, “danger”, and “off”. (See handout.)
Stone stairs lead in a circle up the side of the tower toward a trap door in the ceiling. The air is very slightly damp. A pale fungi grows along the ceiling and walls. The door leading outside is partway open.
 The trap door to the upper room is charred slightly around the edges, and blocked with pieces of furniture and spikes. There is a symbol drawn on the door in rouge. To someone who knows spellcraft, the symbol is probably a magical fire symbol of some kind. The symbol is drawn large at five feet out—a bit far for a goblin. It was part of the spell that burned the defenders on the second level of this tower (level 2, Southwest Tower, 11).
The skeletons lie so thick in this tower you need to step carefully if you wish to avoid stepping on them. A trickle of light shines through a cracked and busted trap door above the circular stairs, and more light shines in from the partially open door to the outside.
As in the other towers, the doors between levels are horizontal trap doors, though the trap door to the next higher level is busted open. There are no goblin skeletons here. The warriors were a volunteer guard, guarding the escape route that their friends used to escape the battle. The goblins never found the trap door in the floor; perhaps they never cared. The trap door route leads under the castle walls and up the hills.
One skeleton is lying as if reaching toward something on the floor. Its shattered forehead still holds the arrow that killed it, like a wilting flower in a deranged flower pot.
The secret trap door opens by pressing down on one of the stones. Finding the stone is at a bonus of 2. The door will shift down slightly and may then be pushed further. It will spring back and lock if let go quickly.
It is a thin tunnel, barely four and a half feet wide. Twenty feet into the tunnel is a trap, set off by a plate in the ground. The plate is marked by lines on the wall so that those who know it is there can jump across. Anyone weighing more than 30 pounds stepping on the plate will set it off. The roof will collapse upon them, causing 3d6 points damage; an Evasion roll will reduce this to half damage. The plate for the trap is five feet wide; the tunnel collapses for a thirteen foot length, four feet on either side. Anyone at the edges of the collapse can make an Evasion roll to avoid the collapse completely.
Someone looking for previous tracks might recognize that five people last used this escape route decades ago.
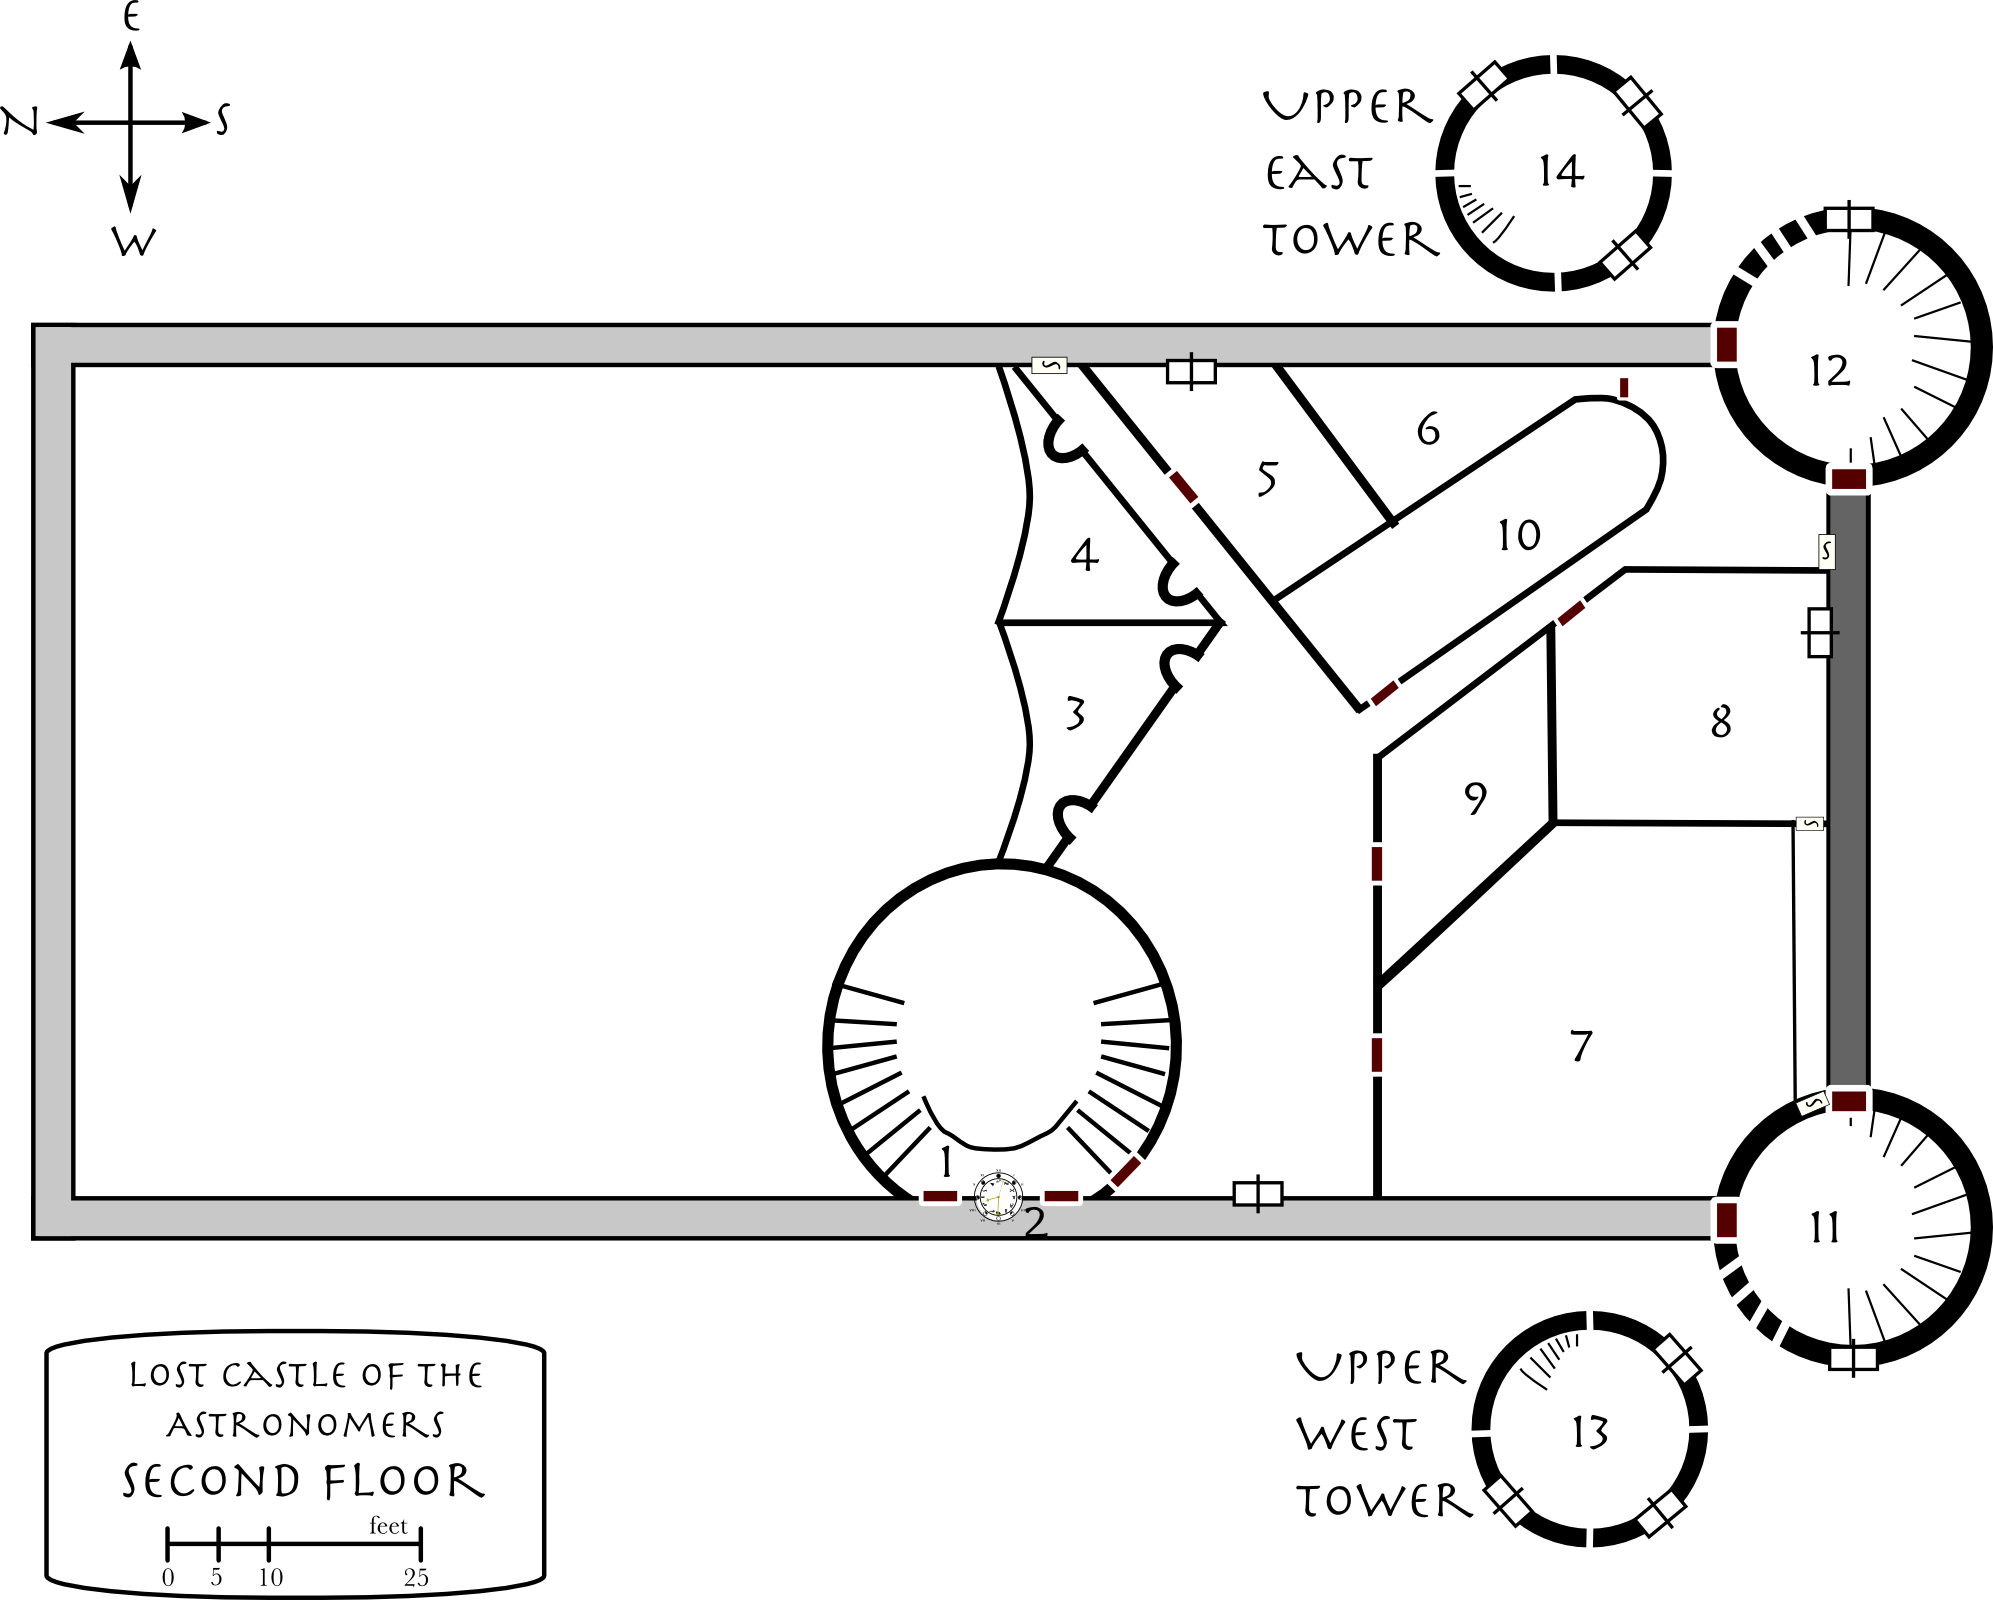
The chance for an encounter within the upstairs area of the castle is 10% every six hours, although if the skeletons have been activated it is unlikely that other creatures will come out of hiding.
| 01-38 | Normal Spiders (1d3) | 38% |
| 39-65 | Large Spiders (1d2) | 27% |
| 66-78 | Lost Bird (1) | 13% |
| 79-88 | Mice (1d20) | 10% |
| 89-95 | Strange Noises | 7% |
| 96-98 | Borogoves (4) | 3% |
| 99 | Pink Horror (level 1 room 8) | 1% |
| 00 | Loose floor | 1% |
In the event of a loose floor, the affected player must make a Perception or Evasion roll to avoid falling 15 feet to the first floor.
For information about the borogoves, see the key for the East Overlook (room 3).
The secret doors at the end of the hallways between rooms 4 and 5 and between rooms 8 and 12 are not very secret, (and were often opened by the original inhabitants). Search at +5 to find them.
From here you can just see across the outer walls and survey the forest for miles. Beyond the desolate courtyard, the trees are thick, some green, some the red and brown of autumn. Far to the southwest a mist rises above the trees. Occasionally you hear the cries of birds and the screams of predators.
Skeletons of the castle’s defenders lie scattered about the battlement. A few of the skeletons are goblins.
The crenellated battlement runs above the first floor and at the same level as the second floor, along the entire edge of the castle. On the north half, the dome of the ballroom rises above the battlement. On the south half, the walls of the second floor rise another twelve feet. The battlement does not extend through the towers: the two towers have doors which open outward.
The tower doors are open. The southwest tower doors are charred at the edges. See the Charred Door, below, for flavor text.
There are human skeletons scattered throughout the battlement, and three goblin skeletons lying on the north side.
There are three windows set five feet above the battlement, and two doors that lead into the main entrance on the first floor. The windows have wooden shutters, once used to close them in inclement weather, that lie on the battlement.
The door to the tower is charred and blackened around the edges, as is the wooden frame set into the stone tower walls. The door itself is slightly opened, and shudders lightly in the breeze that blows across the battlement.
The tower room on this floor was hit with a fire spell that killed everyone in the second floor tower and started a fire that burnt everything inside.
At the top of the stairs, you look over the grand entrance and the curved walls and ceiling. The knotwork is almost hypnotizing, and leads into the ceiling’s constellations so well you can hardly tell where one ends and the other begins. You hear a barely perceptible whirring coming from beyond the wall, interspersed with a slight ticking. Two doors lead west, and one leads south.
The two western doors lead out to the battlement. The southwest door leads to the second floor.
The great marble arch encloses a golden circle. Inside the circle, three hands point at arcane symbols. Some symbols look like ancient reckoning, as are often found on clocks. Others might be moon phases, and others are even stranger.
The “even stranger” symbols are the zodiac (see handout). The face can be pulled outward (although it is about seven feet up) to reveal gears inside. This clock was designed for the long haul. It does not rust; it does not collect dust; dust it does collect is blown off by fans; animals are discouraged with moving blunt pinwheels. The gears gleam as if they were polished yesterday.
It runs by water from below. Water winds the clock, and a long axle reaches up through the castle walls to turn the hands.
Beyond the arched doorway, tapestries hang in tatters from the walls, and lie in heaps on the floors. Tables are tipped over and ceramic jugs and pots lie shattered on the floor. Couches are ripped open. Seeds are scattered about the floor and crannies. A pile of straw lies in the far corner. A wide arched balcony overlooks the great ballroom. Shafts of light break through holes in the ceiling, illuminating the devastation below, the skeletons and columns.
There is no door, just the archway. The pile of straw is a borogove nest. If not yet dead, they are here 50% of the time. They are unlikely to attack, although they are shy and will leave if they hear noise, inflating their tails and floating out over the ballroom and out the back door.
The nest includes bits of gold, silver, and colored thread, three silver zodiac coins, a brass key, and a silk glove. The key is the key to the Gemini room in the dungeon level.
Borogoves (Fantastic: 1-1; Survival 3, 4, 3, 5; Move: 8/4; Defense: 2; Attack: claw/claw/bite; Damage: 1/1/1; Lair: 50%)
Beyond an arched doorway, tapestries lie in ribbons and tatters on the floor. Tables are tipped over; ceramic jugs and pots lie scattered about, and a couch has been turned over and torn apart. A wide arched balcony overlooks the ballroom, where shafts of dusty light illuminate the dead below.
If the borogoves are in room 3, any noise here will likely scare them into leaving; they will then be visible from the balcony.
A gaping hole in the ceiling has given the elements full reign. A flock of birds flutter out the hole as you open the door. Cots are overturned. Boxes, pots, and chests are smashed. All are covered in bird droppings and feathers.
The room was first ransacked, then left to the elements, and finally turned into nests. Searching the room could, on a successful Perception roll, find d3 silver zodiac coins, up to seventeen total.
The ceiling has partially collapsed. Birds flutter away as you open the door. Beneath the feathers, dust, and bird droppings, odd structures poke above the rubble.
The odd structures include smashed starfields painted on wood, including a starfield painted on wood with a shield attached, with a hole in one side; the shield rotates to show only part of the starfield at a time. The edges are marked with astrological symbols (to denote the months). What were once glass spheres within spheres to show planets and stars are now in slivers.
There were also tools for metalworking, woodworking, and measuring, all destroyed or rusted away. Calipers stick out of one bird’s nest. Hammers, wood shaving knives, pliers, all worthless, may be found. Whether or not anything is salvageable is up to you. Anything that is salvageable will take significant work to restore.
Tables and chairs lie overturned about the room. Ragged paper fragments flutter slightly as you push the door further open. The walls are stained a faded blue. Light glows from circular skylights in the ceiling.
The faded blue is from ink, long faded, that the goblins tossed against the walls. The tables were carrels, basically, for studying. Each scholar or pair of scholars would work at a table and store their work there.
Among the papers here are plans for an “astrological laboratory” (an observatory). Only parts of the plans remain, and they were never finished, but a scholar could with years of study recreate the missing work.
There are four skylights. Two have translucent glass covering them; the other two are open, shattered glass lying below them.
Your eyes are drawn immediately to the life-size portrait on the far wall. A man in nearly royal accoutrement stands amidst the stars and moon in a black velvet sky. A tall bed to your right bears a sagging, torn canopy. Beneath the bed appear to be drawers. A bookshelf and writing table stand to your left. A high window overlooks the battlement.
The painting was very important to the last Abbot. It has been enchanted with a permanent indestructibility: +5 to saving rolls. It has barely aged because of this. On the abbot’s left is the constellation Libra. On his right is Leo.
The Abbot’s diary is largely intact. Written in both Ancient and Anglish, depending on what the Abbot felt like, it concerns itself mostly with the bureaucratic aspects of running an order. The last entry, for example, concerns a dispute between Captain Cambel and Lieutenant Courlander. Another recent entry indicates that the harvest was extremely good this year. The diary also contains, about a year previous, the code word for “Abiram’s book case”. (See room 9.)
There is no money here. His clothing (much of which contains the symbol for Leo) is intact enough to be worth 60 shillings and his portrait is worth 80 to 120 shillings depending on tastes. It may be removed from its frame and rolled up to reduce its bulk from 35 to 10. The portrait is by turn-of-the-century South Bend painter Henry l’Autrec, and dates to 1885, the beginning of that painter’s career.
 Behind the painting is a secret door to the southwest tower. If the painting is moved, the door is relatively obvious; rolls to find it are at +5. It opens simply by pushing on it, and then it swings back into place. It does not open from the other side.
The wooden door, closed, is scratched with a circle, with a multitude of crude lines pointing out of the bottom.
A goblin skeleton lies clutching a book on the floor in front of a small, glass-enclosed bookshelf. The glass doors are open, and on the shelf are books and two vases or containers of some kind.
A large decorated pot in the corner of the room is overturned, and drawers beneath a simple mattress have been opened, their contents strewn about the floor.
The door was scratched with a warning to the other goblins looting the castle, to stay away from this room, after one of them tried to take a book from the shelf and was killed by the lightning ward. They fled, leaving the corpse and the room, slamming the door behind them. The symbol represents the sun, a warning symbol to goblins. The goblin skeleton is holding Abiram’s diary.
The ceramic chamber pot is decorated with symbolism relating to the two zodiac signs Leo and Virgo. It is worth 5 pounds.
The Master Astronomer was also the Master Engineer. It was Abiram’s predecessor who decided that they didn’t know enough about building castles and that they should work with the Dwarves on any further additions (such as the dungeon level). Abiram worked with the Dwarves to design the clock tower. He has all of his notes on the clock’s mechanism and construction in a binder; his diary (in the goblin’s “hands”) also contains much related to the clock’s day-to-day construction, as well as his consultations with the Dwarves. Combined, the two books would be worth 200 to 300 shillings, depending on the buyer. The diary alone is worth about 50 shillings; the plans about 100 shillings. The binder is in the bookshelf.
Abiram specialized in protective spells. His bookshelf is protected by a minor ward that has been made permanent. The first person taking anything from the shelf without speaking the phrase “ne lucere”, pronounced approximately “nay loo cherry”, will take 2d6 points lightning damage. They may make an Evasion roll for half damage. The ward replenishes each night at midnight. Only the Abbott (and Abiram) knew the pass phrase.
Also on the shelf (and also subject to the ward) is a small vase decorated with wolves howling beneath a starry sky. In the vase is the Pisces treasure safe key, a small brass key. A cobalt-blue vial contains a healing potion imbued with a fourth-level healing spirit (normally it will heal 1d8 survival points, for a minimum of 4 points). The vial is marked with depressions in the shape of the stars of the constellation Aquarius.
Finally, there is a second book still on the bookshelf. It is a notebook detailing star positions and how to build some large structure; it is how to build an observatory. It matches the observatory in Stelopolis.
Much of Abiram’s clothing contains the symbol for Virgo.
The doors to this wide, empty room are already mostly open. Muted light shines from two white skylights in the ceiling. Dark wooden bars cross the floor all the way up to the front of the room, where a wooden altar stands before a huge tapestry. The tapestry appears to be a depiction of Heaven, but in this heaven the departed read books in great, heavenly libraries, and write on papers that are then handed to angels who shelve them in golden scroll repositories, while Jesus and the Saints perform alchemical experiments, and God the Father crafts the stars in firm and gentle hands.
The temple has been ransacked. The low bars are solid oak kneelers (there are no pews). There is also an oak podium, overturned, on the west side of the altar. There are a few prayer tracts scattered about, with prayers dedicated to “the great clock maker” and “he who lights the stars one by one each evening.”
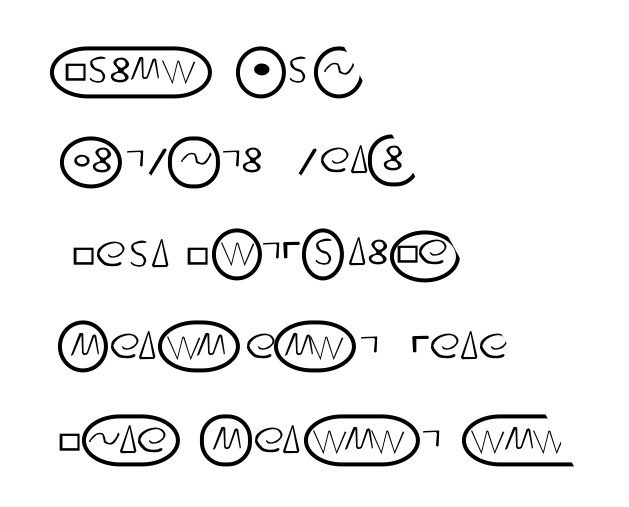 Southwest Tower (11)
Skeletons of man and goblin lie scattered about the soot-covered floor. It is dark. A door at the top of the stairs is closed, as is the door at the bottom of the stairs. Some skeletons wear armor. Weapons lie intermingled with the dead. A light mold grows over everything. Soot is everywhere.
The doors are heavily charred inside the tower. The door leading down is blocked with furniture and spikes on the other side. A strength roll at a penalty of 5 will open the door.
The secret door doesn’t open from inside the tower, only from the secret corridor. The battlement doors are both open.
If they search, they will see a hint of silver beneath some soot. One sword hilt is weaved in simple jade knotwork. Only a jagged piece of blade remains sticking out of the hilt. It has odd writing on it. This is Lirel len-Elessan. If they take the broken sword, this will “activate” the goblin skeletons surrounding the castle. See the “Magic Items” section for more information about when and how this happens.
The trap door is busted open. Pieces of wood fall down the stairs as you brush past the opening. A few skeletons lie jumbled on the floor, animal corpses scattered among them. A grayish curtain of gauze hangs through the trap door up the stairs to the right, and a sliver of light shines through a window on the far wall.
All but a few corpses are desiccated. They are all small animals such as rats, squirrels, and birds. Some are so old they fall to dust on touching them. The gauze is a large spider’s web. It is thicker than the cobwebs they’ve seen everywhere else.
Soot and ash cover everything. Scrolls, papers, and flasks scatter about shelves on the walls. A skeleton lies on the floor, cloth wrapped around its skull. Another is on the floor before the front window. Light from three windows illuminates this tower room.
There were three soldiers here. One jumped to his death (he’s still there at the bottom of the tower), while the other two hoped to wait out the fire below, but it lasted too long. One died of smoke inhalation (the one on the floor) and the other took an arrow because he was hanging his head out the window for air.
There are also four arrow slits in the walls.
The paper easily tears. They’ve been subject to weather, sun, weather, sun, over and over, for a hundred years. Agility rolls are required to hold a paper intact. Most of these are written in Ancient. It will be nearly impossible to carry these papers back home without destroying them. One of the papers describes the means to create the gas in the Pisces room in the dungeon.
If material components are needed, there is a 25% chance that simple components will be here. There is a flask of quicksilver, for example, worth 50 shillings, a vial of sulfur, and a box of huge spider web powder (marked with the symbol for Cancer).
You push aside the spider’s web and can see clearly into the upper tower. Light is shining through gossamer strands around each window. The netting on the far window shakes as a tiny sparrow struggles within it. The strands hang throughout the room and cover the ceiling like a blanket of criss-crossing string. There may be a bronze glint behind the webbing on the left wall.
 There are two large spiders in the webbing on the ceiling. They are extremely likely to attack about a round or two after anyone enters and begins moving the strands of webbing.
Large spiders (Animal: 1; Survival: 3, 4; Move: 10; Attack: 1 point; Lair: 90%; Poison: strength 1, one round action time, d2 injuries)
Most of the papers here are unreadable. Golden bookends surround some books that have survived fairly well behind the webbing. The bookends are of gold leaf, heads studded with blue gems for eyes, green for earrings, and the gold hair pounded into curls. The bookends are worth 250 shillings each and have a bulk of ten each.
The books are journals of experiments, and catalogs of equipment and materials. A few experiments might be intact, but most are stuck together with other pages, blurred, or even eaten from the inside. At the back of one is a note to “request Pisces key from Abiram or Abbot for more cinnamon”. (Someone with spellcraft might note that cinnamon can be used for certain kinds of aromatic illusions.) Another note in different handwriting says “why not get it yourself?” with an arrow pointing to a crude stick figure getting hit by lightning.
Some flasks are broken. Some sulfur spills out of one flask onto the floor.
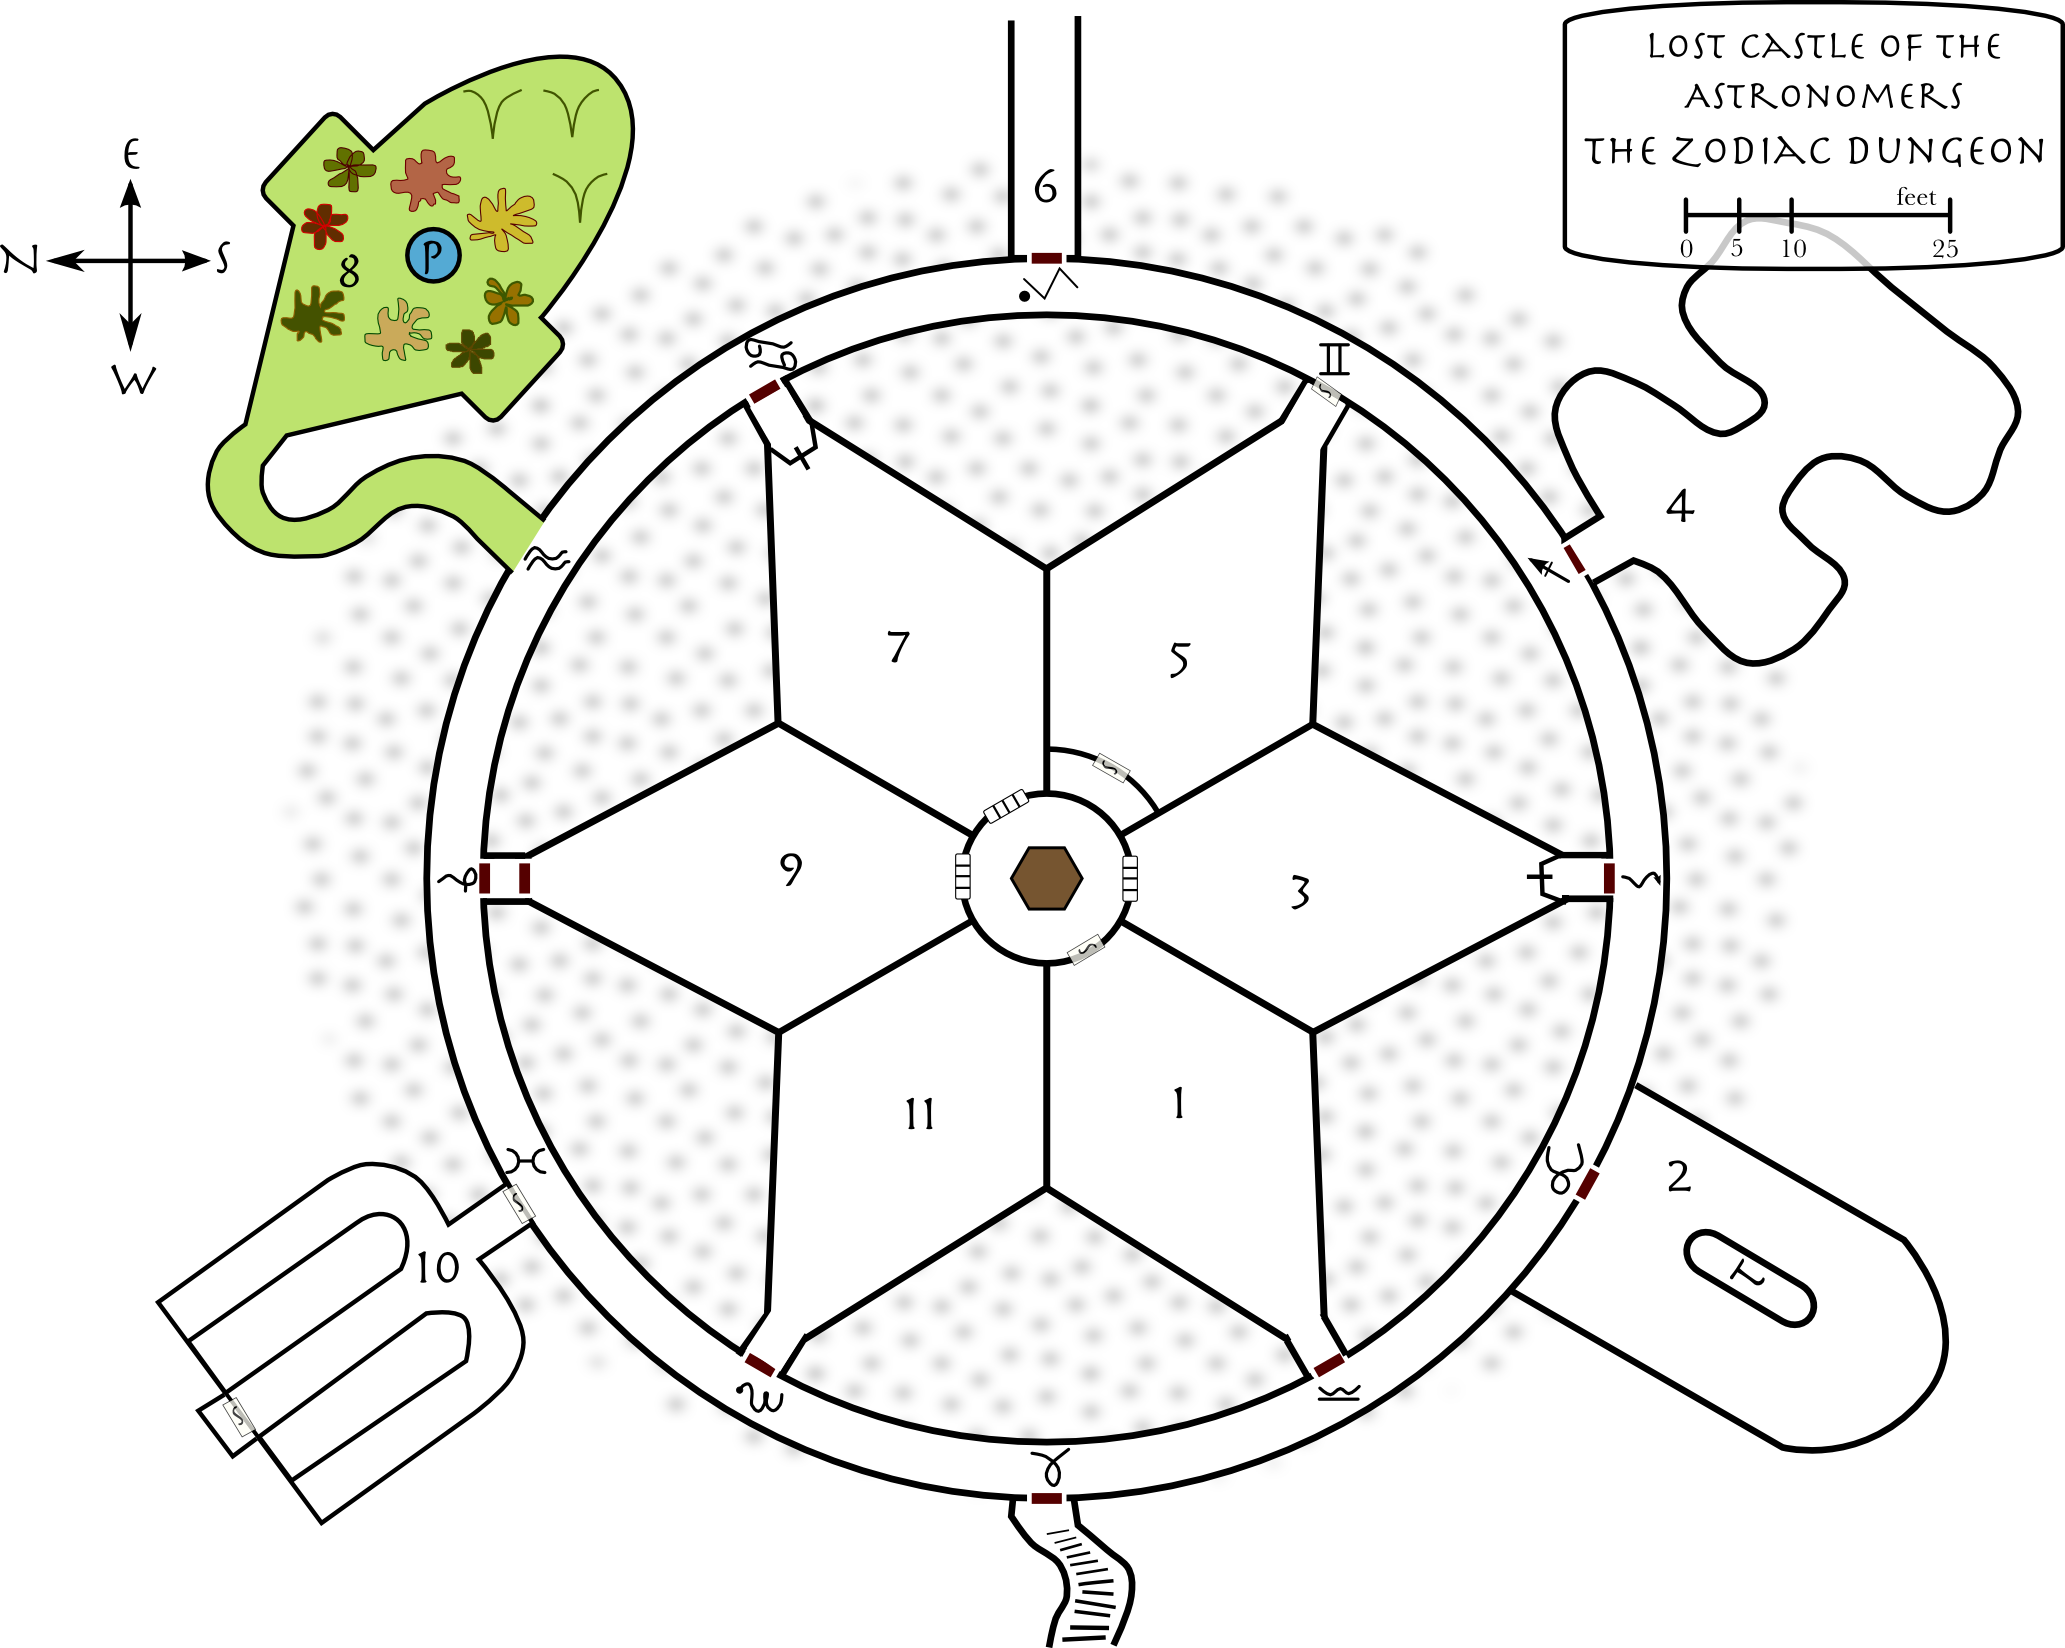
The dungeon is laid out with the doors on the points of two six-pointed stars. The dungeon level is better quality stonework than the rest of the castle. Anyone skilled in stonework will be amazed at the quality of the work here. If they’ve seen Dwarven work before, they’ll recognize it immediately. Otherwise, legends of Dwarven miners and craftsmen are still likely to come to mind.
Doors are spaced nearly exactly ten yards apart. The hallway is 360 feet in circumference measured from the inner wall. All of the doors open easily unless they are locked. The Dwarves’ craftsmanship endures. Doors are generally unlocked but closed unless otherwise noted in the flavor text. They open into the hallway (toward the characters).
Note that the wall painting descriptions assume that the characters are moving clockwise or counter-clockwise around the circle. Transition descriptions are marked “CW” for clockwise, and “CCW” for counter-clockwise. There will also often be an “inside” text for when they open the door or peer inside.
The walls in the hallways are usually set with stone. The walls in the rooms are usually set with thin stone.
The chance for an encounter within the dungeon area of the castle is 10% every six hours.
| 01-20 | Normal Spiders (1d20) | 20% |
| 21-40 | Mice (1d20) | 20% |
| 41-55 | Snakes (1d3) | 15% |
| 56-70 | Rats (1d10) | 15% |
| 71-80 | Huge Spider (1) | 10% |
| 81-90 | Giant Rats (1d6) | 10% |
| 91-00 | Poisonous Snake (1) | 10% |
The huge spiders are from the Aquarius room. See that room for details.
A large hexagonal pillar rises from the center of this tiny circular room. Large, rusted keys hang from the simple stone pillar.
The center room contains entrances to the prison rooms (3, 7, and 9), and the keys to those rooms as well. Keys to both the inner (barred) doors and the outer, observation, doors to the prisons hang from the wall. There are thus seven keys: two each for rooms three and seven, and three for room nine.
The center room also provides drainage to the other rooms. Tiny holes in a groove around the edges of the column allow water to seep into the earth.
Large grey stones of varying shades lead down stairs that twist right and then left for at least a hundred feet.
At the bottom is another oaken door, bound in iron and barred with two thick wooden poles. The poles pass through bars on both the wall and the door.
The stairs are forty yards long and drop fifty feet. (There are 99 steps total.) The door is barred from both sides. Huge iron slots in both the walls and the door hold two six-inch-diameter poles and keep the door from opening into the dungeon hallway. On the dungeon side, spears hold the door shut, but they are weak. A strength roll at a penalty of 3 will crack them. The door is six inches thick, and oak, with metal bars through the center of the wood.
You smash the door in. The hallway runs in a curve to the left and right. The walls and floors are set with large stones, boulders of granite, and occasional dark marble, inlaid with a greenish metal around the stones. The hallway is about five feet wide and seven feet tall. The walls are covered in paintings of mountains silhouetted by the night sky.
If they turn around to look at the door they’ve just opened:
The door you’ve just opened is lacquered with a scratched and chipped ram’s horn beneath a crescent moon. Broken spears lie scattered on the floor.
If they’ve arrived from clockwise or counterclockwise, use the appropriate description:
CCW: Rural library and field becomes hill and mountain, darkening the night so that mountain peaks are silhouetted by stars and moon.
CW: Hell gives way to earthly tortures. Sodom and Gomorrah burn in the night. Destruction fades to tournaments as jousters take the field. Jousting fields and crowds in turn give way to mountains, darkly lit by the painted night.
CCW: The mountains give way to tournaments of jousting, the destruction of Sodom and Gomorrah, and the scales of hell. Yellow stars mark the outline of blue lacquer scales on an inner door.
CW: Man’s great labors fall into decay. The pride of Babel drops to the fires of hell, its stones weighed and found wanting.
Inside, stone stairs lead down a small auditorium, past oaken seats to a table flanked by dark marble statues of scales and a huge crab. High-backed chairs decorated with silver stars hold ceremony to the empty seats. Torch sconces line the walls. Two large ones jut from the wall behind the high-backed chairs.
The statue of the scales is on the left, the statue of the crab on the right. The marble is veined with white and blood-red streaks.
Pulling on the right torch sconce behind the chairs opens the secret door.
CCW: Destruction gives way to the rebirth of great structures and cities. Man and beast toil to move stone blocks and raise great monuments to God. On the outer wall a lacquered carving outlines a rampaging bull, glossy black against the rich brown door.
CW: Whirlwinds calm, and from the desert grow great monuments to God and man. Beasts and workers toil to move huge stones to create grand tombs and towers to the heavens, where man speaks to the stars as an equal.
Inside, a huge glass table held off the floor by an obsidian-black bull is covered in papers. The bull’s hollow eyes give it an eerie, vacant stare. Two brilliant red gems lie on the floor beneath the table.
The maps are of Highland, Biblyon, and Illustrious Castle. It looks as though they were planning an attack on Illustrious Castle when last here. The red gems, the eyes of the bull, are worth 100 shillings each. The bull, could it be removed—it was carved in place—is worth one to three thousand shillings, or even four thousand with its glass top, depending on the buyer.
CCW: Cities give way to deserts as you approach a door on the inner wall. Whirlwinds stir up dust, and the devil tempts Jesus with the illusory kingdoms of the world from a rock overlooking the desert’s desolation. A white lacquer scorpion raises its tail menacingly at you from the entrance to the door.
CW: Armies lie dead in the fields, rotting to skeletons and dust. Desert sands overtake all. Jesus stands atop a huge rock and overlooks the great cities of the world, tempted by worldly power.
Inside, a barred window looks down on strange devices. A hollow man with spikes and an open, man-shaped door; whips of many kinds, and metal and wood contraptions you have no idea what they were used for and probably don’t want to know.
Anyone familiar with torture instruments will recognize the iron maiden, the cat-o-nine tails, thumbscrews, and others. From the central room, a door of vertical iron bars leads into this room.
CCW: The desert gives way to combat. Arrows rain down on helpless armies; war machines carry destruction to castles. On the outer wall, the door is slightly ajar, but you can see a translucent amber archer pointing his arrows to the stars.
CW: The serenity of lake and mountain turns to masses of soldiers battling endlessly in forest, city, and plain. Arrows rain death to soldiers, and great machines carry destruction to castles.
Inside, an hour-glass-shaped room holds benches, and bows and arrows in various states of repair. Strings hang from rods on the walls. You see the edges of a pile of dirt around the squeeze in the “hourglass”.
In the far section eleven monks broke through the wall and tried digging to the southeast. They made it ten feet before dying; all eleven remain as skeletons. They were trying to reach the secret tunnel out of the southeast tower. The monks didn’t have the Dwarves make a secret exit here because they didn’t want the Dwarves knowing about the secret tunnel to Stelopolis.
The cool dryness of the underground is less destructive to wood and string than the wild weather changes above ground. While the bows are probably not usable, they look reasonably nice, and the arrows could probably be put to use, though they might need refletching (use them at a penalty of two to attack). There are seven bows and thirty arrows here.
CCW: Combat gives way to writing, study, and experimentation.
CW: Sharp peaks smooth to soft, restful mountains.
Both: A monastery sits at the edge of a serene lake, a mountain looming behind it; both the mountain and the monastery are reflected perfectly in the lake. Giants look down and over to the scholars.
Unless they stop to take a look, proceed immediately to the next room rather than reading the next section.
The stars above the mountain are of Gemini, and a twin-faced god stares down from the heavens. A two-headed giant lifts its head from behind the mountain peaks, its eyes vacant holes with pinpricks for an iris.
A perception roll is required to find the door. It is metal, with thin stone, designed to blend with the wall. There is a bonus of four if they know where the door is and that it should be Gemini. The Gemini room key fits into the eyes of the rightmost head. Locks & traps rolls to pick the lock are at one worse than normal
The giant’s head twists and the door pops inward, gliding silently open to reveal the darkened room. Inside, past a short initial hallway, two bronze bells flank the entrance. The walls on the far end of the “diamond” are lined with shelves and benches, themselves holding inkwells, and decorative sculptures of horizontal rods with rings around the rods. A large tapestry is woven with an image of the castle. Above the castle, in the night sky and surrounded by attending stars, the moon greets the sun.
The room is somewhat diamond-shaped. About five feet inside the room, it begins to widen, and there are two bronze-colored, bell-shaped devices, one on either wall just at that point. The “decorative sculptures” are abaci.
The entrance trap is triggered if the key isn’t used to open the door. Anyone picking the lock must make a perception roll at a penalty of 2 (with their locks & traps bonus) to successfully disable the blade. (The Dwarven craftsman recommended that the key have to remain in the lock, but the Astronomers overrode him on safety grounds.)
The wall near the bells has a thick dark line running up from floor to ceiling. This thick line is an opening in the wall as if for a sliding door. The opening extends from floor to ceiling and is about three inches thick.
The trap is triggered by at least 40 pounds of weight stepping on a three foot by three foot square of the floor inside the room just as the room widens. If the door is not opened with the key, the first person to step into the room must make an Evasion roll at a bonus of 1, or take 2d6 points damage from a massive blade that swings down on a heavy pendulum.
The bells ring sweetly if tapped and loudly when hit by the pendulum. The head of the pendulum will strike both bells on each pass, which is likely to attract creatures. An encounter check is made for every two minutes that the bell is ringing.
The pendulum will swing for ten minutes before it winds down over another ten minutes. Characters can pass between swings on a successful Evasion roll, at a bonus of five, but it’ll be safer to wait. (Of course, they might not realize this.)
The trigger can be reset in room 19 (the Library Workroom) on the first floor of the castle.
Across the bottom of the tapestry reads “Praeluxi Astralas Erudit”, or “Knowledge shines forth from the stars”. The tapestry is intact and worth 400 shillings. It is seven by five feet and has a bulk of 25. The tapestry covers a safe.
A simple metal door stands at chest height behind the tapestry. A small keyhole mocks you on the right side of the door.
Here, the Astronomers followed the Dwarves’ recommendation: if the safe’s key is not in the keyhole, anyone removing or jostling the contents will trigger an arrow. An evasion roll is required to avoid d6 points damage. The trap will work twice. Anyone looking closely at the sides of the safe might realize that it “gives” slightly when touched.
The door pops outward. The safe is filled with papers, books, and scrolls in nearly pristine condition. One book’s spine reads, embossed in leather, “Morpheus Somnium”.
Most of them are contracts and treaties, in the Ancient tongue. One Anglish contract is with the Dwarves for building the dungeon complex in the 863rd year of the Cataclysm of Earth. The long preamble, among other things, forgives the Dwarves for “working with their long-despaired enemy”. They paid in large amounts of grain, alcohol, vegetables, and wood. There is another contract, far in the back, for the building of the clock tower, dated from the 795th year of the Cataclysm of Earth.
There is a peace treaty in Anglish and Ancient with the Order of Illustration, dated June 15th of the 887th year.
There are three spell research notes. One contains the secret dream spells of the Astronomers: Dreams, Sleep, Dream Omen, and Dream Walk. It is inscribed on the inside with “Rex somnium dicat servis suis, et interpretationem illius indicabimus.” This is from Daniel, and means “Let the King tell his servants the dream, and we will declare the interpretation of it.” Another contains Indestructible Object and Elemental Ward; these were researched by Master Astronomer Abiram Forney. The final is a shorter book discussing “Ephemeral Backdrop”, and including that spell. Each of these are for mnemonic casters of Highland, but a classical (West Highland) caster should be able to use them with a little extra study.
And there is an excerpt from No More Stars, taken from the Order of Illustration.
CCW: The restful mountains and stream build to rocky badlands and sharp peaks. A lacquer pink ram bounds from peak to peak on a wide open door on the outer wall.
CW: Swamps are fed by rivers, rivers by streams, and streams wind through rocky badlands. Badlands grow to sharp peaks and stark hills. The door is open.
Both: Tiny goats range through hills carved on the frame around the doorway. A mountain shepherd leads a flock of goats and lambs to his cottage home overlooking a valley.
Inside, cobwebs hang everywhere. Skulls and skeletal hands poke upward through the webbing in shelves on the left and the right. Two ornate arches hold up the ceiling at ten foot intervals.
The spiders no longer abide here. They are usually in the Aquarius room. There is a 5% chance that one huge spider is here.
This is a crypt. The majority of the Order is buried in the cemetery in Stelopolis. Higher-status members, such as officers and leaders, were lain here on shelves in the sides of the walls, once their flesh decayed from their bones in the graveyard.
This crypt is for you to work with. At its most basic, it is a crypt that may provide clues to the higher-status members of the Order. While none of the skeletons will animate, there’s no reason that some of them couldn’t. Or there could be oracular ghosts haunting the crypt, or phantasms. Or it could lead to an entirely new dungeon of your design. Just make sure to put in the right backstory elsewhere in the adventure if necessary.
The arches are inscribed with goats and snakes prancing among trees and hills. At the far end of the crypt is a statue of a tree. From the tree hang fruit and snakes. At the base of the tree is written “Ipse revelat profunda, et abscondita, et novit in tenebris constituta: et lux cum eo est” which means “He reveals deep and hidden things, and knows what is in darkness: and light is with him.”
There are three apples on the left side of the tree which, if pulled, cause the right side of the tree to slide over, revealing a ladder on the inside and a hole in the ceiling. This hole leads to the statue of Moses up top (which has also opened up). This secret exit was known only to Abiram, Parthane, and Cambel. Cambel died in the forest, and Abiram and Parthane escaped to die in Stelopolis.
A thief examining the tree’s trunk might, on a Locks & Traps roll at a further penalty of 4, see the fine seam running down both sides of the tree. A similar roll looking at the apples will let them know that some apples are just very slightly more giving than others.
CCW: Badlands turn to streams, and streams to rivers and swamps.
CW: Aqueducts and cities draw from deep dams, dams hold back rivers, peasants carry water from river to hovel. Rivers meander into swamp.
Both: Crabs abound in the water, and tiny gnome-like creatures feast on boiled crab. A lustrous white lacquered crab menaces a door on the inner wall with its raised, open claws.
Inside, a barred window looks down on benches and cots, empty.
This was once a prison cell. Any items or people teleported by the trap on the Pisces room will be here. The door with the barred window is locked. The keys are in the Center Room. A gate of vertical iron bars leads in from the Center Room.
CCW: Peasants carry water from rivers to hovels, aqueducts carry river water to cities, and dams hold back the rivers.
CW: Thrones rule castles, castles rule kingdoms, and kingdoms rule cities. Cities depend on life-giving water delivered by complex schemes of aqueducts.
Both: An open portal with no door leads into dirt and darkness. An earthy odor emanates from the inky blackness.
As you turn around the twisting corridor, you begin to see a light glow, and hear the gurgling of falling water. The corridor turns and you find yourself gazing into a garden of unearthly beauty. The walls and arching ceiling glow a soft white; pastel purple flowers hang amidst gossamer strands of white. Vines loop around bright red and yellow flowers. Tall plants, their white clusters swaying ever so slowly, grow from reddish leaves at their base. Flies buzz by, and a light warmth surrounds you. Fireflies flicker before your eyes.
In the center of the garden a small, stone-lined pool is cooled by green ferns. Dragonflies skim across the water. Three skeletons recline around the pool, almost as if they were sleeping.
Two small waterfalls fall into pools in alcoves to the right and left. A beetle crawls over your foot.
The tall, white, clustered plants are giant Venus Flytraps. Closer examination will reveal the pods at the top and perhaps a rat skeleton or two decaying into the ground as nature takes hold of it.
There are d6 huge spiders (90% of the time), d6 poisonous snakes (65% of the time), and 2d6 giant rats (90% of the time) here, and many more rats, spiders, snakes, and insects. The creatures are rarely aggressive, unless they are hungry, which happens 5% of the time for the flytraps, and 10% of the time for the huge spiders. They will fight back if attacked, unless frightened. (Flytraps can’t run, and huge spiders bite if frightened. They might bite and then run if that seems instinctively expedient.)
Huge Spiders (Animal: 2; Movement: 10; Attacks: 1; Damage: 1d3; Defense: 1; Poison: strength 2, one round action time, d3 injuries)
Venus Flytraps (Plant: 2; Movement: 0; Attacks: special; Damage: d3; Defense: -1)
Poisonous Snakes (Animal: ¼; Movement: 12; Attacks: 1; Damage: 1; Defense: +2; Poison: strength 2, one round action time, d2 injuries)
The pool in the center is blessed. Three people per week may drink once from the pool. Doing so will heal 1d8 survival points, minimum 3. Otherwise, the pool is merely refreshing. The water must be drunk in the garden.
A niche at the far end, about head height in the wall, has a small curtain covering it. Behind the curtain is a skull. This is the skull of the founder, Aaron Paul. Beneath the niche is a simple plaque engraved with the words “Et eduxit eos de tenebris et umbra mortis et vincula eorum disrupit.” In Anglish, this is “And he brought them out of darkness, and the shadow of death; and broke their bonds in sunder.” A person familiar with the bible might recognize this as a psalm.
Anyone taking the skull will incur a curse. The last voluntary bearer of the skull will have a penalty of 1 on all rolls, including saving rolls, ability rolls, attack rolls, and damage rolls. The curse will only be broken when someone else voluntarily takes the skull, or the skull is returned to the niche.
CCW: Cities grow to kingdoms, kingdoms to castles, and castles to thrones.
CW: Whales battle great waves to escape huge kraken. Storms rile the sea, but fade to lesser and lesser waves as you move on. Sea comes to shore, shore to forest, and forest arrives at castle and throne.
Both: Wise rulers dispense wisdom and justice. A ruby red lion, outlined in gold, roars proudly on an inner door. Red eyes, shining with an inner fire, stare back at you. Its tail is a cluster of bright gems of purple, red, and blue.
On the inner wall of the main corridor, toward the floor, there is a running satire. Beneath the grand human castles and cities, a gnome king leads his subjects against a rat king. His heroics end when a flood cleans the undercity of both gnome and rat.
The gems are worth two shillings each. There are seven in the tail.
Inside, a door with a barred window stands slightly open. The room beyond the door is Spartan but comfortable. Two jugs stand beside a wide bowl. A large ceramic pot shows a lion tearing a deer to pieces.
This prison was used for noble captives awaiting ransom.
CCW: The paintings on the wall fade from throne to forest, forest to river, river to sea, and sea to storm. Whales battle the waves, and great kraken feed on the whales, their eyes glittering like stars.
CW: Utopian bay disappears across endless waves. Storms batter the seas, and great monsters rise out of the water. Whales flee the tentacled monsters, and the monsters feed on the whales. The monsters’ eyes glitter like stars in the storm.
This is a secret door. Unless they stop to look, move on to the next room. Like the Gemini room, if they realize that there should be a room here and that it should be Pisces they’ll have a bonus of four searching for it.
The eyes of the Kraken are moonstone, and most are placed in the shape of the constellation Pisces. If all 17 eyes of Pisces (and only those eyes) are pressed in at the same time, one of the waves will roll over, revealing a keyhole. Two people at least are required to do this.
You hear a slight click, and a smaller wave rolls over, revealing a small hole in the wall.
The lock is at a penalty of 3 beyond normal to pick. If opened without the key, it will magically trigger a trap:
A huge wind assails you, sending a storm of dust into your faces.
Evasion rolls are required to avoid going sand-blind for d4 rounds after the wind stops. The wind stops after one round.
Inside, the room is filled with sacks overflowing with treasure: gems, coins of gold and silver, necklaces and bracelets studded with gems, goblets of gold embedded with rubies and sapphires, and goblets of ruby held in baskets of spun gold.
This is an Ephemeral Backdrop. It is easy to recognize as unreal if examined closely.
The trap is magical: a one-way magic portal to the Cancer cell, dungeon room 7. The magic portal will last six rounds (one minute). The illusion will last 24 minutes before disappearing to reveal the weapon storage.
This is a daily trap: once set off, it will not be set off again until after midnight, whereupon both portions of the spell renew.
If they wait over a minute, but less than twenty-four minutes, to step through:
The treasure disappears. Three halls extend down, each lined with swords, spears, or maces. The walls are made of large stones set in a pebbled mortar.
The spears are untrustworthy. The swords and maces could be used, though the grip on the swords is unlikely to last long. There are sixty spears, thirty swords, and thirty maces.
 At the end of the middle hall is a secret door. One of the pebbles below it moves to reveal the keyhole. This lock can be picked as normal. If the safe’s key is not used, it will trigger a gas trap. Unless they recognize that there is gas being released (it makes no noise), they must make a Health roll or fall unconscious for d20 minutes. If they do realize gas is being released, they’ll be allowed an Evasion roll to hold their breath.
Anyone at the end of the hallway will need to make a saving roll about four rounds after the gas is released; their saving rolls will be at +3 due to the gas being diluted. The gas dissipates completely in two minutes.
The gas trap is a one-time trap.
The safe contains 200 shillings (in two bags of one hundred each), 100 pounds (in ten bags of ten each), and bags, jars, and vials of magical materials: powders, spices, dried plants. One large, heavy (bulk fifty) blackened rock. Feathers, hooves, teeth, bones. Insects. Insect parts. Lizard tails. Animal hair. All the oddities you expect in a wizard’s pantry.
The forty bags of spices (hand sized, bulk .25) are worth ten to sixty shillings each. The 15 jars (bulk 3) are worth 2d20 shillings each. On an intelligence roll, a character can choose the best four, which will be worth 20+d20 shillings each.
CCW: Storm is abated by bay, and waves lap lightly on shores untouched by war or hunger.
CW: Mountains drop down to fields and isolated libraries.
Both: Delicately painted nobility pursue their studies chastely and without emotion in library and field.
Inside, skeletons lie on the floor, amidst sacks of flour, barley, wheat, hemp, beans, and roots that have been ransacked and scattered about.
This was a dry food storage room; most of the food has been eaten, though it must not have been comfortable. There are three Astronomer skeletons here.
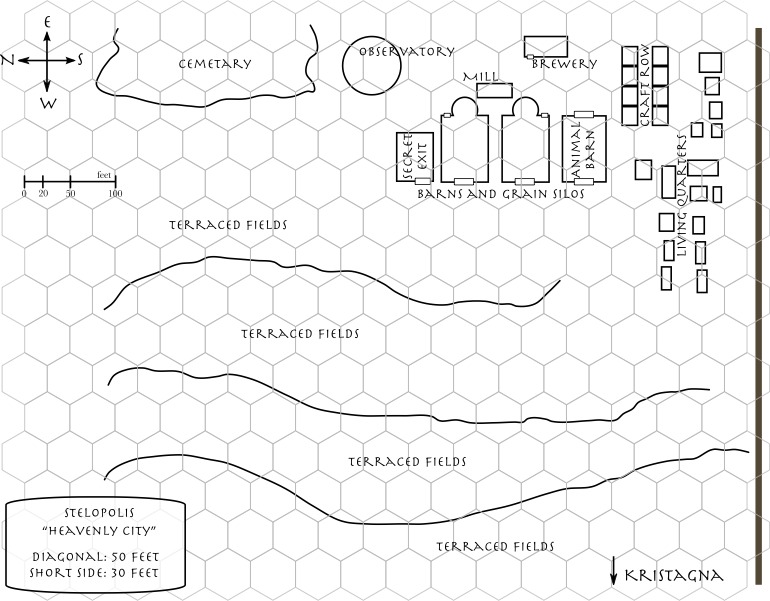
Use the wandering encounters for the deep forest in Stelopolis. Stelopolis is built on a series of wide terraces. It was mostly a farming area. A stone fence runs east-west going down the mountainside at the north and south edges of the fields.
The secret exit from room 21 of the first floor (the Southeast Tower) comes out in a small building, after winding up stairs and through tunnels for two miles.
You walk for nearly half a mile down the tunnel when you come to stairs that wind upward. Between stairs, and tunnels, tunnels and stairs, you must walk miles before the moonlight peers through cracks in a wooden ceiling.
There is a trap door in the wooden ceiling which must be forced open. While there is a latch that can be turned simply with no key from either side, there is debris lying on the trap door, and it opens upward. A strength roll is required to force the door open; it will break when so forced.
You crack the trap door open. Amidst splinters and dust, moonbeams shine through openings in the slats on the wooden walls of a small building. You are surrounded by long blades—of plows, and by tackle and harness.
The character opening the trap door should make an Evasion roll to avoid falling debris or take 1d4 points damage.
Nothing in here is particularly worthwhile. It was a small barn for the storage of farm implements.
You step outside into the cold night air. A few skeletons lie jumbled together several yards away. Three more buildings stand to your left, and two small towers rise above them. Ahead of you the mountainside drops slowly on terraced fields.
The small towers are granaries. Each of the barns once contained sacks and barrels to fill with grain from the granaries, but the granaries are now emptied. The goblins took whatever they could to feed their army.
About ten yards from the storage building are the skeletons of Abbot Parthane, Master Astronomer Abiram, and two guards, where they were overwhelmed by orcs and goblins. There are some orc and goblin skeletons there as well. The only thing of value remaining (unless you’ve placed it somewhere else) is the key to the safe in the Gemini room. Once in the folds of the abbot’s cloak, it now lies on the ground beneath his skeleton.
On a small hill, a domed tower overlooks the lesser buildings. It has withstood the test of time with fewer holes in its sides, although there is a wide swath missing from its roof.
Inside, light from the stars and moon shine through the swath in the ceiling. A grooved shelf circles the walls at about six feet. Some small chairs and stools lie in the outer area, and upon a raised dais in the center.
The observatory is a small, circular wall built around a deep foundation. The Astronomers never had the chance to finish it. In particular, there are no lenses (it is up to you whether they have already placed the order with the Dwarves). Some of the observatory had been built, and there are gears in a wooden crate at the edge of the room. The gears are well-designed; there are two large gears and seven smaller ones, which will fetch 10 and 5 shillings respectively. The larger ones have a bulk of fifteen, the smaller ones a bulk of four.
Two rows of tightly-spaced single-story and story-and-a-half ramshackle buildings form a wide pathway a hundred yards long leading toward the mountain. Gaunt windows look out on a leaf-covered, overgrown street. Half-empty trees spread their denuded branches over the roofs of the buildings.
Comprising the brewery (just north of the row) and a number of other craft workshops, craft row once held workspaces for a carpenter, a blacksmith, a potter, a tailor, a baker, a wainwright/cooper (wheels and barrels), an armorer, and a weaponsmith.
A haphazard collection of buildings, large and small, form a vague pathway, though the path is now broken by small trees and bushes. The buildings are seeing the effects of age and disuse; in many you can see inside through small holes; in others large portions of the walls have fallen in or been removed.
This is where craftsmen, families, and others supporting the castle lived. A few also tried to make a home for themselves in a more secluded area, so within this part of the Deep Forest the characters may run across other homes. A road leads down directly from here to the castle a mile away. Some of the buildings have occasionally been used as a source of firewood.
Rows upon rows of stone pillars, crosses, and markers run unevenly down the side of the mountain.
If they spend an hour or so studying the cemetery, you might allow them to deduce some information about the Order. There were more women in earlier days than in latter days, for example. The earliest date on the stones is from the 558th AC (year of the cataclysm), and the latest is from the 895th year AC.
Tall grass waves in the breeze on terraced fields. Further down is a field of trees, and to the right vine-like plants tangle. A light smell of cider wafts up from the side of the mountain.
Tomatoes, apples, wheat, and barley grow wild now, on these wide terraces up and down the mountainside.
The journey home will be similar to the journey south, except that it may be shorter if the characters decide to travel due north instead of retracing their steps. A Perception roll at +8 is required to notice the Leather road when crossing it.
Several things in this adventure can lead to other adventures. There are occasional references (in the contracts in the Gemini room and in Lieutenant Courlander’s diary) to an unknown area of Illustrious Castle. Any part of Illustrious Castle that has not been searched and ransacked might still contain treasure, information, and magic. For the “official” version, look on godsmonsters.com/Guide for Haunted Illustrious Castle.
Further exploration of the Chaotic Mist might lead them to an understanding of the “passing on” of the world, especially if they can tie it to a Dry City adventure.
The Elvish sword, Lirel len-Elessan, may lead them to the Elves, and thence to a quest to find the rest of the sword. The Elves of West Highland have never heard of it, and in fact had sent an emissary to the area about eighty years ago in search of a rumored sword with Elvish runes. He never returned (his skeleton is in the back of Illustrious Castle). The sword itself will attract the attention of undead creatures the characters would rather avoid.
Some adventurers may wish to search out the Dwarves who built the Zodiac dungeon.
Some adventurers may wish to find a way to empty Kristagna of all its treasures; this will be a heady undertaking: the larger the group heading into the Deep Forest, the more danger they’ll attract. And if the characters have activated the goblin skeletons, you can provide a running adventure in the style of “The Evil Dead” or “Army of Darkness”.
And there is the evidence right before their eyes that the Goblins, not normally organized or particularly advanced, led a modern campaign against West Highland a hundred years ago. No one ever found out who the hooded Goblin Mage was or why he led his armies against West Highland.
Some of the texts in the castle might reference a historical or magical relic the Astronomers had on display, but which is clearly missing now. No text mentions it having been removed. The characters’ best choice in finding it is to track down the descendants of the Orcs who stole it.
Look in the resources file for the maps and handouts. You can get the resources on godsmonsters.com/Guide/Lost/.
1. Twisted forest cover images (GIMP, JPEG)
2. Information card and inscription for sword of Lirelen Ellesan (Scribus, Inkscape, PDF, PNG)
3. Astrological clock (Inkscape, PNG)
4. No More Stars (Inkscape, PDF), an excerpt from an illustrated text stolen from the Order of Illustration.
5. Various door markings (Inkscape, PDF)
6. Map of the wilderness between Hightown and Kristagna (Inkscape, PDF)
7. Map of the castle and moat (Inkscape, PDF)
8. Map of the castle’s first and second floor (Inkscape, PDF)
9. Map of the zodiac dungeon (Inkscape, PDF)
These were all created using Inkscape, GIMP, and Scribus. These are free software packages available for Windows, Mac OS X, and Linux, so you should be able to edit the source files in the resources archive as needed for your own game.
There are special keys for the treasure rooms. The Pisces room, the Pisces treasure room, the Gemini room, and the Gemini lock box all have special keys. If the characters find them, they can avoid the traps on those locks.
1. Gemini room key: brass, ornate, the sign of Gemini: in the borogove nest on level 2, room 3, east overlook.
2. Gemini safe key: on a corpse in Stelopolis.
3. Pisces room key: in Captain Cambel’s closet. The Pisces symbol is on it.
4. Pisces safe key: on Master Astronomer Abiram Forney’s bookshelf, in a vase.
The spell research notebooks from the Gemini room of the dungeon contain enough research for any sorceror to reconstruct the four dream spells of the Astronomers: Dreams, Sleep, Dream Omen, and Dreamwalk. The books have a mojo level of 15 for researching those spells. The spell descriptions can all be found in Arcane Lore at godsmonsters.com/Game/Lore.
The notes are also useful for researching other dream-oriented spells. They have a mojo level of 8 for dream spells in general.
Master Astronomer Abiram Forney’s diary details the day-to-day construction of the clock, as well as his day-to-day consultations with the Dwarven builders. He also has a binder of notes planning the clock’s design and summarizing his original consultations with the Dwarves. Combined, the two books are worth 200 to 300 shillings, depending on the buyer. The diary alone is worth about 50 shillings; the plans about 100 shillings.
The Abbot’s diary is written in both Ancient and Anglish, depending on what the Abbot felt like. It concerns itself mostly with the bureaucratic aspects of running an order. The last entry, dated May 5 896, concerns a dispute between Captain Cambel and Lieutenant Courlander over how to defend the castle from the goblins. Another recent entry indicates that the harvest was extremely good this year. The diary also contains, about a year previous, the code word for “Abiram’s book case”. (The code word is “Ne Lucere”.)
Beyond that there isn’t much of interest in Parthane’s diary, although you are of course welcome to place any clues or foreshadowings you wish into the text.
It is up to you how much information the lieutenant’s notes contain. One of the trivial things it contains are some of the names of the other members of the order, such as Captain Cambel, Abbot Parthane, and Master Astronomer Abiram. Toward the beginning of the book (while he is merely a minor officer, probably a sergeant), he agrees that the Dwarves are being too paranoid about the Gemini room. “Their idea is too dangerous.” But he thinks they were right about needing a secret passage out of the dungeons. “We may come to regret the lack of an exit.”
When he discusses the goblins, he calls them “orcs”, which marks him as from the nobility. Most people else in West Highland call both goblins and orcs night trolls. East Highland and the nobility call them goblins and orcs, or just orcs, since they’re usually led by at least one orc. The last entry, dated May 3rd in the 896th year of the Cataclysm, mentions an argument with “Captain Cambel” about what to do if the “rumors of orcs is true”. Cambel wants to “take the field and wipe them up as we always do. Parthane agrees.” Courlander thinks “we ought to hole up. This time different. Should send courier north. Still technically at peace with Illustrators.”
Courlander’s diary also, toward the beginning, describes how he and a group of three warriors and sorcerors made a pact of mutual benefits. One group project was commissioning a special ring of silver strands and soft white pearl from the Dwarves. It describes his and their adventures acquiring the pearl back in East Highland. It tells of their journey into an underground tomb of the Druids, though it does not say why. Sometime after that he and the rest of the group moved ahead more quickly. Nothing sinister about it, but something is missing from the diary. He becomes a better spy; it was he who copied the “No More Stars” piece by sneaking into Illustrious Castle. He does not describe sneaking in, though he does describe sneaking around and going into their underground living quarters.
You should fill the diary with entries that relate to adventures you might want the characters to discover. For example, on a journey to find a ghostly castle that appears but once every year:
Date
We have come further south than I ever imagined possible. The sky is diamond-studded pitch, and the forest is alive with ghosts. We must retrieve a stone from a castle that does not exist.
So the four maps to Charon were cured here of war. Ten fun games cause doom to man in his writing, creating the lament that is his fee due god. We issue in you this world of humor, you mute women known.
Test semen under no fat woman gods you nurture, you who mint them the noxious musks. He who draws to worlds will knit one toy net. Hinges vow to better hinge, and bar shale. Harm all strange metal, and adhere to the thin hate of the freer sin there.
Beneath the text, in more coarse handwriting, is written “excerpted from Illustrated text”. A player with appropriate knowledge can guess that this means either a text from the Knights of Illustration—since the Astronomers often interacted with them—or a more general text that has been illustrated by some Christian order.
Translation:
Words are the source of power for the human race. Indeed, it is the written language that is the source of magic and the means of summoning. If you would summon Nowhere, you must know where on it is.
To understand the nature of summoning, you must know where those you summon exist. The World as we know it is not the only world. There are things below, and things above. And there are things in the realm of the Ether, and the realm of the Astral.
See the resources archive for a PDF of this document and the Inkscape original.
Forged by Dwarves and wielded by Elven kings, the sword was broken in the last battle of the Deadless Lord on the eastern continent. The Elves call it “Lirelen Elessan” (which means, simply, “the sword of Ellesan”). It was last wielded by Elessan Torilarvan, whose name means “Sword of the Silver Forest”.
The sword is now in two parts, the engraved jade hilt with the lower part of the blade, and the rest of the blade. This is the hilt. There are five lines of Elvish runes on the base of the blade, clearly incomplete:
 tiale waya: “tiale” means “in the reign of”. The next part is almost certainly the first part of a royal name.
panvono vira: “panvono” means “victory”. The next portion, if it is a whole word, is “gratitude”. It might make sense for this to be “viralva”, which would mean “In gratitude for victory”.
dier dencarotuh: “dier” means “transported”, and “dencarotuh” is “across the wide earth” or “across the wide lands”.
lirelilen ciri: “lirelilen” is “this sword of” and “ciri” is “Elves and” something else.
daya lirelen ele: “daya” is “I am” and “lirelen” is “the sword of”. The fragment “ele” could be many things, such as “elessar” (starlight) or “elessan” (weapons, swords), or a name. That is, “I am the sword of swords” or “I am the sword of starlight.”
The hilt and base of the sword confer the ability to Turn Undead (as the Specialty), as a fifth level prophet. Those with the specialty who bear the hilt gain a bonus of two to their level when “Turning” undead (but turn at a minimum of fifth level). In the presence of undead, it grows a full blade, glowing green, which confers a bonus of 2 to attack and a bonus of 1 to defense against undead. Even when glowing, it may not be used to attack anything other than undead: it passes through other creatures or things. The magical blade ignores certain physical defenses of undead, such as the skeleton’s ability to take reduced damage from slashing and pointed weapons.
The hilt is also cursed, depending on your point of view. It attracts nearby undead. Evil things killed violently, or in the act of committing evil, have a level+10% chance of coming back as skeletons or walking dead when the sword is near their corpses.
The hilt came to the western continent via the underground. The Elves of the west do not know its origin, although they have heard rumors about the glowing sword with Elvish runes on the blade. They are very interested in finding the sword, and discovering its origin.
If the player characters (or anyone else) take the broken sword, this will “activate” the goblin skeletons surrounding the castle. The skeletons will, at three in the morning, animate and move across the moat and crawl over the walls and into the castle, and attack anything living in their path. There are 67 animated goblin skeletons in total—far too many for your average first to third level adventurers to defeat.
There are very few goblin skeletons actually inside the castle. The goblins won, after all, and pulled their friends out for proper burial. (The adventurers may be looking for a more sinister explanation for the lack of goblin bodies, and they’ll certainly be able to make one up, but the real reason is much more mundane.)
For those goblin skeletons that do remain in the castle, you’ll have to decide whether they can leave their not-so-final resting places and how much time it will take them to get to the sword-bearer. On the first floor there are still two goblin skeletons in the library (room 18), three in room 15, and three in the grand ballroom (room 2). On the second floor there are three skeletons on the battlement, and one in Abiram’s bedroom (9).
The skeletons will follow the sword hilt out of the castle as long as it is within one mile of them. If evaded, they will remain animated, though still, within the castle, and anyone entering the castle afterward will have to deal with them. They’ll rest again in seven years if undisturbed.
67 Goblin Skeletons (Undead: 1; Move: 10; Defense: 3; Attack: short swords; Damage: d6; Special Defense: Pointed weapons do 1 point; Slashing weapons do half damage)
The “moonstone ring” is made of silver strands woven together around a pale, soft white pearl. Under normal circumstances, the ring offers the wearer a bonus of 1 to defense. At night, it offers a bonus of 2 to defense. On nights of the full moon, it offers a bonus of 3 to defense. On nights of the new moon, the wearer and up to ten pounds of clothing or other items may walk through any door as if the door were insubstantial.
The ring is also enhanced with Indestructible Object, for +8 on saving rolls or defense against destruction.
“Night” means after sunset and before sunrise.
This is the ring commissioned by Lieutenant Courlander and his friends from the Dwarves. They adventured to find the right ingredients and magic to enchant it to its current power.
The Goblin Wars began in 896 AC and ended in 901. There’s more information in the Highland Gazetteer.
| 525 | Aaron Paul founds the Order of the Astronomers in Crosspoint Bay |
| 557 | Aaron Paul and the first monks of the Order of the Astronomers arrive from Crosspoint |
| 578 (May 15) | The Astronomers christen Castle Kristagna |
| 587 | Aaron Paul dies |
| 593 | Taurus, warrior of the Astronomers, turns to shadow with Alazar and Measure |
| 739-769 | Isaacs’s mnemonic magic adopted by Astronomers |
| 795 | Clock tower contracted with the Dwarves |
| 837-839 | Isaiah studies and teaches at Kristagna |
| 861 | Abiram Forney becomes Master Astronomer |
| 863-867 | Dungeon excavated by Dwarves |
| 869 | Jethroh Parthane becomes Abbot |
| 871 | The Miracle of the Aquarian Pool |
| 873 | Clock tower built by Dwarves |
| 882 | Aaron Courlander arrives from Lisport |
| 884 | The Pact of Four: Aaron Courlander, Philip Carlisle, Zachary Maunder, Frances Nelson. |
| 887 (June 15) | Peace with the Knights of Illustration |
| 891 | William Joel Cambel becomes Captain of the Guard |
| 894 | Aaron Courlander becomes Lieutenant |
| 896 (May 6) | Castle Kristagna and Stelopolis overrun by goblins |
The descriptions and notes all assume that the adventurers are exploring the ruins in the autumn of 991 AC, 95 years after the castle was overrun.
Version 1.3, 3 November 2008
Copyright (C) 2000, 2001, 2002, 2007, 2008 Free Software Foundation, Inc. <http://fsf.org/>
Everyone is permitted to copy and distribute verbatim copies of this license document, but changing it is not allowed.
The purpose of this License is to make a manual, textbook, or other functional and useful document “free” in the sense of freedom: to assure everyone the effective freedom to copy and redistribute it, with or without modifying it, either commercially or noncommercially. Secondarily, this License preserves for the author and publisher a way to get credit for their work, while not being considered responsible for modifications made by others.
This License is a kind of “copyleft”, which means that derivative works of the document must themselves be free in the same sense. It complements the GNU General Public License, which is a copyleft license designed for free software.
We have designed this License in order to use it for manuals for free software, because free software needs free documentation: a free program should come with manuals providing the same freedoms that the software does. But this License is not limited to software manuals; it can be used for any textual work, regardless of subject matter or whether it is published as a printed book. We recommend this License principally for works whose purpose is instruction or reference.
This License applies to any manual or other work, in any medium, that contains a notice placed by the copyright holder saying it can be distributed under the terms of this License. Such a notice grants a world-wide, royalty-free license, unlimited in duration, to use that work under the conditions stated herein. The “Document”, below, refers to any such manual or work. Any member of the public is a licensee, and is addressed as “you”. You accept the license if you copy, modify or distribute the work in a way requiring permission under copyright law.
A “Modified Version” of the Document means any work containing the Document or a portion of it, either copied verbatim, or with modifications and/or translated into another language.
A “Secondary Section” is a named appendix or a front-matter section of the Document that deals exclusively with the relationship of the publishers or authors of the Document to the Document’s overall subject (or to related matters) and contains nothing that could fall directly within that overall subject. (Thus, if the Document is in part a textbook of mathematics, a Secondary Section may not explain any mathematics.) The relationship could be a matter of historical connection with the subject or with related matters, or of legal, commercial, philosophical, ethical or political position regarding them.
The “Invariant Sections” are certain Secondary Sections whose titles are designated, as being those of Invariant Sections, in the notice that says that the Document is released under this License. If a section does not fit the above definition of Secondary then it is not allowed to be designated as Invariant. The Document may contain zero Invariant Sections. If the Document does not identify any Invariant Sections then there are none.
The “Cover Texts” are certain short passages of text that are listed, as Front-Cover Texts or Back-Cover Texts, in the notice that says that the Document is released under this License. A Front-Cover Text may be at most 5 words, and a Back-Cover Text may be at most 25 words.
A “Transparent” copy of the Document means a machine-readable copy, represented in a format whose specification is available to the general public, that is suitable for revising the document straightforwardly with generic text editors or (for images composed of pixels) generic paint programs or (for drawings) some widely available drawing editor, and that is suitable for input to text formatters or for automatic translation to a variety of formats suitable for input to text formatters. A copy made in an otherwise Transparent file format whose markup, or absence of markup, has been arranged to thwart or discourage subsequent modification by readers is not Transparent. An image format is not Transparent if used for any substantial amount of text. A copy that is not “Transparent” is called “Opaque”.
Examples of suitable formats for Transparent copies include plain ASCII without markup, Texinfo input format, LaTeX input format, SGML or XML using a publicly available DTD, and standard-conforming simple HTML, PostScript or PDF designed for human modification. Examples of transparent image formats include PNG, XCF and JPG. Opaque formats include proprietary formats that can be read and edited only by proprietary word processors, SGML or XML for which the DTD and/or processing tools are not generally available, and the machine-generated HTML, PostScript or PDF produced by some word processors for output purposes only.
The “Title Page” means, for a printed book, the title page itself, plus such following pages as are needed to hold, legibly, the material this License requires to appear in the title page. For works in formats which do not have any title page as such, “Title Page” means the text near the most prominent appearance of the work’s title, preceding the beginning of the body of the text.
The “publisher” means any person or entity that distributes copies of the Document to the public.
A section “Entitled XYZ” means a named subunit of the Document whose title either is precisely XYZ or contains XYZ in parentheses following text that translates XYZ in another language. (Here XYZ stands for a specific section name mentioned below, such as “Acknowledgements”, “Dedications”, “Endorsements”, or “History”.) To “Preserve the Title” of such a section when you modify the Document means that it remains a section “Entitled XYZ” according to this definition.
The Document may include Warranty Disclaimers next to the notice which states that this License applies to the Document. These Warranty Disclaimers are considered to be included by reference in this License, but only as regards disclaiming warranties: any other implication that these Warranty Disclaimers may have is void and has no effect on the meaning of this License.
You may copy and distribute the Document in any medium, either commercially or noncommercially, provided that this License, the copyright notices, and the license notice saying this License applies to the Document are reproduced in all copies, and that you add no other conditions whatsoever to those of this License. You may not use technical measures to obstruct or control the reading or further copying of the copies you make or distribute. However, you may accept compensation in exchange for copies. If you distribute a large enough number of copies you must also follow the conditions in section 3.
You may also lend copies, under the same conditions stated above, and you may publicly display copies.
If you publish printed copies (or copies in media that commonly have printed covers) of the Document, numbering more than 100, and the Document’s license notice requires Cover Texts, you must enclose the copies in covers that carry, clearly and legibly, all these Cover Texts: Front-Cover Texts on the front cover, and Back-Cover Texts on the back cover. Both covers must also clearly and legibly identify you as the publisher of these copies. The front cover must present the full title with all words of the title equally prominent and visible. You may add other material on the covers in addition. Copying with changes limited to the covers, as long as they preserve the title of the Document and satisfy these conditions, can be treated as verbatim copying in other respects.
If the required texts for either cover are too voluminous to fit legibly, you should put the first ones listed (as many as fit reasonably) on the actual cover, and continue the rest onto adjacent pages.
If you publish or distribute Opaque copies of the Document numbering more than 100, you must either include a machine-readable Transparent copy along with each Opaque copy, or state in or with each Opaque copy a computer-network location from which the general network-using public has access to download using public-standard network protocols a complete Transparent copy of the Document, free of added material. If you use the latter option, you must take reasonably prudent steps, when you begin distribution of Opaque copies in quantity, to ensure that this Transparent copy will remain thus accessible at the stated location until at least one year after the last time you distribute an Opaque copy (directly or through your agents or retailers) of that edition to the public.
It is requested, but not required, that you contact the authors of the Document well before redistributing any large number of copies, to give them a chance to provide you with an updated version of the Document.
You may copy and distribute a Modified Version of the Document under the conditions of sections 2 and 3 above, provided that you release the Modified Version under precisely this License, with the Modified Version filling the role of the Document, thus licensing distribution and modification of the Modified Version to whoever possesses a copy of it. In addition, you must do these things in the Modified Version:
1. Use in the Title Page (and on the covers, if any) a title distinct from that of the Document, and from those of previous versions (which should, if there were any, be listed in the History section of the Document). You may use the same title as a previous version if the original publisher of that version gives permission.
2. List on the Title Page, as authors, one or more persons or entities responsible for authorship of the modifications in the Modified Version, together with at least five of the principal authors of the Document (all of its principal authors, if it has fewer than five), unless they release you from this requirement.
3. State on the Title page the name of the publisher of the Modified Version, as the publisher.
4. Preserve all the copyright notices of the Document.
5. Add an appropriate copyright notice for your modifications adjacent to the other copyright notices.
6. Include, immediately after the copyright notices, a license notice giving the public permission to use the Modified Version under the terms of this License, in the form shown in the Addendum below.
7. Preserve in that license notice the full lists of Invariant Sections and required Cover Texts given in the Document’s license notice.
8. Include an unaltered copy of this License.
9. Preserve the section Entitled “History”, Preserve its Title, and add to it an item stating at least the title, year, new authors, and publisher of the Modified Version as given on the Title Page. If there is no section Entitled “History” in the Document, create one stating the title, year, authors, and publisher of the Document as given on its Title Page, then add an item describing the Modified Version as stated in the previous sentence.
10. Preserve the network location, if any, given in the Document for public access to a Transparent copy of the Document, and likewise the network locations given in the Document for previous versions it was based on. These may be placed in the “History” section. You may omit a network location for a work that was published at least four years before the Document itself, or if the original publisher of the version it refers to gives permission.
11. For any section Entitled “Acknowledgements” or “Dedications”, Preserve the Title of the section, and preserve in the section all the substance and tone of each of the contributor acknowledgements and/or dedications given therein.
12. Preserve all the Invariant Sections of the Document, unaltered in their text and in their titles. Section numbers or the equivalent are not considered part of the section titles.
13. Delete any section Entitled “Endorsements”. Such a section may not be included in the Modified Version.
14. Do not retitle any existing section to be Entitled “Endorsements” or to conflict in title with any Invariant Section.
15. Preserve any Warranty Disclaimers.
If the Modified Version includes new front-matter sections or appendices that qualify as Secondary Sections and contain no material copied from the Document, you may at your option designate some or all of these sections as invariant. To do this, add their titles to the list of Invariant Sections in the Modified Version’s license notice. These titles must be distinct from any other section titles.
You may add a section Entitled “Endorsements”, provided it contains nothing but endorsements of your Modified Version by various parties—for example, statements of peer review or that the text has been approved by an organization as the authoritative definition of a standard.
You may add a passage of up to five words as a Front-Cover Text, and a passage of up to 25 words as a Back-Cover Text, to the end of the list of Cover Texts in the Modified Version. Only one passage of Front-Cover Text and one of Back-Cover Text may be added by (or through arrangements made by) any one entity. If the Document already includes a cover text for the same cover, previously added by you or by arrangement made by the same entity you are acting on behalf of, you may not add another; but you may replace the old one, on explicit permission from the previous publisher that added the old one.
The author(s) and publisher(s) of the Document do not by this License give permission to use their names for publicity for or to assert or imply endorsement of any Modified Version.
You may combine the Document with other documents released under this License, under the terms defined in section 4 above for modified versions, provided that you include in the combination all of the Invariant Sections of all of the original documents, unmodified, and list them all as Invariant Sections of your combined work in its license notice, and that you preserve all their Warranty Disclaimers.
The combined work need only contain one copy of this License, and multiple identical Invariant Sections may be replaced with a single copy. If there are multiple Invariant Sections with the same name but different contents, make the title of each such section unique by adding at the end of it, in parentheses, the name of the original author or publisher of that section if known, or else a unique number. Make the same adjustment to the section titles in the list of Invariant Sections in the license notice of the combined work.
In the combination, you must combine any sections Entitled “History” in the various original documents, forming one section Entitled “History”; likewise combine any sections Entitled “Acknowledgements”, and any sections Entitled “Dedications”. You must delete all sections Entitled “Endorsements”.
You may make a collection consisting of the Document and other documents released under this License, and replace the individual copies of this License in the various documents with a single copy that is included in the collection, provided that you follow the rules of this License for verbatim copying of each of the documents in all other respects.
You may extract a single document from such a collection, and distribute it individually under this License, provided you insert a copy of this License into the extracted document, and follow this License in all other respects regarding verbatim copying of that document.
A compilation of the Document or its derivatives with other separate and independent documents or works, in or on a volume of a storage or distribution medium, is called an “aggregate” if the copyright resulting from the compilation is not used to limit the legal rights of the compilation’s users beyond what the individual works permit. When the Document is included in an aggregate, this License does not apply to the other works in the aggregate which are not themselves derivative works of the Document.
If the Cover Text requirement of section 3 is applicable to these copies of the Document, then if the Document is less than one half of the entire aggregate, the Document’s Cover Texts may be placed on covers that bracket the Document within the aggregate, or the electronic equivalent of covers if the Document is in electronic form. Otherwise they must appear on printed covers that bracket the whole aggregate.
Translation is considered a kind of modification, so you may distribute translations of the Document under the terms of section 4. Replacing Invariant Sections with translations requires special permission from their copyright holders, but you may include translations of some or all Invariant Sections in addition to the original versions of these Invariant Sections. You may include a translation of this License, and all the license notices in the Document, and any Warranty Disclaimers, provided that you also include the original English version of this License and the original versions of those notices and disclaimers. In case of a disagreement between the translation and the original version of this License or a notice or disclaimer, the original version will prevail.
If a section in the Document is Entitled “Acknowledgements”, “Dedications”, or “History”, the requirement (section 4) to Preserve its Title (section 1) will typically require changing the actual title.
You may not copy, modify, sublicense, or distribute the Document except as expressly provided under this License. Any attempt otherwise to copy, modify, sublicense, or distribute it is void, and will automatically terminate your rights under this License.
However, if you cease all violation of this License, then your license from a particular copyright holder is reinstated (a) provisionally, unless and until the copyright holder explicitly and finally terminates your license, and (b) permanently, if the copyright holder fails to notify you of the violation by some reasonable means prior to 60 days after the cessation.
Moreover, your license from a particular copyright holder is reinstated permanently if the copyright holder notifies you of the violation by some reasonable means, this is the first time you have received notice of violation of this License (for any work) from that copyright holder, and you cure the violation prior to 30 days after your receipt of the notice.
Termination of your rights under this section does not terminate the licenses of parties who have received copies or rights from you under this License. If your rights have been terminated and not permanently reinstated, receipt of a copy of some or all of the same material does not give you any rights to use it.
The Free Software Foundation may publish new, revised versions of the GNU Free Documentation License from time to time. Such new versions will be similar in spirit to the present version, but may differ in detail to address new problems or concerns. See http://www.gnu.org/copyleft/.
Each version of the License is given a distinguishing version number. If the Document specifies that a particular numbered version of this License “or any later version” applies to it, you have the option of following the terms and conditions either of that specified version or of any later version that has been published (not as a draft) by the Free Software Foundation. If the Document does not specify a version number of this License, you may choose any version ever published (not as a draft) by the Free Software Foundation. If the Document specifies that a proxy can decide which future versions of this License can be used, that proxy’s public statement of acceptance of a version permanently authorizes you to choose that version for the Document.
“Massive Multiauthor Collaboration Site” (or “MMC Site”) means any World Wide Web server that publishes copyrightable works and also provides prominent facilities for anybody to edit those works. A public wiki that anybody can edit is an example of such a server. A “Massive Multiauthor Collaboration” (or “MMC”) contained in the site means any set of copyrightable works thus published on the MMC site.
“CC-BY-SA” means the Creative Commons Attribution-Share Alike 3.0 license published by Creative Commons Corporation, a not-for-profit corporation with a principal place of business in San Francisco, California, as well as future copyleft versions of that license published by that same organization.
“Incorporate” means to publish or republish a Document, in whole or in part, as part of another Document.
An MMC is “eligible for relicensing” if it is licensed under this License, and if all works that were first published under this License somewhere other than this MMC, and subsequently incorporated in whole or in part into the MMC, (1) had no cover texts or invariant sections, and (2) were thus incorporated prior to November 1, 2008.
The operator of an MMC Site may republish an MMC contained in the site under CC-BY-SA on the same site at any time before August 1, 2009, provided the MMC is eligible for relicensing.
The mountains of West Highland are dotted with the ruins of lost scholarly orders. The Astronomers, in the Deep Forest south of the Leather Road, have been silent for a hundred years, unheard from since the goblin wars that so devastated Highland. Only vague references remain to taunt treasure hunters and spell seekers.
The Deep Forest is a dangerous place, home to many strange creatures. Only adventurers of stout heart and cunning can hope to penetrate the forest and return alive.